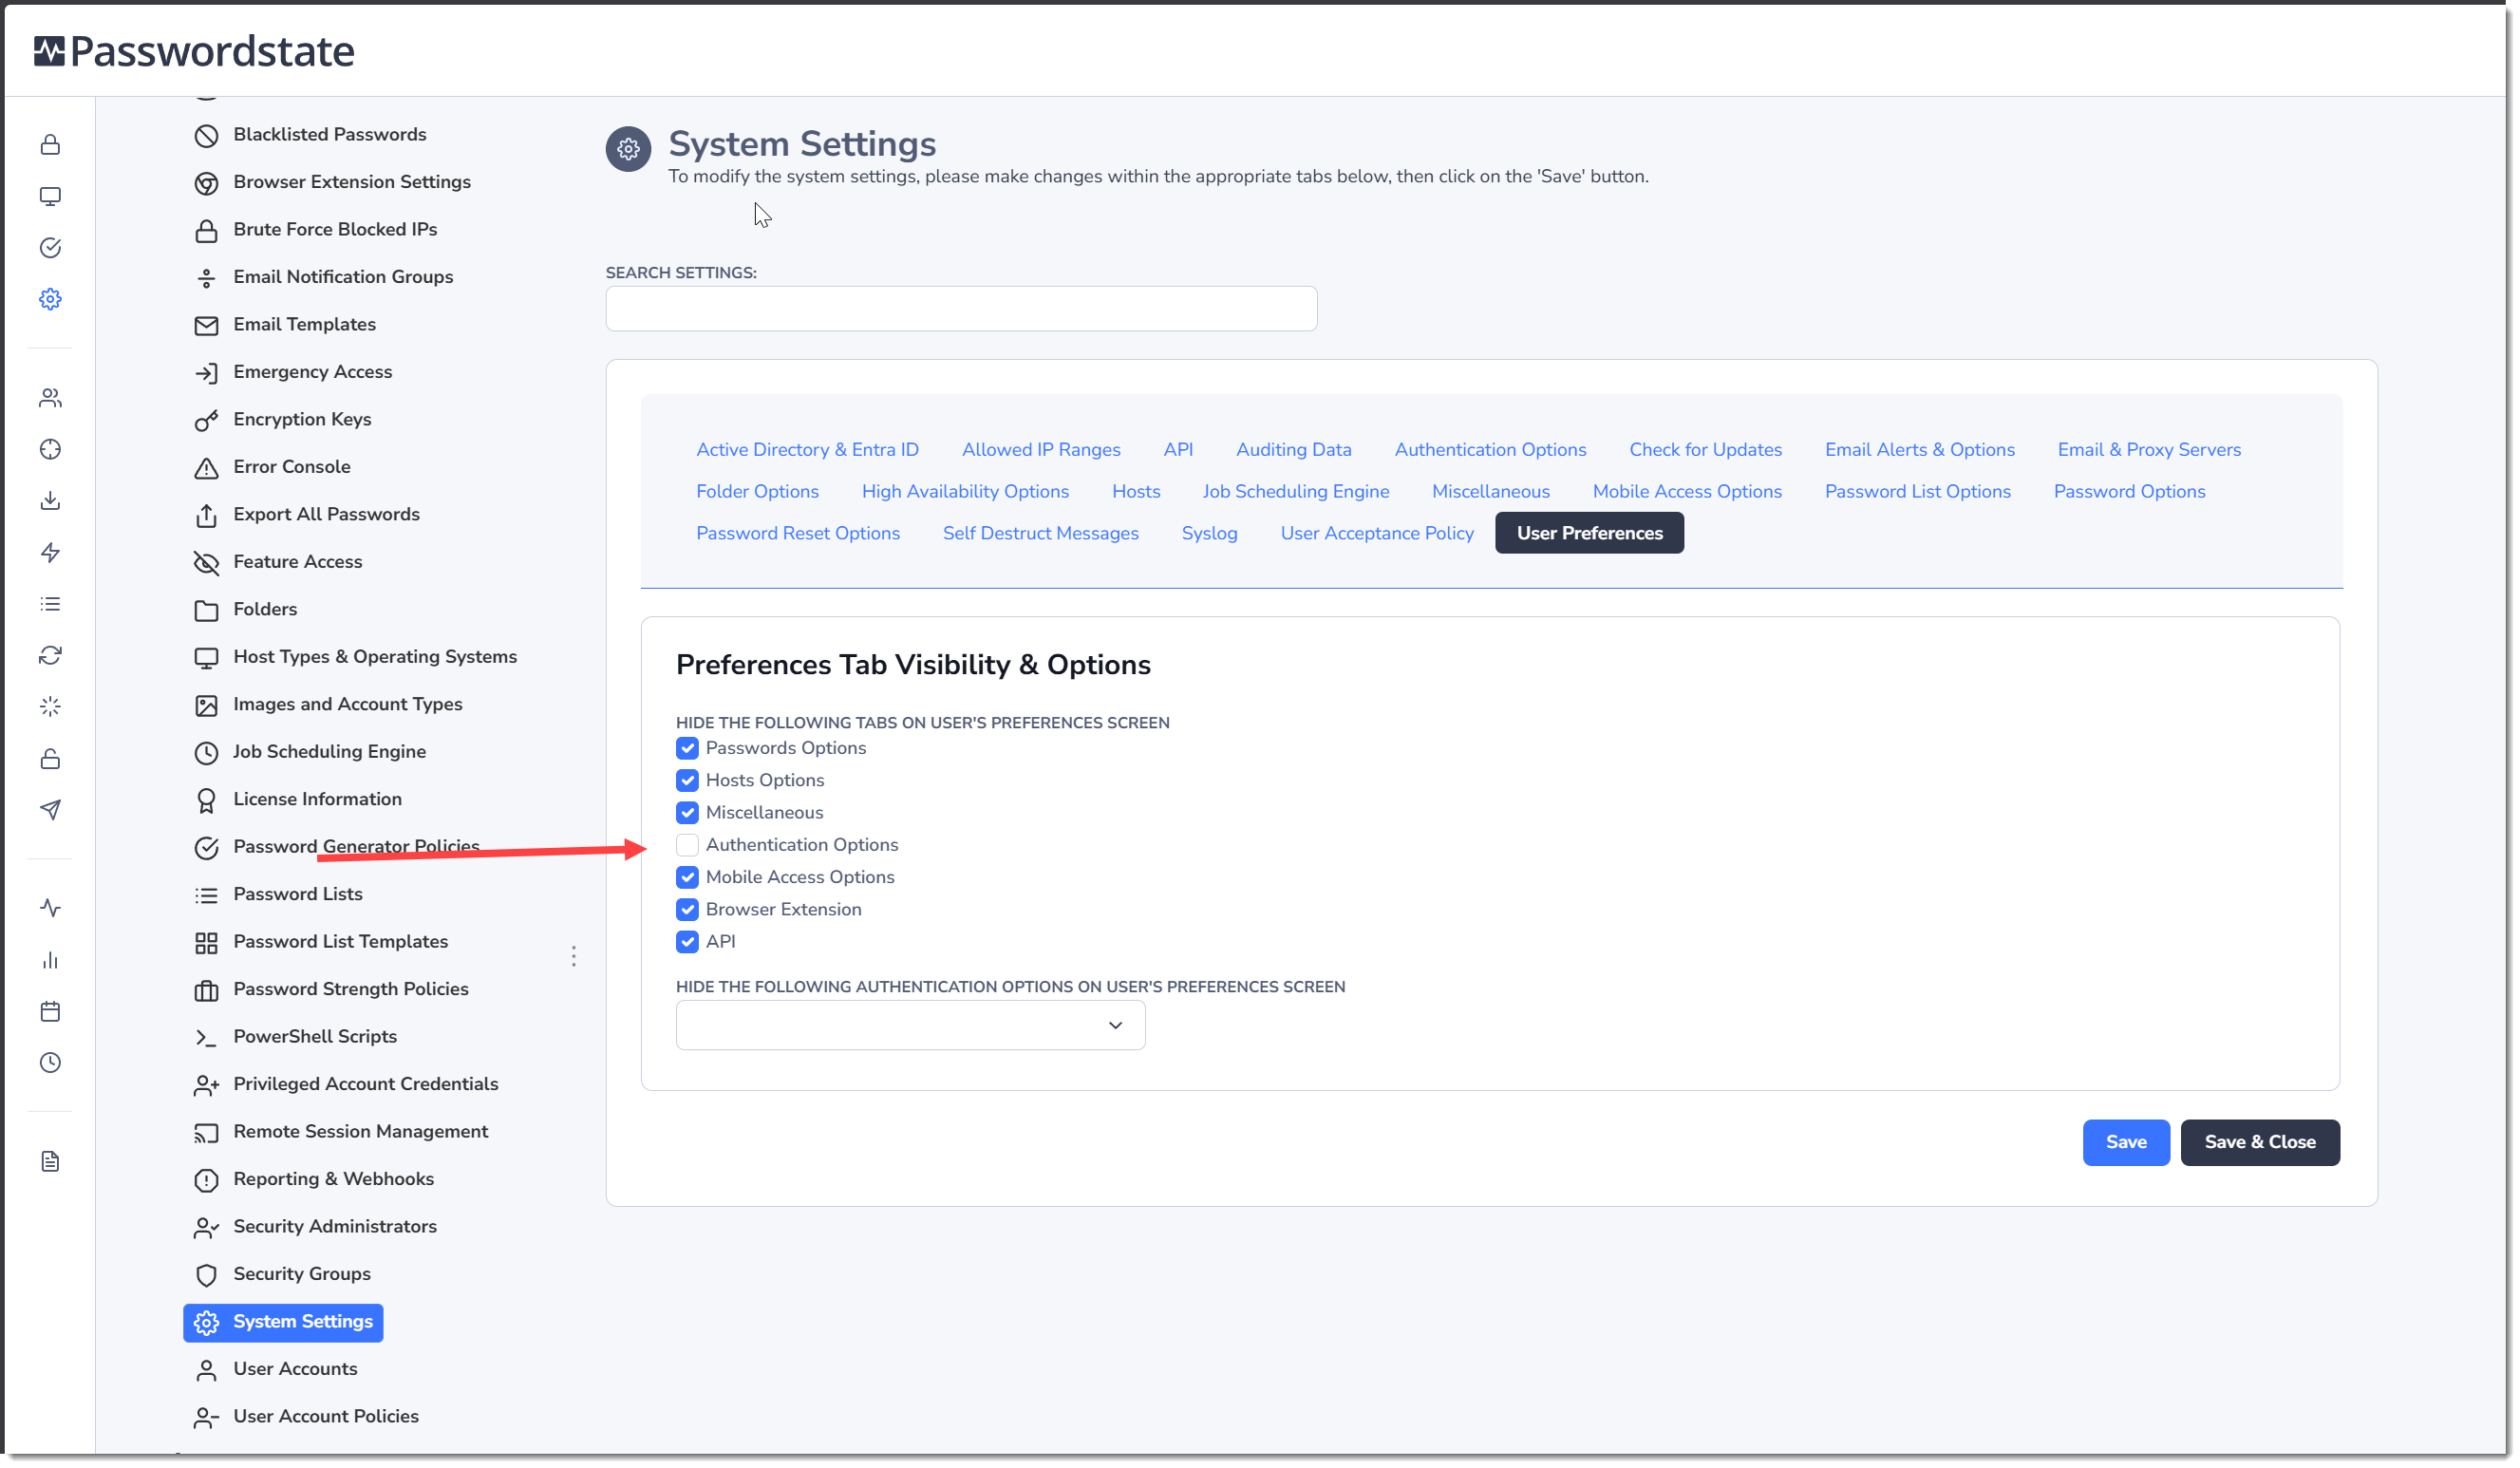
System Settings
Each tab, and each of their respective settings within the System Settings screen is documentated below. |
Active Directory & Entra ID
| Section | Setting Name | Description | Default Value |
|---|---|---|---|
| Passwordstate User Account and Security Group Membership Options | Auto-add user accounts from security groups not yet added to Passwordstate | When the Passwordstate Windows Service synchronizes the membership of any Security Groups you've added on the Security Groups screen, it's possible there will be user accounts in the Active Directory security group which have not yet been added to the User Accounts screen. If this is the case, you can use this option to automatically add the accounts to Passwordstate, or simply ignore the account. | Yes |
| Sync account enabled status with Passwordstate | Using this option, if the enabled/disabled status of a user account in Active Directory is changed,you can also synchronize that change to the account stored in Passwordstate. | No | |
| Disable new accounts when added into Passwordstate | If you have a requirement to disable Active Directory User Accounts when they are initially added into Passwordstate as part of the AD synchronization process, then you can enable this option. | No | |
| When an account is deleted, apply this action in Passwordstate | If a User Account in Active Directory is deleted, you can choose either to delete it in Passwordstate, or simply do nothing. | Do Nothing | |
| When a user is no longer in any security groups, apply this action in Passwordstate | If a user no longer belongs to any Active Directory Security Groups, which have been added to Passwordstate, you can choose to disable it, or do nothing with their account. | Do Nothing | |
| Sync the users email address during sync (uses the mail attribute) | If you do not wish to populate the email address field in Passwordstate with what's stored in AD, set this option to No. | Yes | |
| Auto-delete disabled accounts after specified days | For this setting, you can choose not to automatically delete disabled accounts, or delete after a set period of time. | Do Not Delete | |
| On-Premise Sync Schedule | Sync security group membership and user status | Synchronizing of Active Directory security group memberships, and the status of user accounts (either enabled, disabled or deleted status), can be done either once a day or more frequently if required, by choosing the appropriate option here. | Daily @ 00:30 AM |
| Pause (x) seconds between AD calls during sync | To prevent the Passwordstate Windows Service doesn't perform too many consecutive queries to Active Directory too quickly, you can add a pause for this. This can help prevent monitoring systems form assuming there is a denial of service attack against your AD infrastructure. If you want to put a pause in, usually 1 or 2 seconds is an appropriate value for this setting. | 0 | |
| Microsoft Entra ID Sync Schedule | Sync Microsoft Entra ID group membership and user status at | Synchronizing of Entra ID group memberships, and the status of user accounts (either enabled, disabled or deleted status), can be done either once a day or more frequently if required, by choosing the appropriate option here. | Daily @ 00:30 AM |
| Pause (x) seconds between Entra ID calls during sync | To prevent the Passwordstate Windows Service doesn't perform too many consecutive queries to Entra ID too quickly, you can add a pause for this. This can help prevent monitoring systems form assuming there is a denial of service attack against your Entra ID. If you want to put a pause in, usually 1 or 2 seconds is an appropriate value for this setting. | 0 |
Note: If you reach the maximum number of Client Access License as recorded on the License Information screen, the user accounts will not be added to Passwordstate.
Performance Tip: If you have many Active Directory User Accounts added to Passwordstate, the synchronization of the features above will perform significantly better if these user accounts belong to one or more Security Groups, and these Security Groups have also been added to Passwordstate via the page Security Groups. The reason for this performance improvement is because all the users can be enumerated with one call to Active Directory for the Security Group, instead of making separate calls for every single account. If you have many AD users added to Passwordstate (i.e. 200+), it is recommended you add one or more Security Groups even if you don't use them to apply permissions anywhere.
Allowed IP Ranges
The Allowed IP Ranges tab allows you to specify a range of IP Addresses where clients are allowed to access the Passwordstate website, make calls to the Passwordstate API, or access to the Emergency Access login page.
Specifying IP Ranges can be done in the following format:
- 192.168.1.* (all addresses in the range of 192.168.1.0 to 192.168.1.255)
- 192.168.. (all addresses in the range of 192.168.0.0 to 192.168.255.255)
- 192...* (all addresses in the range of 192.0.0.0 to 192.255.255.255)
- 192.168.1.1-192.168.2.50 (just the addresses in the range of 192.168.1.1 to 192.168.2.50)
- 192.168.1.50 (just a single IP Address)
| Section | Setting Name | Description | Default Value |
|---|---|---|---|
| Web Site Allowed IP Ranges | Specify the allowed IP ranges for accessing the Passwordstate website. | Set one or more IP Ranges to lock down access to the Passwordstate website. Leave blank to allow access from any IP Address | Empty/Blank |
| If Passwordstate is accessed from outside the specified IP ranges, require the user to authenticate using the method below | This option allows you to completey deny access to the Passwordstate website or choose an alternative authentication option, if the user accesses the website from outside the allowed IP ranges you have set. By default, access from IP Addresses which aren't listed as 'Allowed' will be blocked. By selecting an authentication option instead, you can enforce a different authentication mechanism. This is a more secure option if you use Pass-through Authentication within the office, but want to further secure access to Passwordstate when outside the office, as an example. | Deny Access Altogether | |
| Inactivity timeout (in minutes) for access outside the allowed IP ranges | The default Inactivity Timeout setting can be found on the Miscellaneous Tab. If you have restricted access to Passwordstate to specific IP Subnets/Addresses, it's also possible to specify an alternate timeout value when user accesses the website from outside the allowed IP ranges you have set. | 3 | |
| API Allowed IP Ranges | Specify the allowed IP ranges for accessing the Passwordstate API | Set one or more IP Ranges to lock down access to the Passwordstate API. Leave blank to allow scripts connecting to the API to be run from any IP Address. This setting applies to all 3 APIs, the User Based API, WinAPI or Anonymous API. Requests from outside these ranges will receive a HTTP 403 Forbidden response. | Empty/Blank |
| Emergency Access Allowed IP Ranges | Specify the allowed IP ranges for accessing the Emergency Access login page | Set one or more IP Ranges to lock down access to the Emergency access page. Leave blank to allow accessing this page from any IP Address. Requests from outside these ranges will receive an HTTP 404 Not Found response. | Empty/Blank |
Note 1: Regardless of the settings you specify for the Web Site Allowed IP Ranges, you will always be able to access Passwordstate website if logged into your web server directly, or via the Emergency Access account.
Note 2: If making an API call from an IP Address which is not authorized, then API will return an HTTP Status Code of 403 - Forbidden.
API
There are three types of APIs available in Passwordstate:
- Standard API - The Standard API uses API keys for authentication, which can be set at the Password List, Folder, or System Wide level, and is not 'user account' aware (all auditing records will be recorded as Web API Account)
- Windows Integrated API - The Windows Integrated API does not use API keys for authentication, instead uses the User's authenticated Windows session when accessing the API. It provides the user the same level of access as to when they logged into User Interface.(all auditing records will be recorded as the user account making the call)
- User Based API - The User Based API uses API keys for authentication, which is associated with a user's account in Passwordstate. It provides the user the same level of access as to when they logged into User Interface. (all auditing records will be recorded as the user account making the call)
| Section | Setting Name | Description | Default Value |
|---|---|---|---|
| Common API Settings | Allow use of the 'PreventAuditing' parameter when retrieving passwords via the API | By default, for every password that is retrieved using the API, one auditing event will be recorded. This option gives you the ability to prevent any scripts from turning off this auditing. | No |
| Enable the menu 'Toggle Visibility of Web API IDs' only for users who have Modify or Admin rights to Password Lists | Web API IDs can be used in many API scripts, and by default these IDs can be seen by any user who has Modify, or Admin access to Password Lists. If you wish to disable the ability for users with Modify or Admin access to see these API IDs, then set this option to Yes | No | |
| Windows Integrated and User Based API Settings | One-time passwords are required when using the Windows Integrated or User-Based API | Setting this option to Yes will force the script runner to input a One Time Code into their scripts for two factor authentication with the Windows API. | No |
| Standard API Settings | Prevent retrieval of "Check In/Out" password records via the Standard API | In the Passwordstate User Interface, it's possible to configure passwords with the Checkin\Checkout feature to give the user exclusive access to the data. This setting will prevent the user from retrieving the password via the API, if it is configured with th Check Out feature | Yes |
| One-Time Password (OTP) two-factor authentication with the Standard API | Setting this option to Yes will force the script runner to input a One Time Code into their scripts for two factor authentication with the Standard API. | No Secret Key Set by Default | |
| Standard API Keys | Various Options Available | Clicking on the hyperlink of any API key in this section will allow you to set, retrieve or recycle the API key. Different keys perform different functionality in the Standard API | All API keys are blank by default |
Note 1: On the screen Authorized Web Servers you can also specify if the Standard, User Based or Windows Integrated APIs are allowed to be used at all, by changing the Functional Role of the server.
Note 2: You can also restrict which users are allowed to use the Windows Integrated API on the Feature Access screen.
Auditing Data
Passwordstate has two tables in its database, Auditing and AuditingArchive. All data is initially stored in the Auditing table, and this is the data that the software refences for its day to day functionality. All auditing data gets moved into the AuditingArchive table based on the settings in the Auditing Archive Settings section on this page, which will increase performance within various pages of the software.
The Passwordstate Windows Service on your primary webserver is responsible for this automatic data migration.
| Section | Setting Name | Description | Default Value |
|---|---|---|---|
| Auditing Archive Settings | Set the maximum number of rows to retain in the Auditing table | Records exceeding this limit will be moved to the AuditingArchive table | 500000 |
| Enable daily archiving of API Auditing data | Typically, data related to API activity can be excessive, depending on how the scripts are configured. This setting will move any API auditing activity across to the AuditingArchive table on a daily basis, regardless of the active record limit | No | |
| Specify what time of day the archiving occurs | Auditing data is moved into the AuditingArchive table once per day, and this setting determines when this operation occurs. | 04:30 AM | |
| Miscellaneous Settings | Show Auditing data in the Recent Activity Grid to users with the following permissions | By default each Password List has a grid displaying all auditing activity related to the the activity for that list. You can remove this Recent Activity grid for users with different levels of permissions to the List, by deselecting the appropriate option in this setting | All options are enabled by default |
Authentication Options
The Authentication Options tab provides various settings for when your users authenticate to the Passwordstate website. There are multiple different types of authentication options you can choose from, and some will need extra configuring on remote systems such as the SAML or Radius options as an example.
By Default, the authentication option you select from the System Settings -> Authentication Options tab will apply to all users in the system. The users are also able to change the authentication type under their own personal preferences, but if you do not want users to have the ability to choose their own authentication option, please consider setting up a User Account Policy (UAP). User Account Policies in Passwordstate are similar to Windows Group Policies - You create some settings in your UAP and then apply the policy to the one or more users.
An example could be you will create one UAP to force one set of users to authenticate using One-Time Password. You then set up a second UAP to apply to a second set of users who will simply log in with their Active Directory Username and Password.
More information about User Account Policies can be found further in the User Account Policies page in this manual.
Note 1: Certain options on this screen will be disabled by default, due to Anonymous Authentication being enabled for the Passwordstate website in IIS.
Note 2: If in the event you lock yourself out of authenticating against the Passwordstate website for any reason, you can always use the Emergency Access account to gain access to the system and revert out any change.
Note 3: If using Active Directory accounts for authentication, users can also login using the userPrincipleName AD attribute for their account. If doing this, it is recommended to hide the Domain Drop down list on login screens, as this may confuse users. This setting can be found below.
Below is a description of all different login methods and two-factor authentication options that are available in Passwordstate:
| Authentication Option | Description |
|---|---|
| AD Single Sign-On | For enterprises utilizing Active Directory, Passwordstate offers seamless Single Sign-On (SSO) capabilities. This integration allows users on domain-joined Windows PCs to authenticate automatically using their existing Active Directory credentials, eliminating the need for manual login |
| Manual Login Authentication | Manual Login can be used for both Active Directory accounts, or Local Login accounts. This authentication only requires the user to set their username and password to gain access to the system |
| SAML 2 Authentication | SAML is a standard used to enable secure Single Sign-On (SSO). Any SAML provider can be used in Passwordstate, and for best results, anonymous authentication must be endbled in IIS for this |
| Scramblepad Authentication | ScramblePad Authentication operates by assigning a unique PIN to each user account. During the authentication process, users are required to align their PIN with a dynamically generated sequence of randomized letters, ensuring secure and efficient access control. |
| Email Temporary PIN Code | Upon initial authentication to Passwordstate, a temporary PIN code can be sent to a designated email address. The PIN code remains valid only for the duration specified by your Passwordstate Security Administrator(s), ensuring controlled and time-sensitive access. |
| Duo Authentication | DUO authentication using the DUO App, allowing for Push notifications, SMS, One Time Passwords or Call Phone options to authenticate use. |
| One-Time Password | Using TOTP (Time-Based) or HOTP (Counter-Based) algorithms, enterprises can enhance security with two-factor authentication through hardware or software tokens. |
| Radius Authentication | RADIUS authentication lets Passwordstate verify user logins against a central server, so access is securely checked using your organisation’s existing network credentials. |
| Yubikey Authentication | Passwordstate supports advanced authentication through YubiKey devices. This option allows you to leverage Yubico’s cloud-based OTP solutions or the OATH (TOTP and HOTP) protocols to enhance access security. YubiKey integration is ideal for organizations prioritizing physical token-based authentication |
AD Single Sign-On Authentication Overview
AD Single Sign-On will only work when users accessing Passwordstate do so from a domain joined Windows computer. This technology passes the currently logged in credentials of the Windows session to the Passwordstate website, meaning you do not have to type in your username and password to gain access.
You can combine AD Single Sign-On with other two factor authentication options, such as One-Time Passwords as an example. In this scenario, the user would browse to the Passwordstate website and would only be required to set their One-Time Password code, as the username and password was already passed through via the AD Single Sign-On technology.
If you get a browser based pop up asking for credentials when using AD Single Sign-On, this could be due to a few reasons:
- The user account that your user is logged into Windows with does not have a corresponding account in Passwordstate.
- Your user is accessing Passwordstate from a non domain joined machine, like an Apple Mac as an example.
- Your Passwordstate URL is not being detected in the Local Intranet Zone in Internet Properties on the end user's computer (found in control panel)
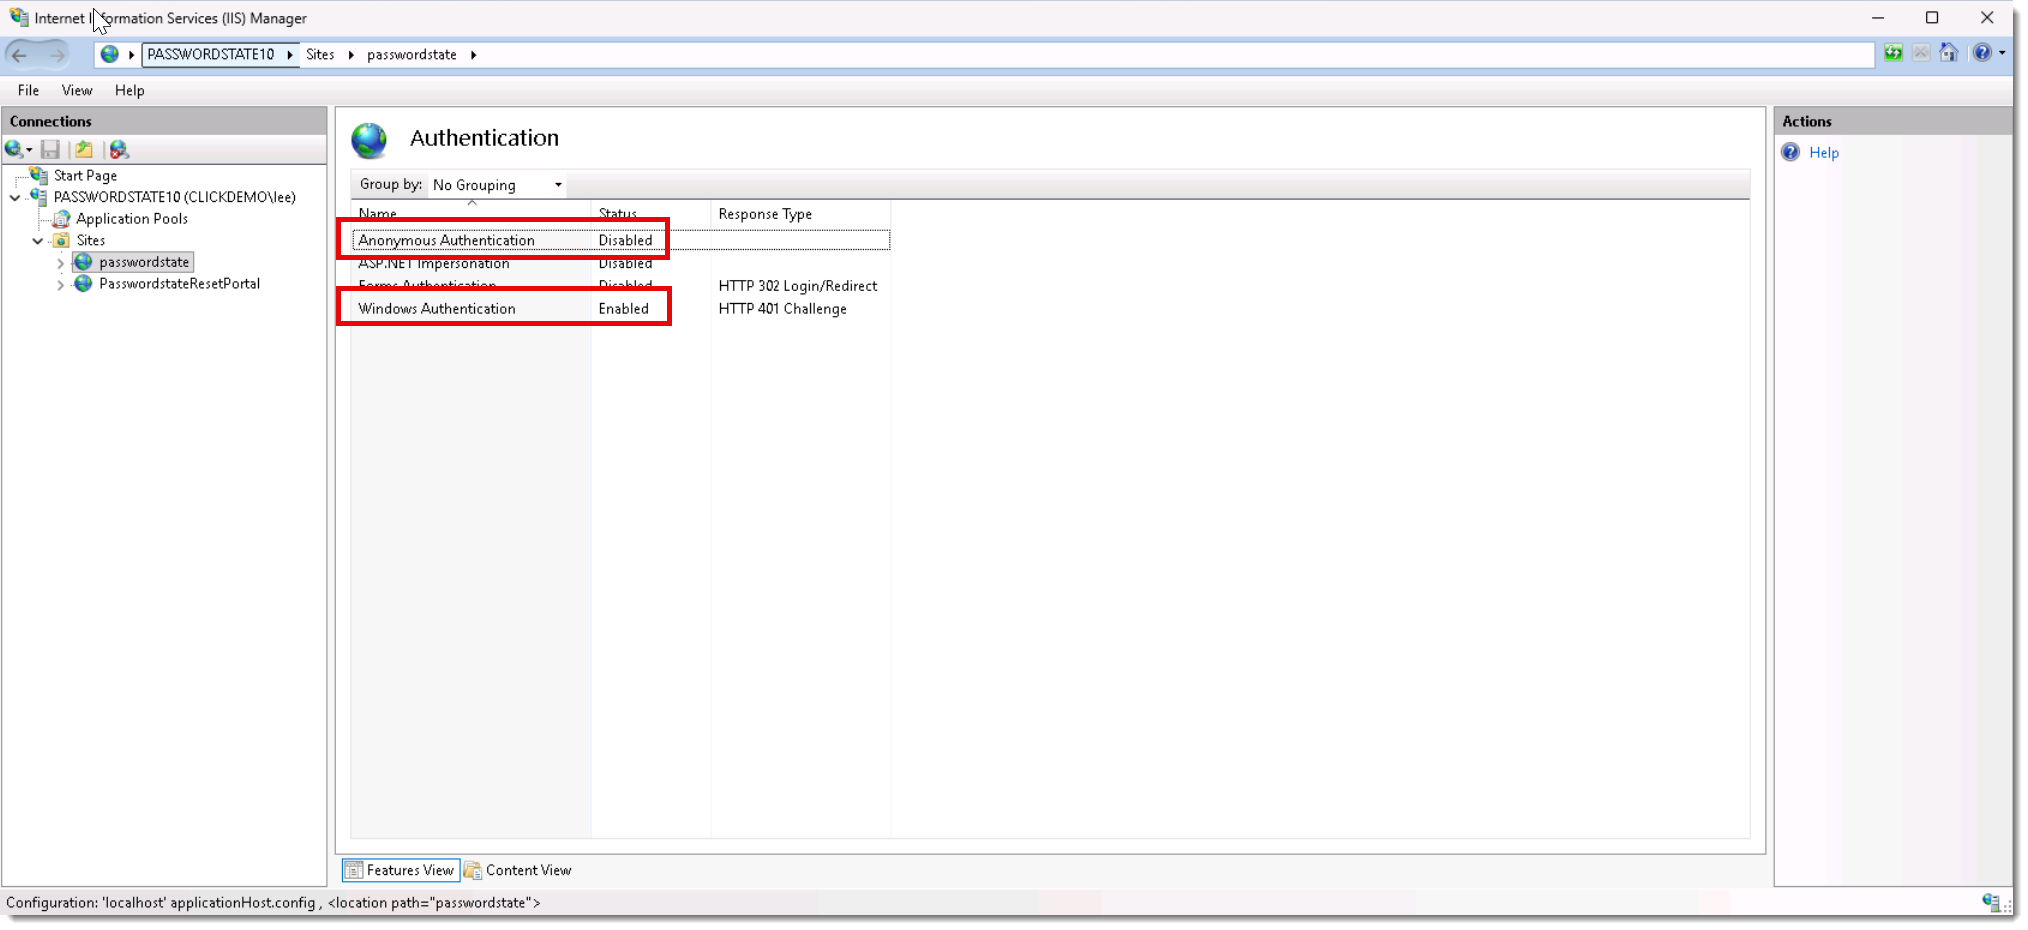
By default, Anonymous Authentication on your Passwordstate website is enabled, and this forces the AD Single Sign-On options to be disabled on this System Settings page. In order to select one of AD Signle Sign-On options, open IIS (Internet Information Services) on your web server, and disable Anonymous Authentication. First, open IIS and click on your Passwordstate website, and then select the Authentication Options button:
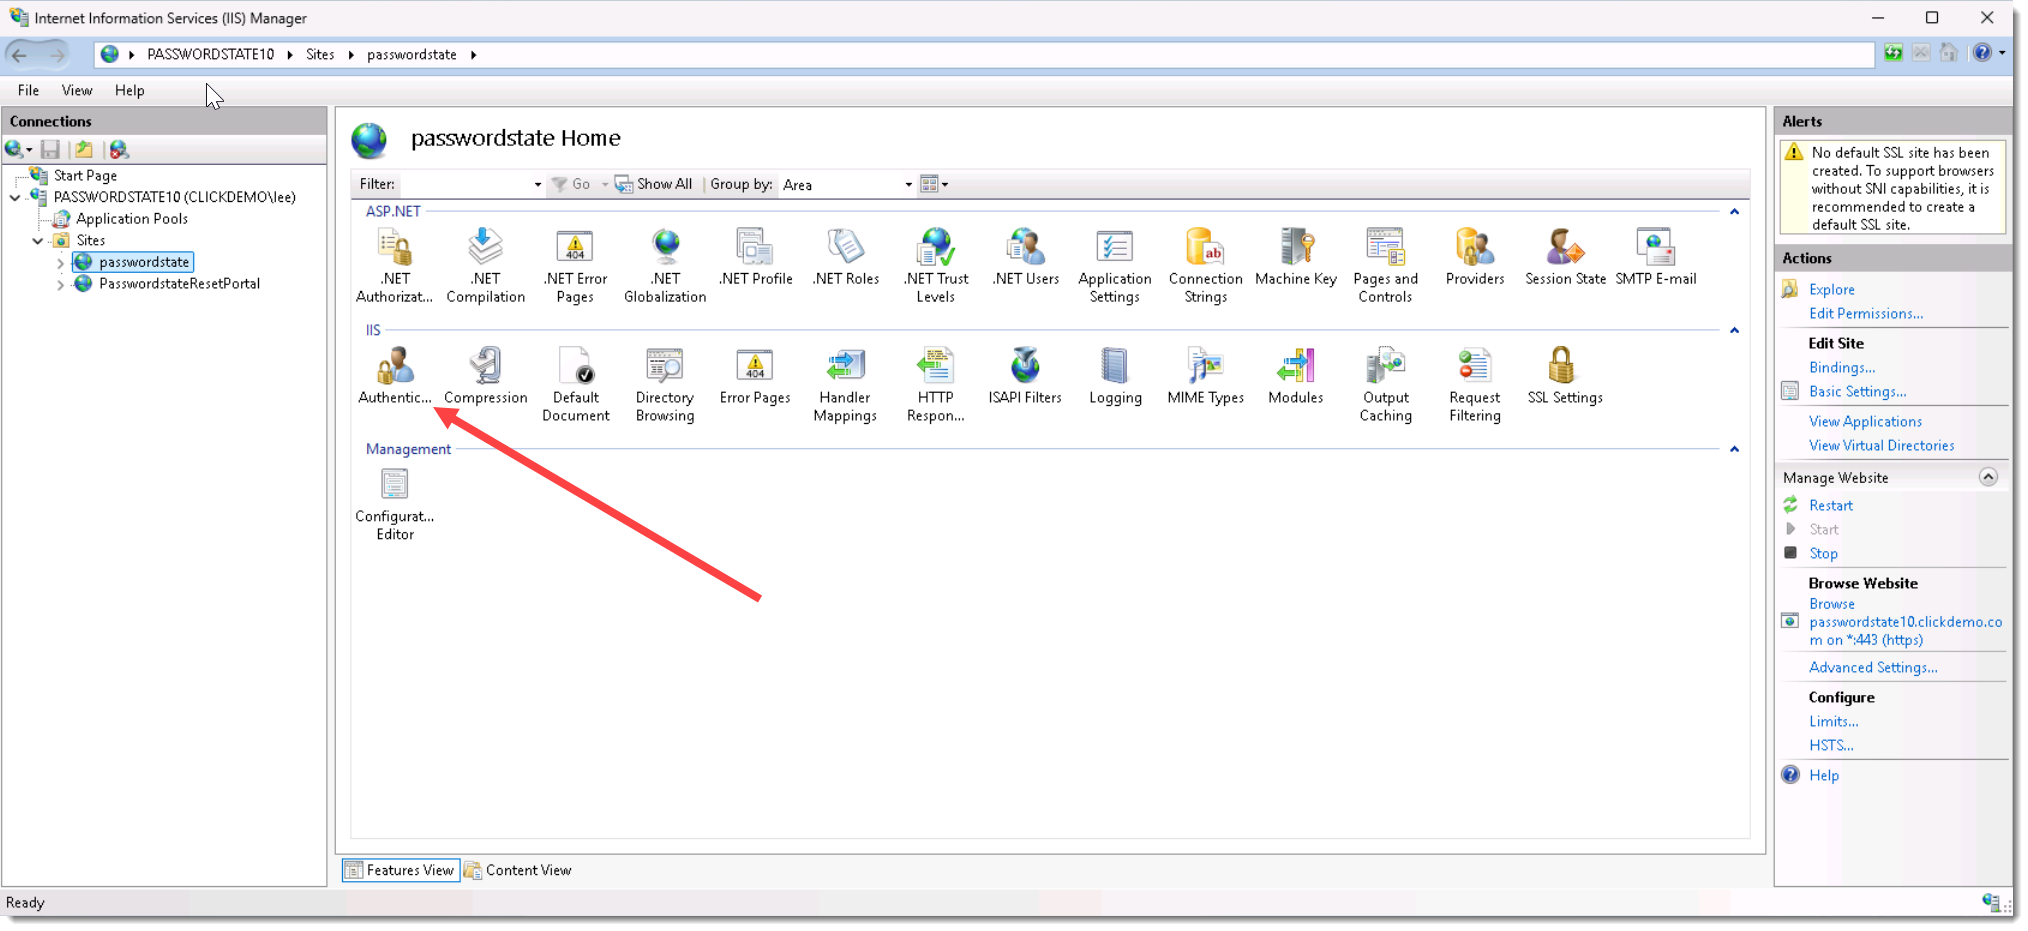
Now make sure you have Anonymous Authentication Disabled, and Windows Authentication Enabled:
Manual Login Authentication Overview
With Manual Login Authentication, users can either authenticate with their Active Directory account, or Local Accounts which have been created within Passwordstate. This option simply requires the users to type their username and password to gain access.
It's possible to also combine Manual Login Authentication with other two factor authentication options, such as One-Time Password as an example. In this scenario, the user would browse to the Passwordstate website, enter their username and password and finally set their One-Time Password code.
SAML Authentication Overview
Important information to note about SAML authentication can be noted below:
- When you turn on SAML Authentication under this System Settings page, this will force all users in the system to then start using SAML to authenticate, meaning all users will need a valid account in your SAML provider in order to login successfully.
- If you are using On-Premise Active Directory accounts, or Local Login accounts in Passwordstate, then you will need to ensure the section below called Primary Site's SAML2 Authentication Settings is configured with a valid SAML application.
- If you have purchased the High Availability module of Passwordstate, and you have a second Passwordstate website using a different HTTPS URL that what your primary website uses, you will need to ensure the section below called High Availability Site's SAML2 Authentication Settings is configured with a valid SAML application.
- If you using Entra ID accounts in Passwordstate, you will need to ensure your Entra ID Tenant has a valid SAML application configured on the Active Directory & Entra ID page.
- Anonymous Authentication must be enabled for your Passwordstate website in IIS.
- When using SAML to authenticate, the authentication process is completely offloaded to your SAML provider. Once successfully authenticated at your SAML provider, users are automatically redirected back to Passwordstate, and they will be logged in to their home page ready to start working.
- When setting up SAML authentication, you get to choose a matching attribute to match the user's account in Paswordstate, with the user's account in your SAML provider. If the values of these attributes are not exactly the same in both environments, the login into Passwordstate will fail for the user.
One Time Passwords Overview
- One Time Password is a generic authentication option that can work with any software that supports it, such as Microsoft Authenticator, Google Authenticator, or even the Passwordstate Mobile App.
- One-Time Password authentication supports the TOTP and HOTP algorithms - TOTP being time-based, and HOTP being counter-based. Both hardware and software tokens can be used for this authentication method
- When using One-Time Password as your Authentication option, any new user will be presented with a QR code on their log in screen when first logging into Passwordstate. They should scan this code into their phone, and when logging in for the first time successfully, this will save the QR code into the Passwordstate database for that particular user. The user can clear this QR code under their own personal preferences, or a Security Administrator can clear the code on the user's behalf from under Administration -> User Accounts -> Open the User -> Authentication Options tab
- Clearing the code will present them with a new QR to scan in, either under their own personal preferences, or on the Passwordstate log in screen.
Web Authentication Options
| Setting Name | Description | Default Value |
|---|---|---|
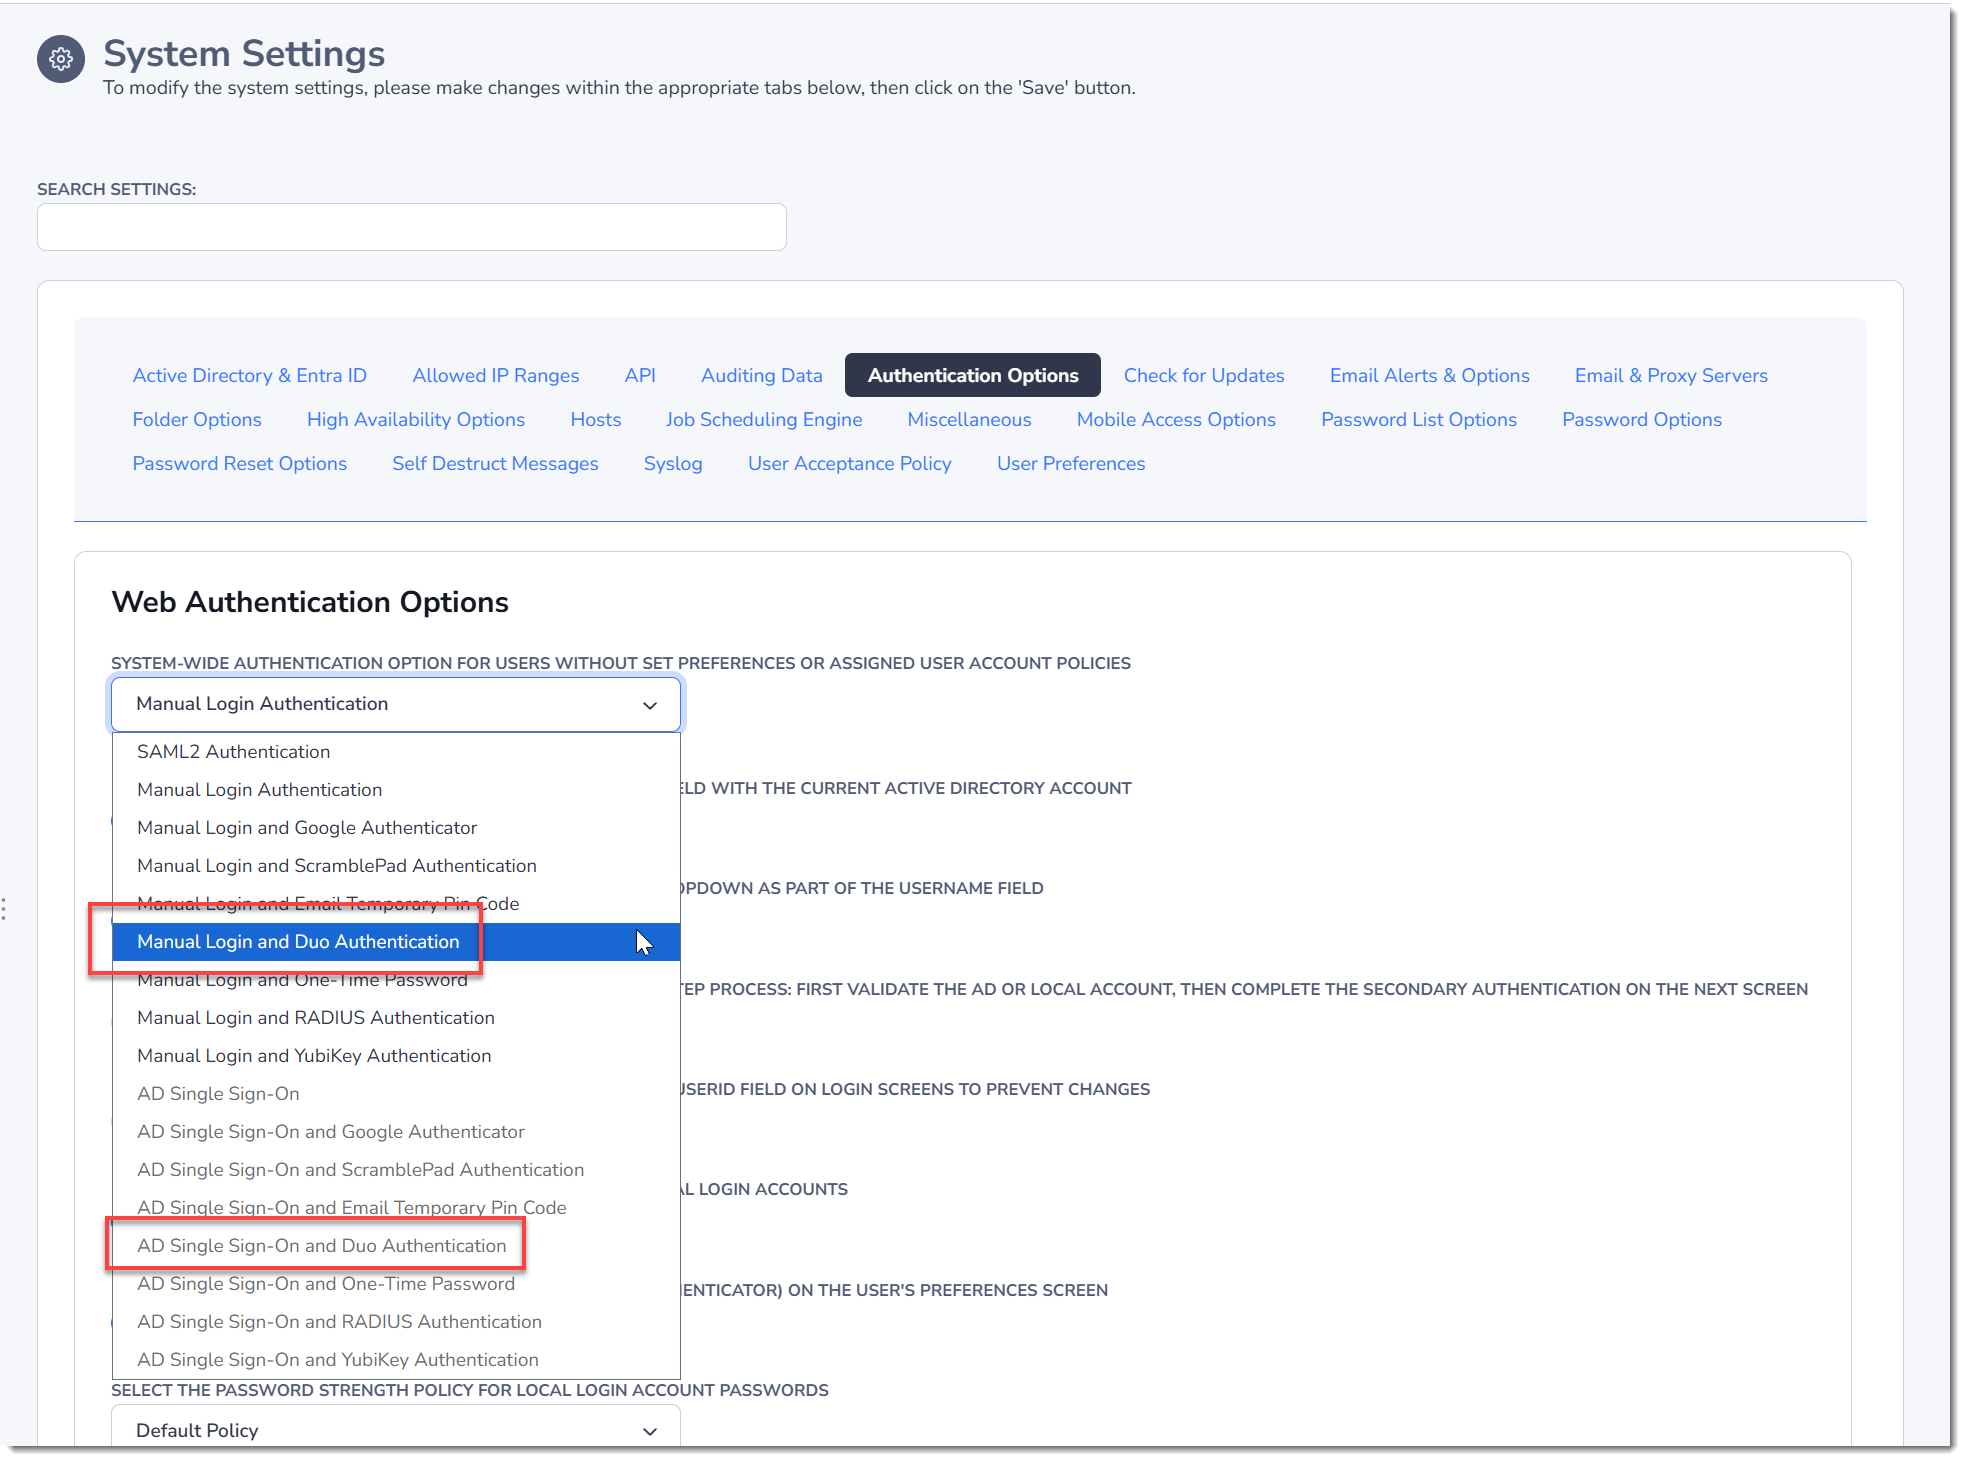
| System-wide authentication option for users without set preferences or assigned User Account Policies | This drop down list allows you to select the global authentication option for all users in the system. Users can override this System Wide setting under their own personal preferences, so if you want to force a specific type of authentication on one or more users, best practice is to set up a User Account Policy | Manual Login Authentication |
| If using SAML Authentication, allow overriding this authentication method with the one selected below | Once this option is set, and you've applied permissions for the users to use this feature on the screen Administration -> Feature Access -> Miscellaneous tab, you can use this feature by appending /logins to your normal Passwordstate URL i.e. https://passwordstate.com/logins. Please note this feature can only be used when SAML is enabled System Wide, as per the setting above. | Do not allow override |
| If a Manual Login option is selected, auto-fill the UserID field with the current Active Directory account | If you select one of the 'Manual Login' authentication options for your users, you can automatically populate the UserID field for them if required. Only possible if the Anonymous Authentication is disabled in IIS. | Yes |
| If a Manual Login option is selected, display a 'Domains' dropdown as part of the UserName field | This option provides a Domain drop down list on all the Manual Login Authentication screens so the user doesn't need to type the domain prefix for their account | Yes |
| If Anonymous Authentication is disabled in IIS, use a two-step process: first validate the AD or Local account, then complete the secondary authentication on the next screen | By choosing this option, the authentication process will be executed in two-steps - initially just authenticating the user's Active Directory or Local account credentials, and then any other additional authentication options selected for their account. This is useful if users need to log into Passwordstate with more than just one account. You need to set this option to No if you wish to use any of the AD Single Sign-On authentication options. | No |
| If Anonymous Authentication is disabled in IIS, disable the UserID field on login screens to prevent changes | If Passwordstate is configured for Single Sign-On with Active Directory i.e. Anonymous Authentication in IIS is disabled, then you can use this option to disable the UserID field on AD Authentication screens if required. | No |
| Disable mandatory password changes for users with Local Login accounts | When using Local Login accounts to login to Passwordstate, by default users will be required to regularly change their login password. The frequency of the required change can vary from 15 to 90 days, depending on the strength of the password they enter. If you wish to disable this feature, you can do so by selecting Yes for this setting. | Yes |
| Hide 2FA secrets (YubiKey, One-Time Passwords) on the user's Preferences screen | To further strengthen the security of Passwordstate, you can hide 2FA Secrets on the user's Preferences screen. | Yes |
| Select the Password Strength Policy for Local Login account passwords | Password Strength Policies can also be used for passwords for user's accounts they authenticate with into Passwordstate - this is only local accounts, and not Active Directory ones. Compliance must be set to Mandatory on this policy if you wish to enforce its rules. | Default Policy |
| Lock out the user after the specified number of failed login attempts to protect against brute-force attacks | You can configure the maximum number of failed login attempts, which will trigger a redirect to a brute force lockout screen for the current session. The Brute Force detection feature works for all authentication options in Passwordstate. Setting to 0 will disable this feature, and it is not recommended - it should only be disabled for troubleshooting purposes. | 3 |
| Track failed login attempts for brute-force detection by | When tracking failed login attempts, you can track based on a combination of UserID and IP Address, or just the IP Address only. If selecting 'IP Address Only', and you are using Load Balancers or Proxy Servers, please ensure you have configured Passwordstate and your network devices for X-Forwarded-For Support. | UserID and IP Address |
| Automatically clear brute force lockouts after (x) minutes | If a user locks themselves out of the system accidently, this setting can automatically clear any locked out users after a time frame of your choice, allowing the user to attempt to log in again. Setting to 0 will disable this feature, requiring a Passwordstate Security Administrator to manully clear any brute force lockouts from the Brute Force Blocked IPs page. | 0 |
| Delay the error message (in seconds) after a failed Active Directory login to obscure whether the failure was due to an unknown account or incorrect password | Active Directory responds with different times compared to an incorrect Username or Password. This setting allows you to mask which type of authentication failure is happening, to prevent someone knowing whether the Active Directory account exists or not. Setting to 0 will not cause any delay with returning failed login messages. | 0 |
| Hide the following Authentication Options on User's Preferences screen | If you wish to restrict which Authentication options user's can select on their Preferences screen, then you can do so with this Dropdown list. | 0 |
Please note the following in regard to the Brute Force login feature:
In the main Passwordstate UI, Brute Force login will be tracked against the authenticating user i.e, via their UserID. So if two users are authenticating from the same IP Address, one user will not lock out another user.After a brute force lockout, the Passwordstate Security Administrator must clear the blocked record on the screen Brute For Blocked IPs.
Time-Based One-Time Password Settings
| Setting Name | Description | Default Value |
|---|---|---|
| Allow hardware tokens to have a maximum Clock Drift of | As hardware tokens age, they can lose time - which is known as Clock Drift. This setting allows Passwordstate to check (x) number of seconds ahead of what the current time is, to detect if there is any clock drift for the users hardware token. If there is, then the user's preferences will be updated to reflect their token's time is out of sync with the current time. | 10 |
| Default Time Step setting which will apply to new user accounts added to Passwordstate | Tokens generally use 30 or 60 second time-steps, and you can specify the default value here for all new user accounts which are added to Passwordstate. | 30 |
Counter-Based One-Time Password Settings
| Setting Name | Description | Default Value |
|---|---|---|
| Look Ahead Window Size for finding a Counter match | Each time the user clicks on the button on their Counter-Based Token, it increments their counterby 1. As the token may be used for other systems as well, there needs to be a look ahead value to try and find a match. When the user successfully authenticates with a Counter-Based token, their Preferences in Passwordstate are updated again to track what this counter value is - you can edit this on the user's Preferences screen. | 100 |
| Default number of Digits used for the One-Time Password | By default, most Counter-Based tokens use 6 digits for authentication, but this can be configured to any value your tokens support - this value is used when creating new user accounts in Passwordstate, and each user can edit their own settings if needed | 6 |
YubiKey Authentication Settings
Yubico supports the following protocols - OTP, OATH - HOTP or OATH - TOTP.
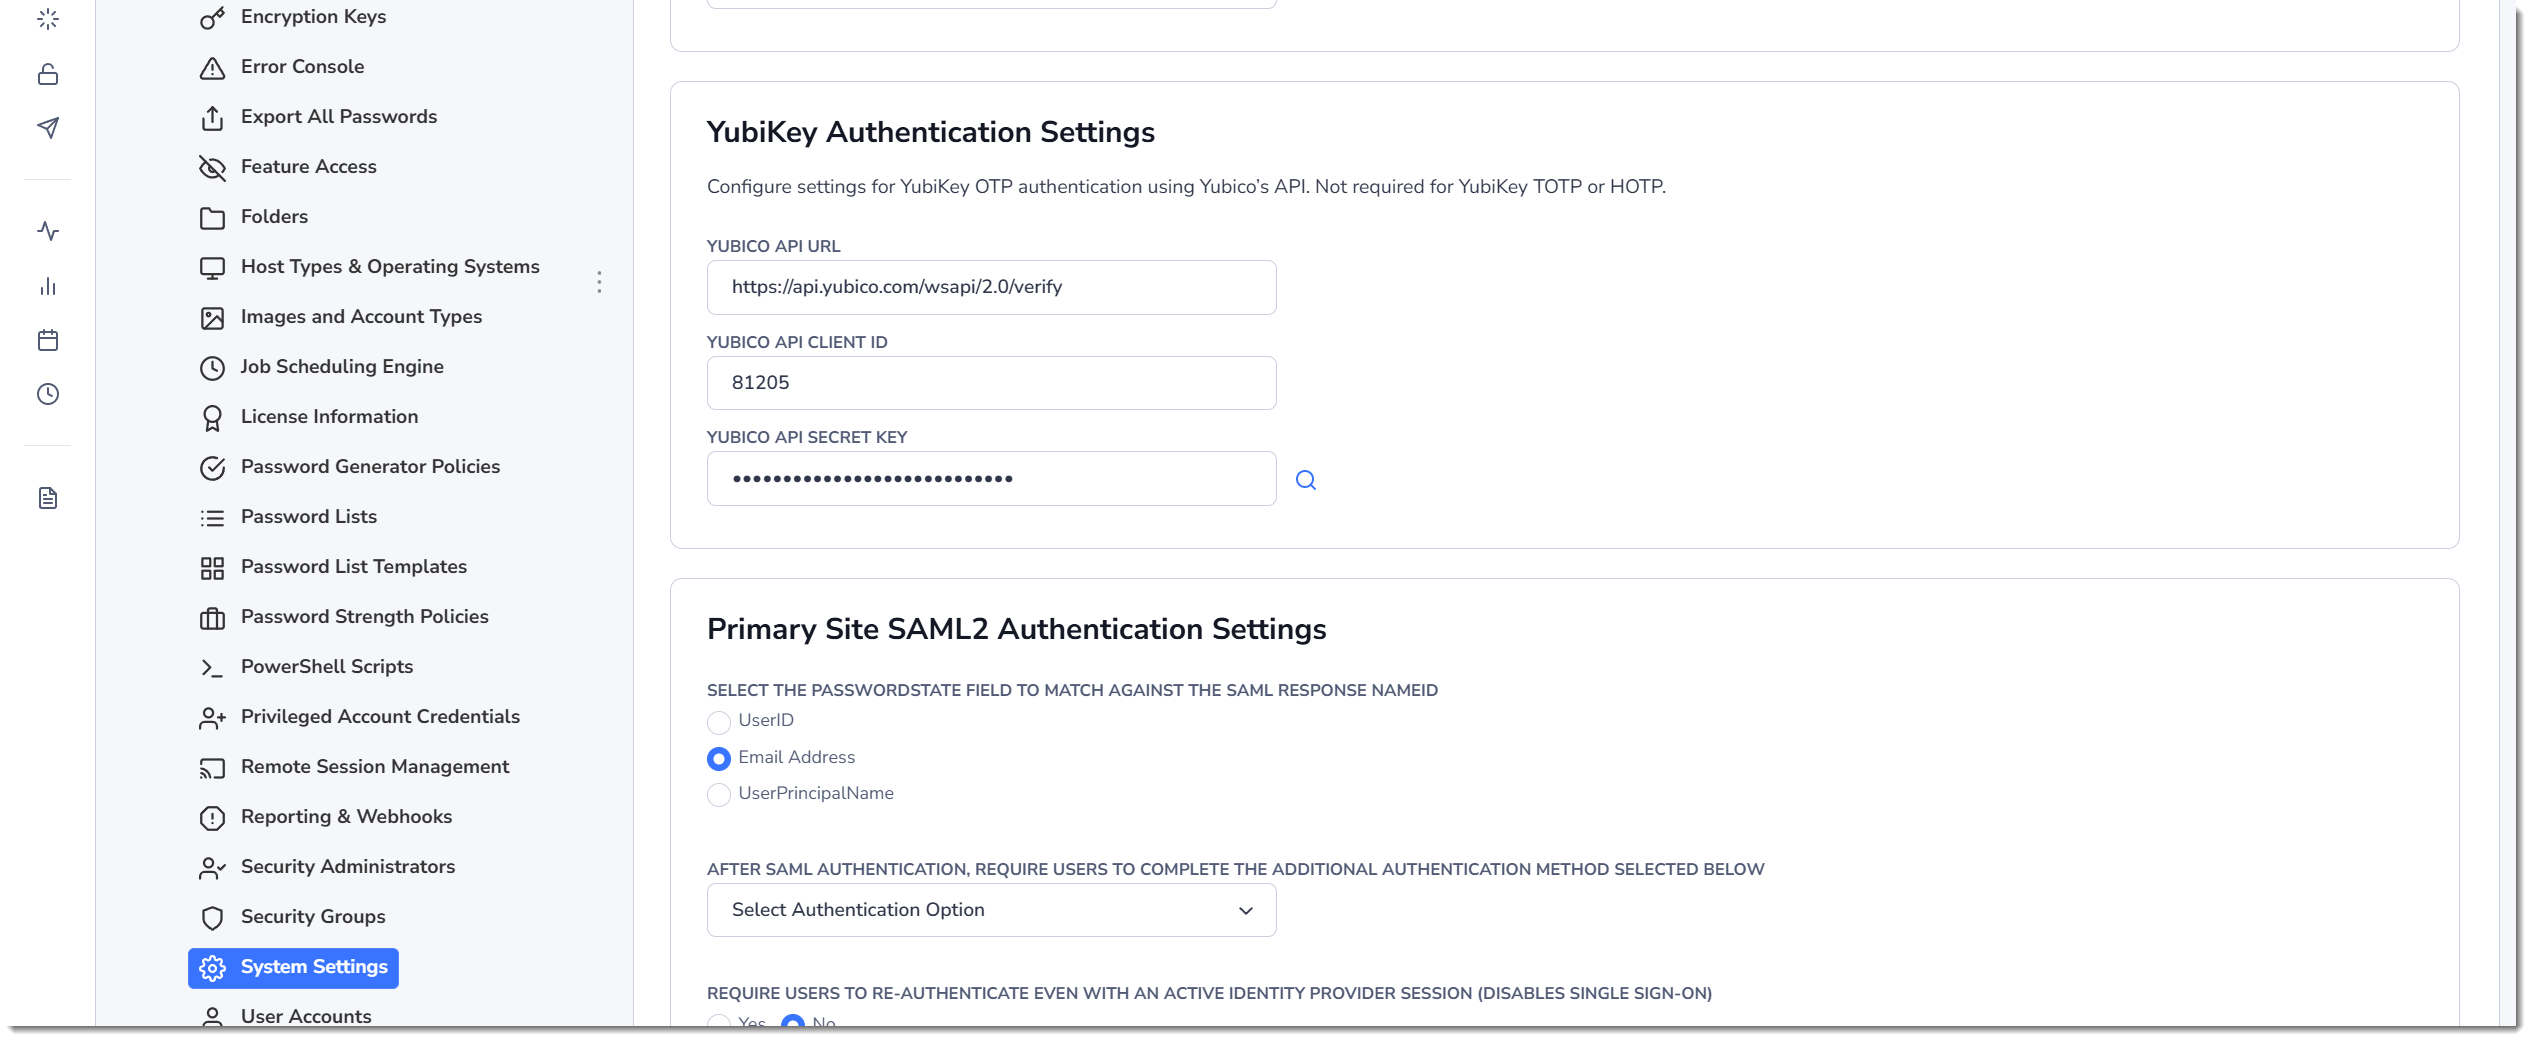
If you are wanting to use the cloud based Yubico OTP authentication option, then this requires you to obtain a Client ID and Secret Key . You can get these from the following page on Yubico's website, and you must use your registered email address and YubiKey to login and obtain this data - https://upgrade.yubico.com/getapikey/
When you have gather the ClientID and SecretID, you can enter those details below into the Yubikey section as per the below screenshot, and then save you changes:
Yubico also provide different API Urls as well you can use if required. Your Passwordstate webserver needs outbound access to whichever URL you choose, in order to successfully authenticate. The URLs that Yubico provides are:
- https://api.yubico.com/wsapi/2.0/verify
- https://api2.yubico.com/wsapi/2.0/verify
- https://api3.yubico.com/wsapi/2.0/verify
- https://api4.yubico.com/wsapi/2.0/verify
- https://api5.yubico.com/wsapi/2.0/verify
On Yubico's website, they document that "These servers are hosted in different places and by different organizations."
Once you have finished configuring Yubikey on this System Settings page, each user must then select which Yubikey protocol they want to use on their own personal Preferences screen. They will need to configure settings for their Yubikey device as per Yubikey Authentication section documentation provided in the Passwordstate User Manual.
If the user has not configured their own personal preferences with these Yubikey settings on their Preferences screen, they will be prompted to provide this on initial authentication into Passwordstate.
Primary Site's SAML Authentication Settings
In order to use SAML authentication in Passwordstate if using Active Directory or Local Login accounts, you must configure this section with appropriate settings - each of these settings can be obtained within the application configured in your SAML Provider.
Please refer to the Creating a SAML App page for an example on how to set up a SAML App in Azure/Entra ID, but if you have a different SAML provider, refer to their documentation for how to create a SAML app in their software.
Example URLs to use in your SAML Provider when creating the Application
| Setting Name | Example URL 1 |
|---|---|
| Single Sign On URL | https://PasswordstateURL/ |
| Recipient URL | https://PasswordstateURL/logins/saml/default.aspx |
| Destination URL | https://PasswordstateURL/logins/saml/default.aspx |
| Audience Restriction | https://PasswordstateURL/ |
| Default Relay State | https://PasswordstateURL/logins/saml/default.aspx |
Settings to Populate Passwordstate with, from your SAML Provider
| Setting Name | Description | Default Value |
|---|---|---|
| Select the Passwordstate field to match against the SAML Response NameID | Passwordstate can be configured to match certain "identifiers" for a user's account i.e. UserID, Email Address or UserPrincipalName | Email Address |
| After SAML authentication, require users to complete the additional authentication method selected below | If required, you can also enforce an additional authentication option on user's, once they have successfully finished their SAML Authentication | Nothing Selected |
| Require users to re-authenticate even with an active Identity Provider session (disables Single Sign-On) | When this option is set to Yes, any attempts to initiate a new session to Passwordstate, will require the user to re-authenticate to their SAML provider - even if they are already authenticated to their SAML provider. Effectively setting this option to Yes disables the Single Sign On design for the SAML specification. | Blank/Empty |
| X.509 Certificate | This certificate value can be obtained from yoru SAML provider when you create a new application for Passwordstate. | SHA256 |
| Certificate Type | Values for this can be set to SHA1 or SHA256, depending on your SAML application. | Blank/Empty |
| IDP Target URL | This URL is issued by your SAML provider when creating the SAML application. | Blank/Empty |
| IDP Issuer URL | This URL is issued by your SAML provider when creating the SAML application. | Blank/Empty |
| Reply URL (Assertion Consumer Service URL) | Only required when Passwordstate is behind a reverse proxy or load balancer which rewrites the Host header. When blank, the Reply URL is worked out from the address of the current request. The Full URL is required here including /logins/saml/default.aspx. | Blank/Empty |
| Audience Restriction (Entity ID) (Mandatory for Entra ID and ADFS) | If required, this should be set to your Passwordstate URL. Only mandatory when using Entra ID or ADFS as your SAML provider, otherwise can leave blank. For Entra ID, it is the Identifier value, and ADFS is the Relying party trust identifier setting. | Blank/Empty |
| Single Logout URL | If you specify a Single Logout URL for your SAML Provider, then when users log out of Passwordstate they will also be redirected to your SAML provider to log out of the active SAML session. If you leave this field blank, the session in Passwordstate will end when a user logs off, but it will not end the session at the Identity Provider's end. | Blank/Empty |
Note 1: If the user is logged out of Passwordstate based on the Inactivity Time Out setting on the System Settings -> Miscellaneous tab, then they will be redirected to the Single Logout URL configured above, regardless of whether SAML Authentication is enabled for their account.
Note 2: When anonymous authentication is enabled for the site in IIS, you cannot use a User Account Policy to specify the authentication type of SAML - User Account Policies first need to validate who the user is, before the policy can be applied - which defeats the purpose of SAML.
Note 3: Audience Restriction can be any value, but most commonly your Passwordstate URL is specified here.
High Availability Site SAML2 Authentication Settings
If you are also using the High Availability Module and using SAML for authentication, then you only need to configure SAML settings for your second High Availability website if you are using different URLs to access each of your sites. This would also require a secondary "application" setup at your SAML Providers end, so the redirection to the correct URL works.
Each settings for this is described in the Primary Site's SAML Authentication Settings section above.
RADIUS Authentication
You can configure Passwordstate to authenticate to a RADIUS Server, by specifying the relevant values for your RADIUS server in this section of the Authentication Options page.
| Setting Name | Description | Default Value |
|---|---|---|
| RADIUS Authentication Mechanism | PAP or MSCHAPV2 are the available options for the format of the communication between Passwordstate website and your Radius server. PAP sends the password in cleartext to the RADIUS server, which is insecure unless protected by TLS. MSCHAPv2 uses a challenge–response exchange based on the NT hash, so the password is never sent in clear text. It also supports mutual authentication and helps prevent replay attacks. | PAP |
| RADIUS Server Name | The netbios name or FQDN of your Radius server, or the IP Address of your Radius server is accepted in this field. | Blank/Empty |
| Server Port Number | Specify the value of the port your Radius server communicates on. | 1812 |
| RADIUS Secret | The Radius (shared) secret is obtained from your Radius server, used to secure communication. | Blank/Empty |
| Timeout | The timeout value is the maximum amount of time in seconds the authentication can take before timing out between yoru Passwordstate webserver and the Radius server. | 5 |
| Logo Description | Customize the Title for the logo on your Radius login page. | Radius Authentication |
| Login Screen Description | Customize the Description on your Radius login page. | Please enter your RADIUS Username and Password to authenticate. |
| Username Label on Login Screens | Customize the Username label on yoru Radius login page. | RADIUS Username |
| Password Label on Login Screens | Custimize the Password label on your Radius login page. | RADIUS Password |
| Make the RADIUS username field read-only on the login screen | Make the Radius username on the login pages read only, so users cannot attempt to change the username to a different value. | Yes |
| Use direct RADIUS authentication without AD pre-authentication | If you use Active Directory, you can completely bypass AD authentication by setting this option to Yes, which will result in Radius only authentication. | No |
Note 1: Remember to configure a 'Client' for your RADIUS Server with the Host Name or IP Address of your Passwordstate web server.
Note 2: On the user's Preferences screen, they can specify what their RADIUS Username is, and then this will be used on each of the RADIUS authentication screens. The Radius name assigned to the account in Passwordstate must be an exact match in the Radius server.
Note 3: If you are using the FIPS Enabled version of Passwordstate, RADIUS Authentication is not possible - If you enforce FIPS compliance on your systems, there is currently no supported authentication protocol for communicating with a RADIUS server. PAP and CHAP use the MD5 algorithm to encode their responses, and one step in the construction of the MS-CHAPv2 response requires using the MD4 algorithm to match how NT systems hash their passwords. Neither of these algorithms are permitted by FIPS-compliant mode.
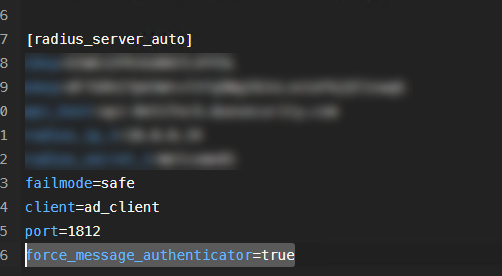
Note 4: If using a RADIUS server like Duo's Authentication Proxy, and additional configuration line is required in the Radius section of the authproxy.cfg file, to support RFC 5080 / RFC 2869's, for improved security.
The line is force_message_authenticator=true, as per the screenshot below.
Duo Authentication
In order to use the Duo Authentication feature, you must have an Enterprise account with Duo Security, and you need to create an Auth API Application in the Duo Portal. You then add the settings of this DUO Application into this Duo Security Two-Factor Settings section, which will allow Passwordstate to security communicate to the DUO portal on the internet.
Note 1: Your Passwordstate webserver needs to connect to the DUO API for this authentication option to work. This outbound traffic is sent to duosecurity.com.
Note 2: Users must have specified their Duo Username on their Preferences screen in order to authenticate.
Note 3: If your users have more than one device assigned to their accounts in your Duo Console, they will be presented with a list of devices to choose from when authenticating into Passwordstate.
Configuring Application in Duo Portal
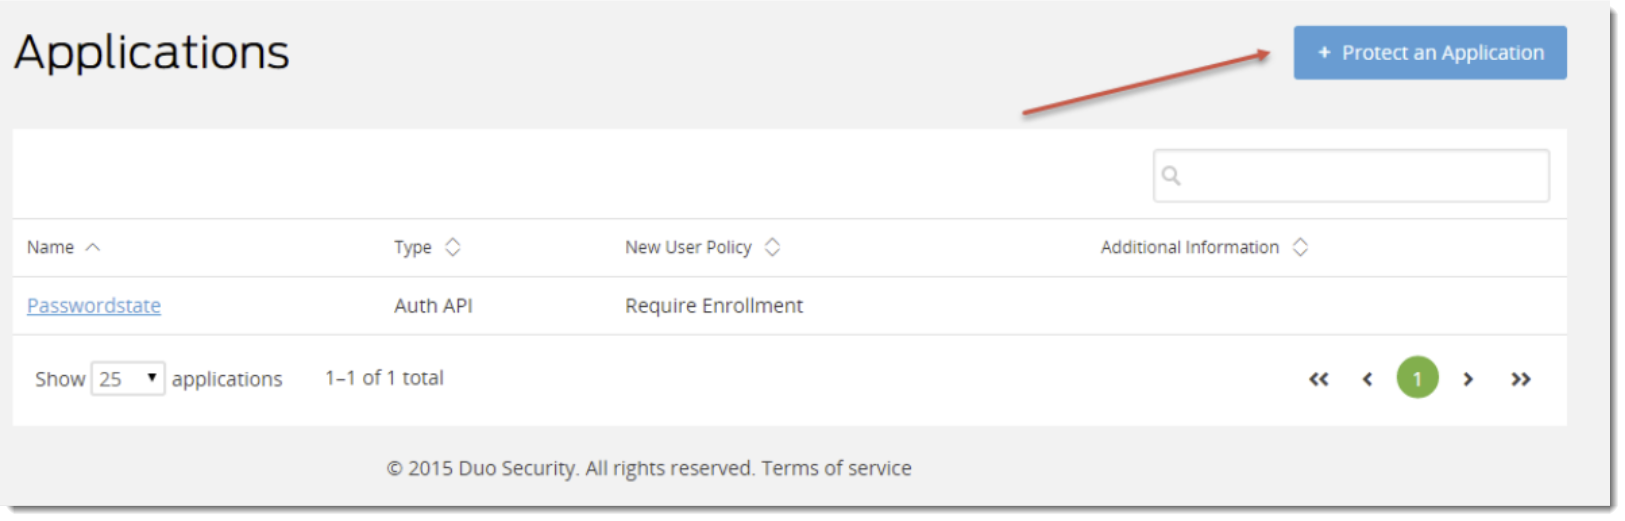
- First, login to your Duo Portal, and click on the Applications menu
- Click on Protect an Application
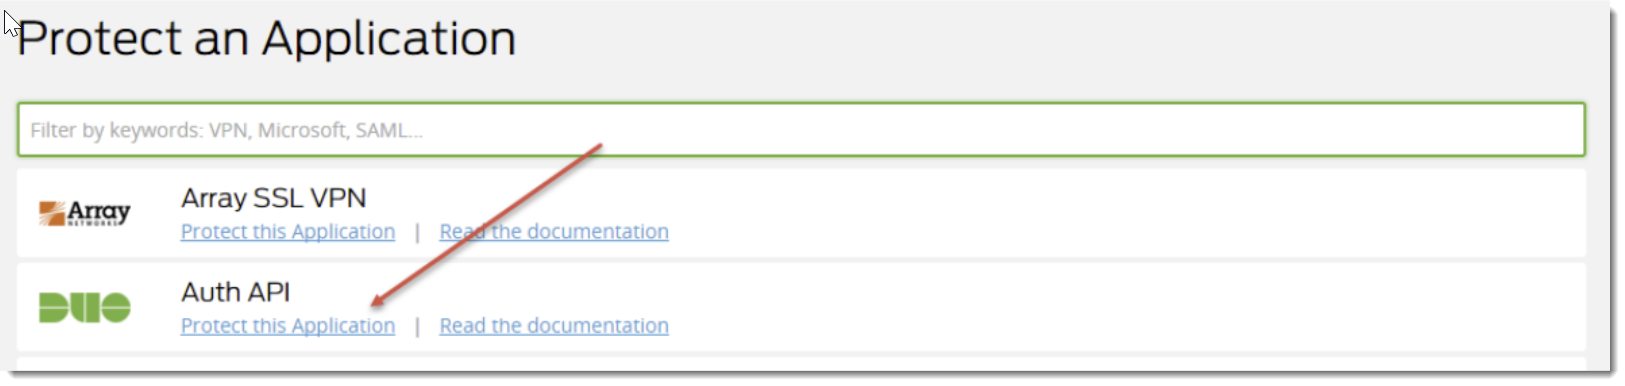
- Choose the Auth API Application
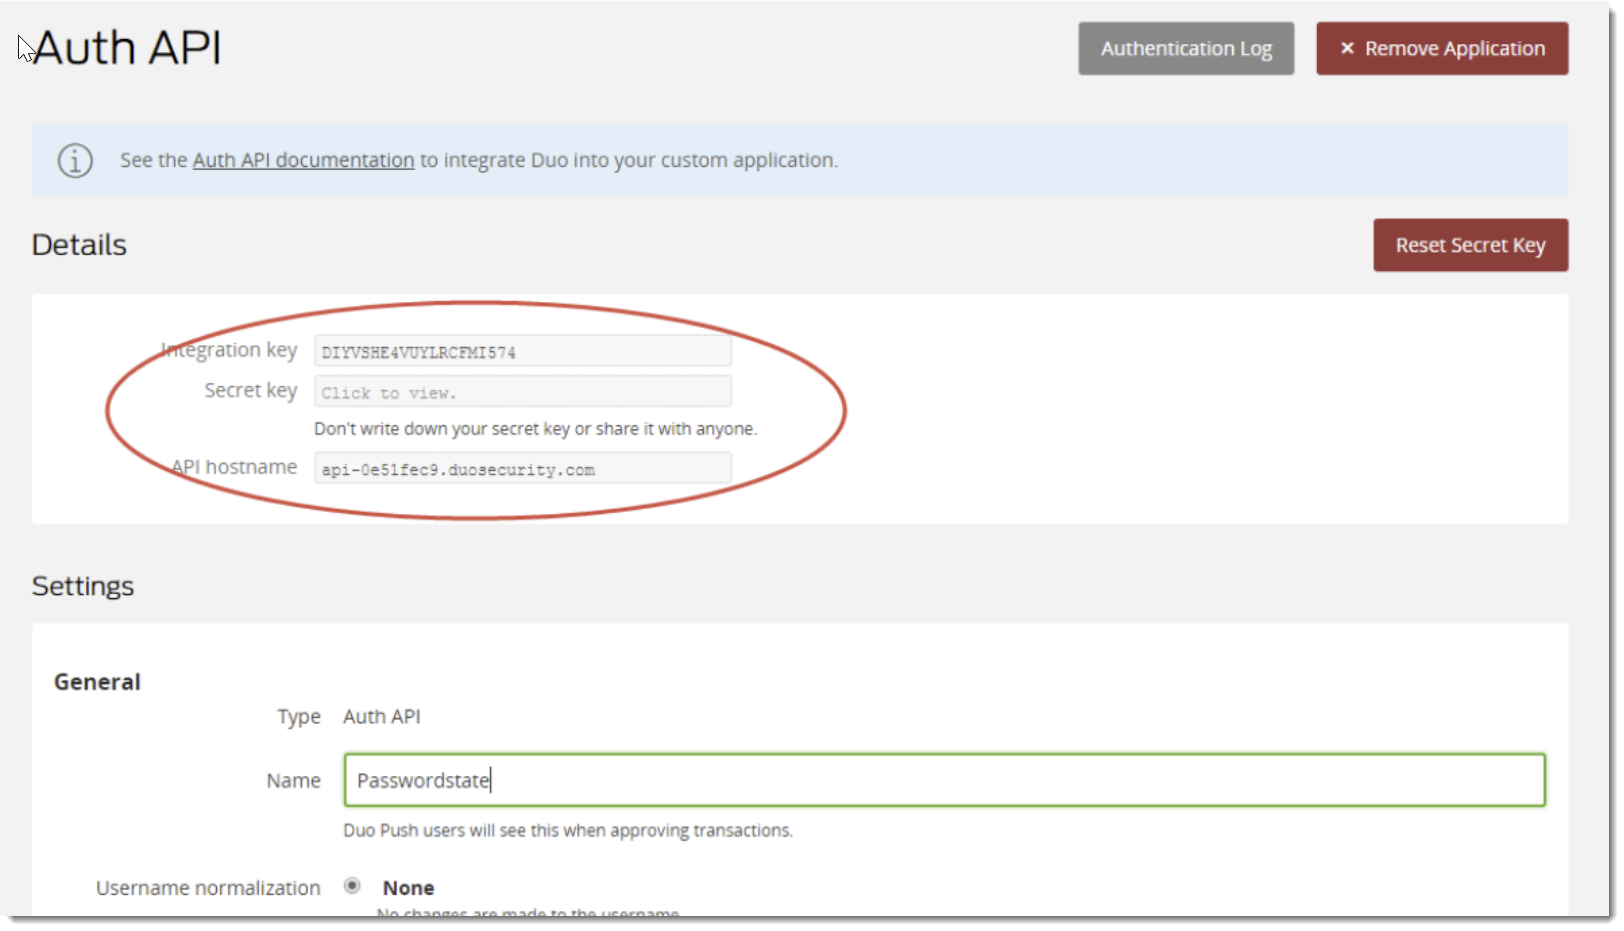
- Create the Secret Key and name the Auth API as appropriate
- Now in Passwordstate, select the appropriate authentication option you want under System Settings -> Authentication Options
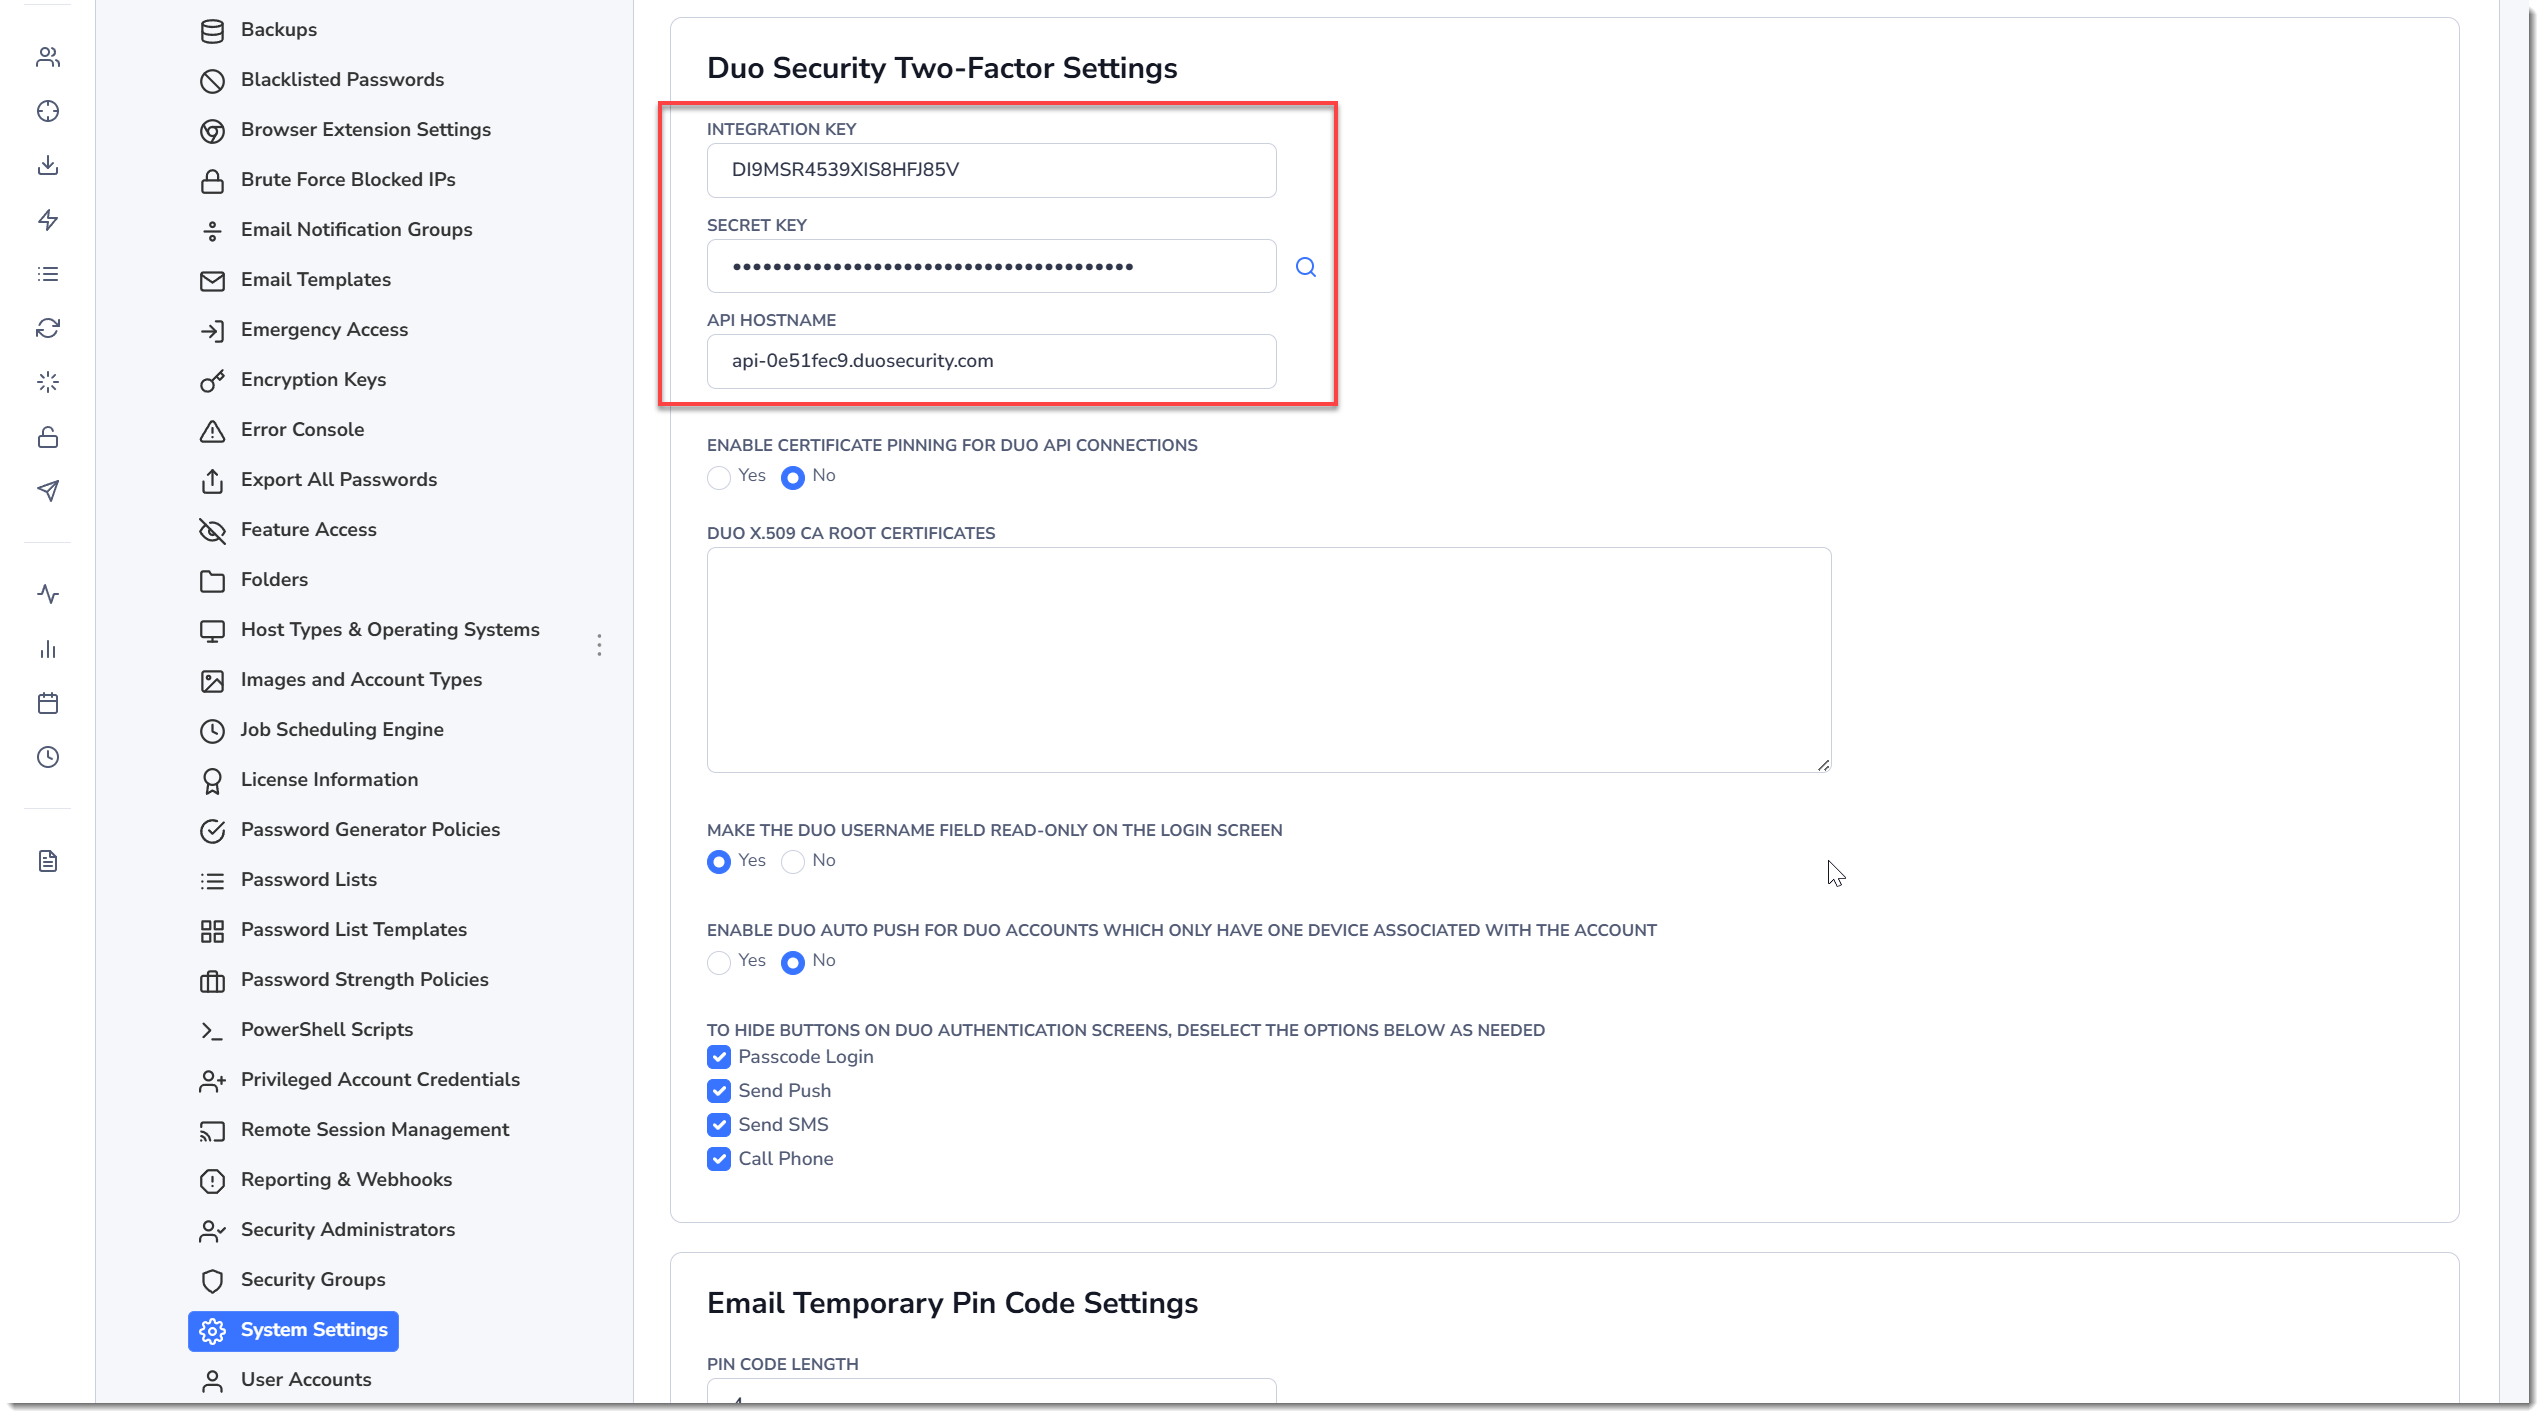
- Populate the settings from the steps above into the Duo Security Two-Factor Settings section.
Additional DUO Settings to Consider
| Setting Name | Description | Default Value |
|---|---|---|
| Enable certificate pinning for Duo API connections | Certificate pinning in Duo Security (Duo) is a security feature that ensures the Duo client only trusts specific known certificates when connecting to Duo’s cloud service. | Yes |
| Duo X.509 CA root certificates | If you have Certificate pinning enabled in the setting above, you must set the contents of your certificate in this field to allow secure communication. f you want to implement certificate pinning for Duo's API, you can download their certificates from their Githob respository here - https://github.com/duosecurity/duo_api_csharp/blob/master/duo_api_csharp/ca_certs.pem | Blank/Empty |
| Make the Duo username field read-only on the login screen | This option prevents a user from walking up to another user's computer, authenticating with their own Duo Push Username, but then logging into Passwordstate as the other user - this can happen when the Pass through authentication occurs after the Duo Push authentication happens | Yes |
| Enable Duo Auto Push for Duo accounts which only have one device associated with the account | If a user only has a single device (mobile phone for example) in Duo, this setting will automatically send them a Push Notification when they log into Passwordstate, as opposed to the user clicking a button on the login page to send a Push Notification. | No |
| To hide buttons on Duo authentication screens, deselect the options below as needed | Duo has multiple ways users can authenticate. This setting allows you to disable the options you do no want to use, to simplify the Duo login screens in Passwordstate. | All Options Enabled |
Email Temporary Pin Code Settings
The Temporary Pin Code Settings allows you to specify the length of the Pin Code, and also how long until the temporary Pin Code will expire if not used.
When using this authentication option, the user who is attempting to log into Passwordstate will be sent an email with a random PIN which will give them access to the system. This email address can be set by the user under their own personal Preferences, under the Authentication tab in a field called Email Temporary Pin Code.
| Setting Name | Description | Default Value |
|---|---|---|
| Pin Code Length | Total Length of PIN user must set | 4 |
| Pin Code Expires | Time in minutes when the PIN expires and can no longer be used | 3 |
ScramblePad Authentication
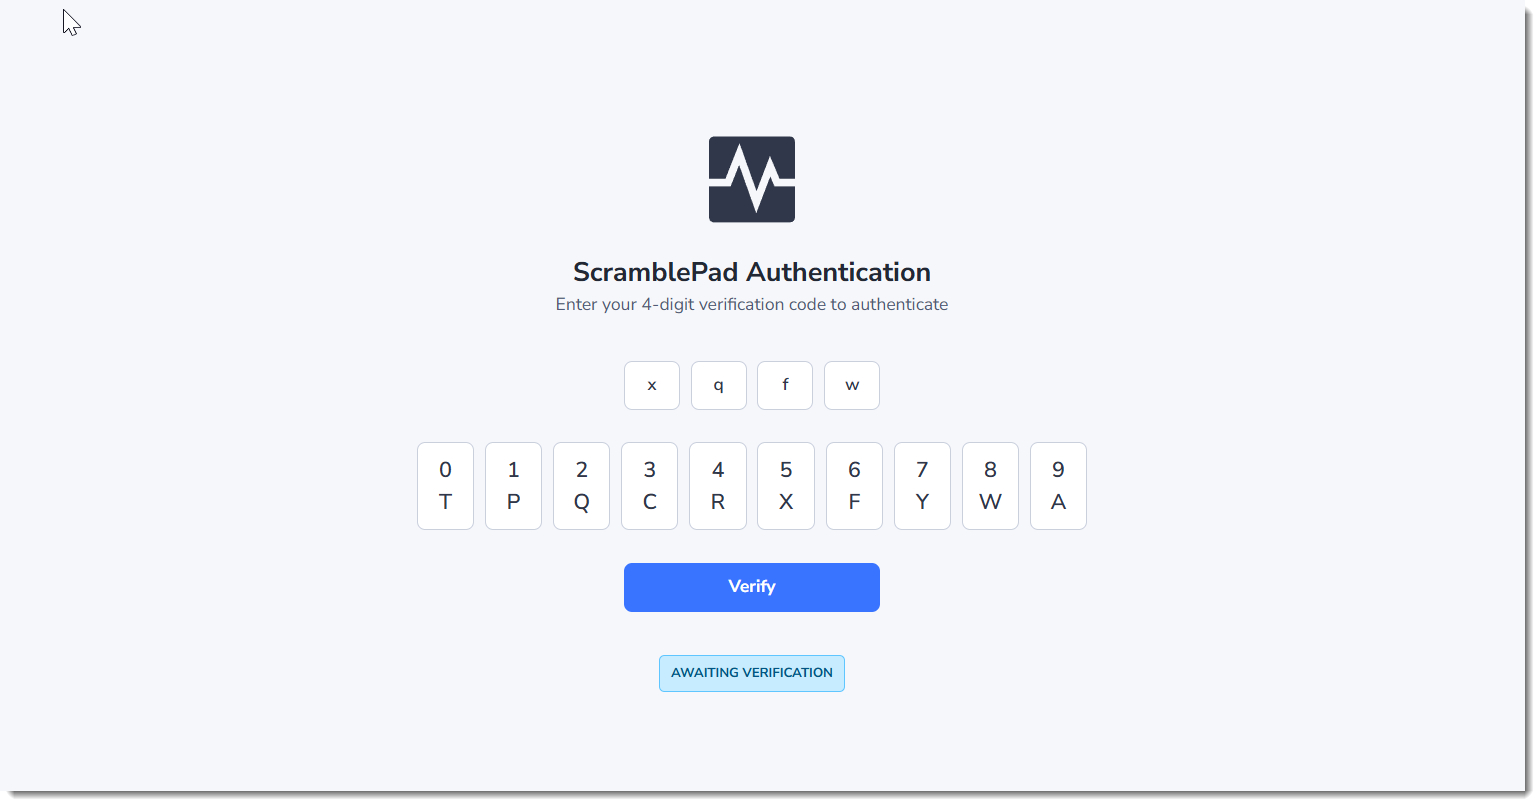
To use this authentication method, the user must specify their ScramblePad Pin number on the Preferences screen, or Security Administrators can do it for them on the User Accounts screen. Alternatively, when a user attempts to log in for the first time with this Scramblepad option, they can generate a new PIN as a once off process.
By default, the ScramblePad Pin length is 4 characters, but can be changed if required in this System Settings page.
When authenticating, the user needs to enter the corresponding letter that is displayed on the screen, matching the numerals specified for their Pin Number. An example in the below screenshot is for a PIN that is 5268. This matrix of numbers and letters randomizes on every time the user attempts to log in:
| Setting Name | Description | Default Value |
|---|---|---|
| Minimum ScramblePad Pin Length | Total length of Scramblepad PIN user must set | 4 |
Branding
On the Branding tab, you can select the default color scheme for all users, as well as upload custom logos for the login screens, and for the top header bar displayed once logged into Passwordstate.
With the logos, you must upload two variants for each type of logo, so the appropriate logos can be displayed for each of the Dark and Light themes. Please also take note of the size restrictions, and the requirement for a transparent background on your logos.
Check for Updates Tab
The Check for Updates tab allows you to specify how frequently the Passwordstate website should check for new updates, and who it should display the new build notification to.
This feature queries the following file - https://www.clickstudios.com.au/NewBuildInfo.xml, and if a new build is found, the notification will be displayed at the top left-hand side of the screen, just next to the main logo.
| Setting Name | Description | Default Value |
|---|---|---|
| Check for new builds every | Set the schedule for how often the Passwordstate Windows Service should check for new builds of Passwordstate | Every 7 Days |
| Show new build alerts to | Choose which users should be alerted whena new build is found | All Users of Passwordstate |
Note: Depending upon your environment, you may need to specify proxy authentication details on the Email and Proxy Servers Tab to allow outbound traffic to the Click Studios website.
Email Alerts & Options Tab
The Email Alerts & Options Tab allows you to specify your email server settings, so emails can be generated and sent out from Passwordstate. There are also multiple settings relating to how emails are sent.
| Setting Name | Description | Default Value |
|---|---|---|
| Send email alerts to Security Administrators (with the User Accounts role) for failed login attempts under the following conditions | When there are failed login attempts, Security Administrators can be emailed based for every failed login attempt, or only when there is a brute force lockout event. All failed login attempts are also recorded and reportable on the Auditing screens. | Every failed login attempt |
| For Self Destruct Messages and emailed permalinks, send emails from the following address | When sending emails for Self Destruct messages or for password permalinks, you can choose to send the emails on behalf of the user who is sending the emails, or via the mailbox configured on this screen. If you wish to send via the user, they must have an email address associated with their account. | The user who is logged into Passwordstate |
| Alert Security Administrators if a single user performs excessive View, Copy, or Export actions. Trigger alert when the following condition is met | Another option which alerts to uncommon behavior is to notify Security Administrators when an individual user is viewing, copying or exporting a lot of password data within a set period of time. i.e. if a user views 10 password records within a single minute, then this is not common behavior and you may have an issue with potential information leakage/theft. | 5 Events are detected wihtin 1 minute |
| In addition to Password List Administrators, also email Security Administrators (roles below) when users request access to Passwords or Lists | By default, Password or Password List Access Requests are routed to the Administrators of the relevant Password Lists. If you would also like the access requests to be sent to various Security Administrators, you can use this option to choose which Security Administrator roles will receive the requests | Do Not Send To Any |
| If no Password List Administrators are assigned, send access requests to Security Administrators | It's possible that there may be no 'Administrator' permissions assigned to a Password List for your users - only Modify or View permissions. If this is the case, someone needs to be notified when users request access to passwords in a Password List which is configured this way. You can use this option to specify where the request is routed i.e. which Security Administrators will receive the 'Request Access' email and popup notification. | Password Lists |
| Email Security Administrators (role below) when passwords are exported | If you would like to alert your Security Administrators when users are exporting password data, you can use this option to do so. | Do Not Send Alerts |
Email & Proxy Servers
The Email & Proxy Servers tab allows you to add in settings for sending emails from Passwordstate, or specifying proxy servers settings to allow outbound traffic if required.
Mail Server Selection
Allows you to choose whether you wish to use an SMTP mail server for sending emails, or Exchange Online.
| Setting Name | Description | Default Value |
|---|---|---|
| Select the type of mail server to use within Passwordstate | Choose either SMTP or Exchangle Online as your email server source. | SMTP Mail Server |
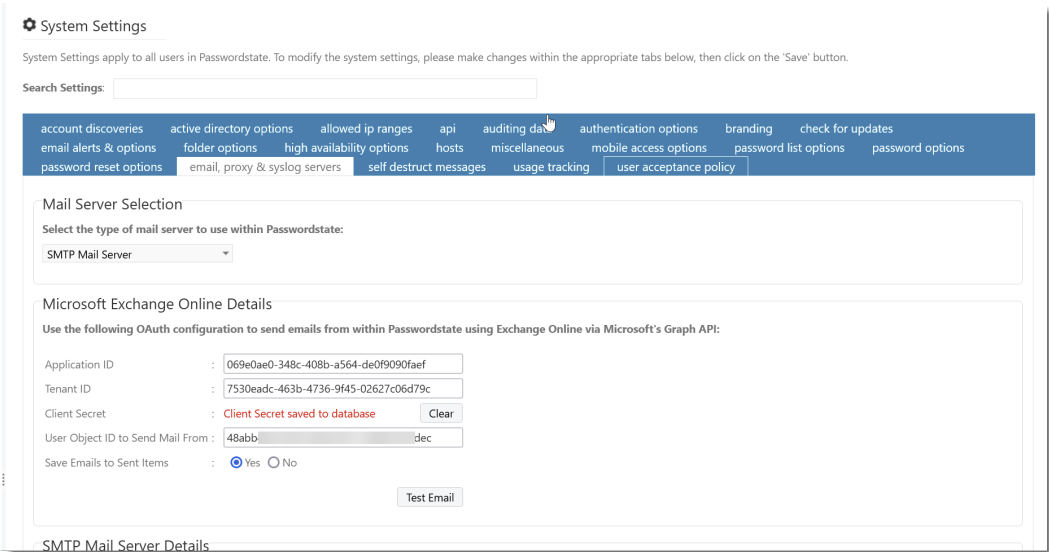
Microsoft Exchange Online Details
If you have a valid Microsoft subscription that allows you to use Exchange Online, then you can use the Microsoft Graph to send various Passwordstate emails.
| Setting Name | Description | Default Value |
|---|---|---|
| Application ID | Value obtained from Microsoft Application | Empty/Blank |
| Tenant ID | Value obtained from Microsoft Application | Empty/Blank |
| Tenant ID | Value obtained from Microsoft Application | Empty/Blank |
| Client Secret | Value obtained from Microsoft Application | Empty/Blank |
| User Object ID to Send Mail From | Value obtained from Microsoft Application | Empty/Blank |
| Save Emails to Sent Items | Choose whether or not to show all sent items in the mailbox of user sending out the emails | No |
The instructions below show you how to configure the Graph API and grant permissions to allow mail to be sent out on behalf of an Entra ID User.
Note: These instructions to create an Application in Antra ID and assign the correct permissions are only guide. Refer to official Microsoft documentation to obtain the most current information and best practices, when it comes to using the Microsoft Graph API.
- Log into your Azure portal, and select Microsoft Entra ID
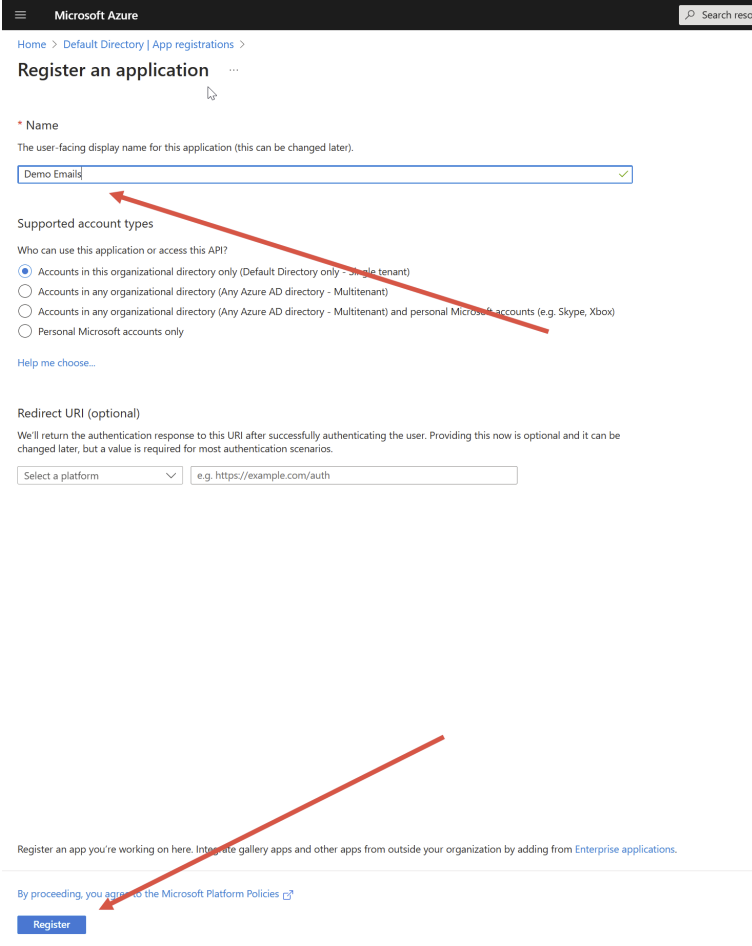
- Click on App registrations menu on the left hand pane, and select New Registration
- Type in a name of your choice for the application you are creating, and then click Register
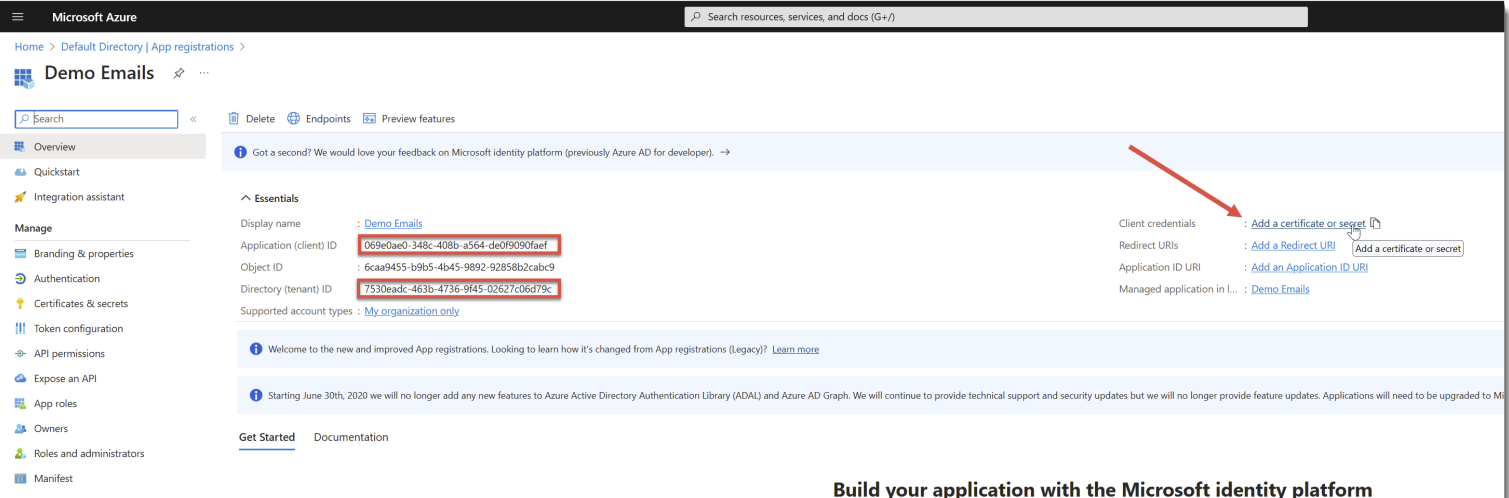
- Take note of the Application (client) ID and Directory (tenant) ID, and the click on the Add a certificate or secret link
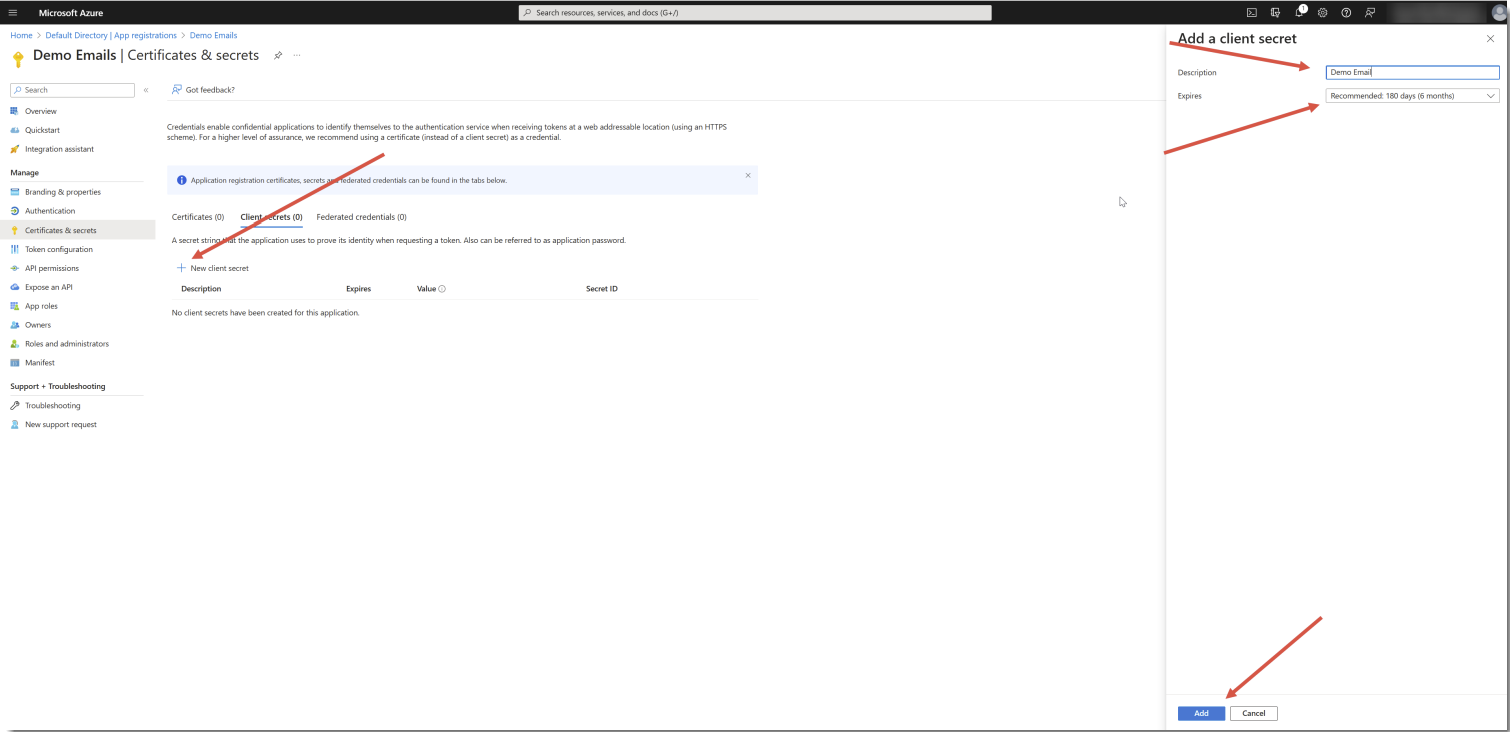
- Click New Client Secret, give it a description, and expiry date and click Add
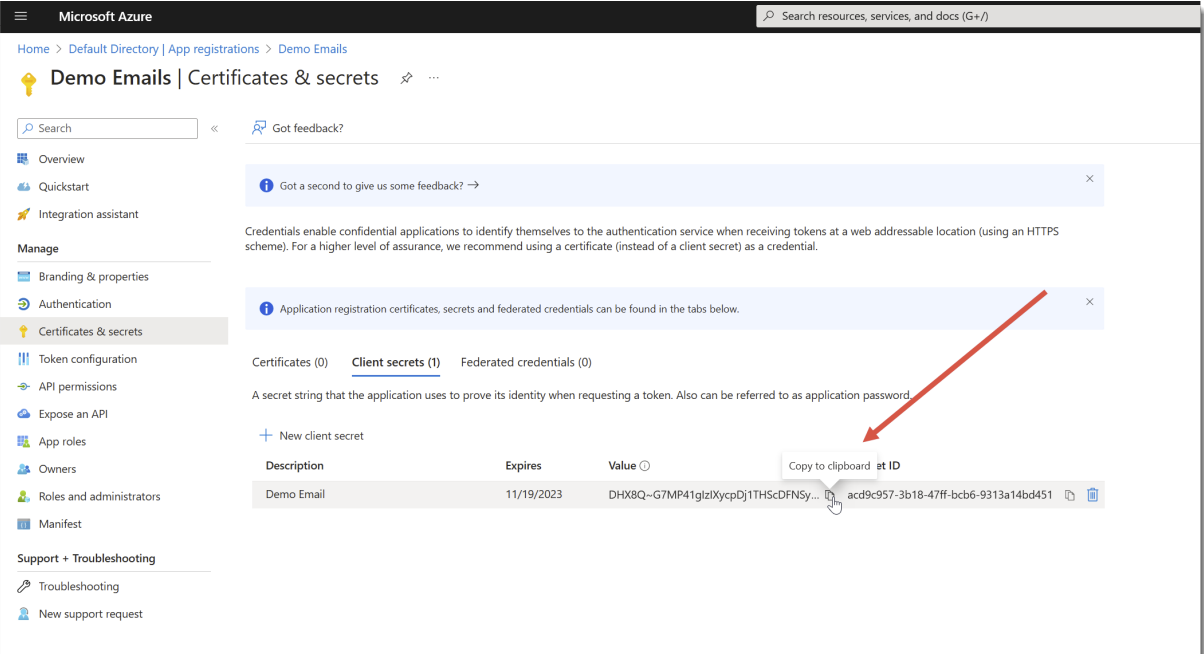
- After the client secret is created, take note of the Value which will be used later in Passwordstate. You can only view this once when you create the secret:
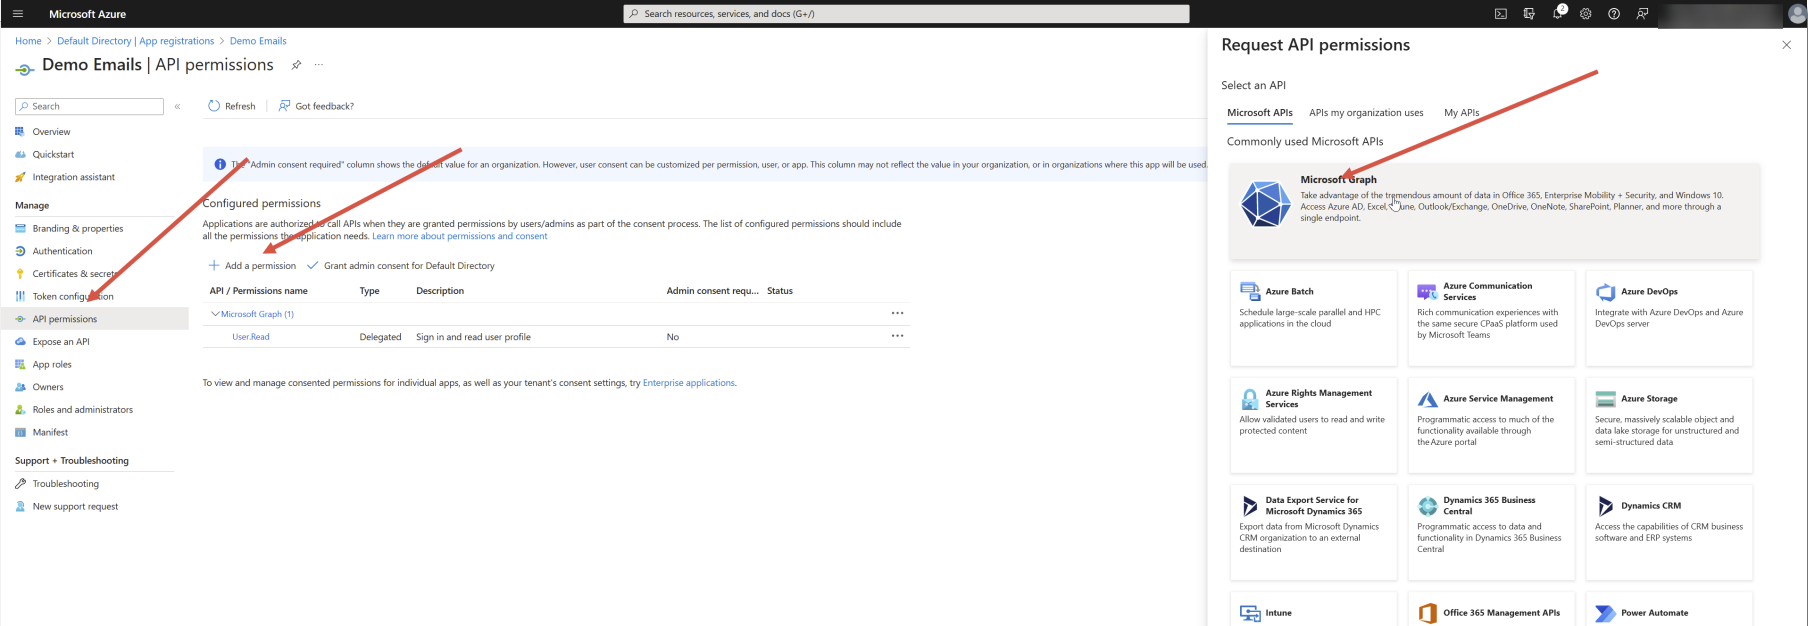
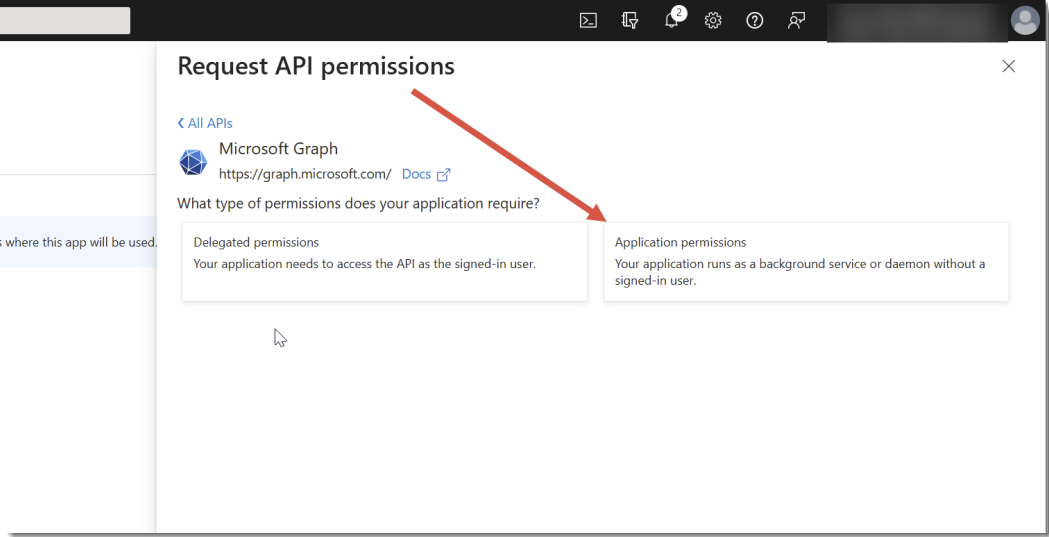
- Now click on API Permissions, click Add Permission and the click on the Microsoft Graph button.
- Click on Application Permissions
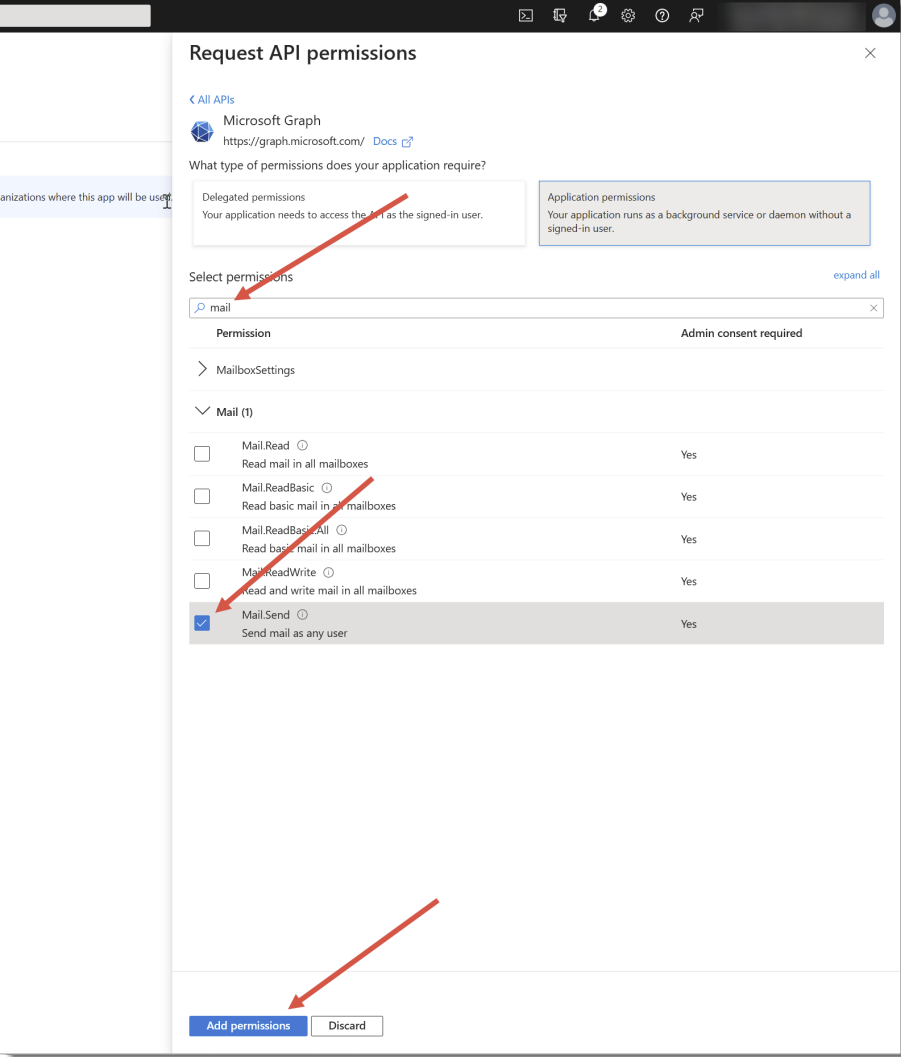
- Search for "mail", tick the Mail.Send option, and click Add Permissions
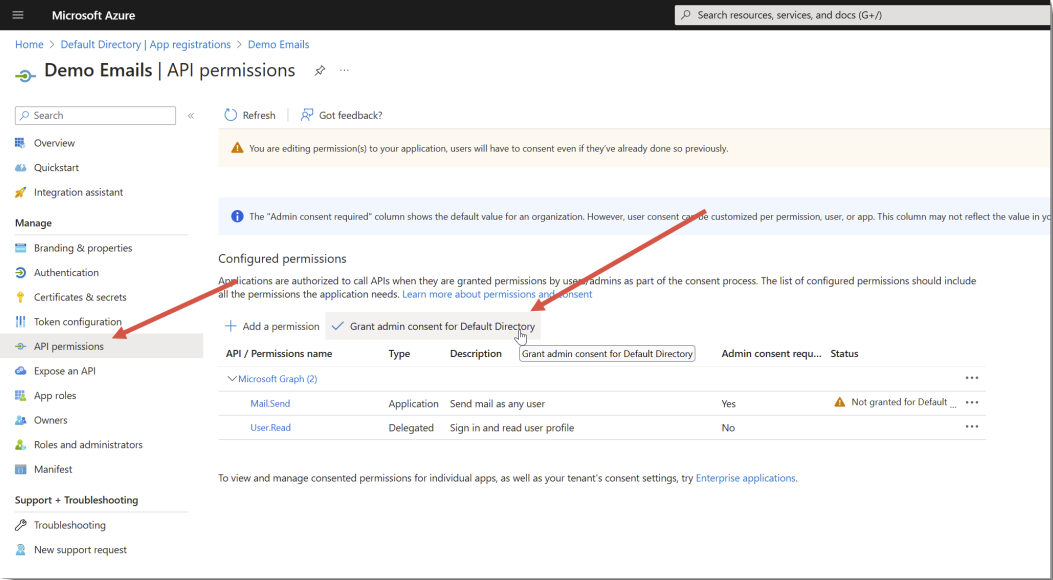
- Under API Permissions page, click the Grant Admin Consent for the Default Directory button
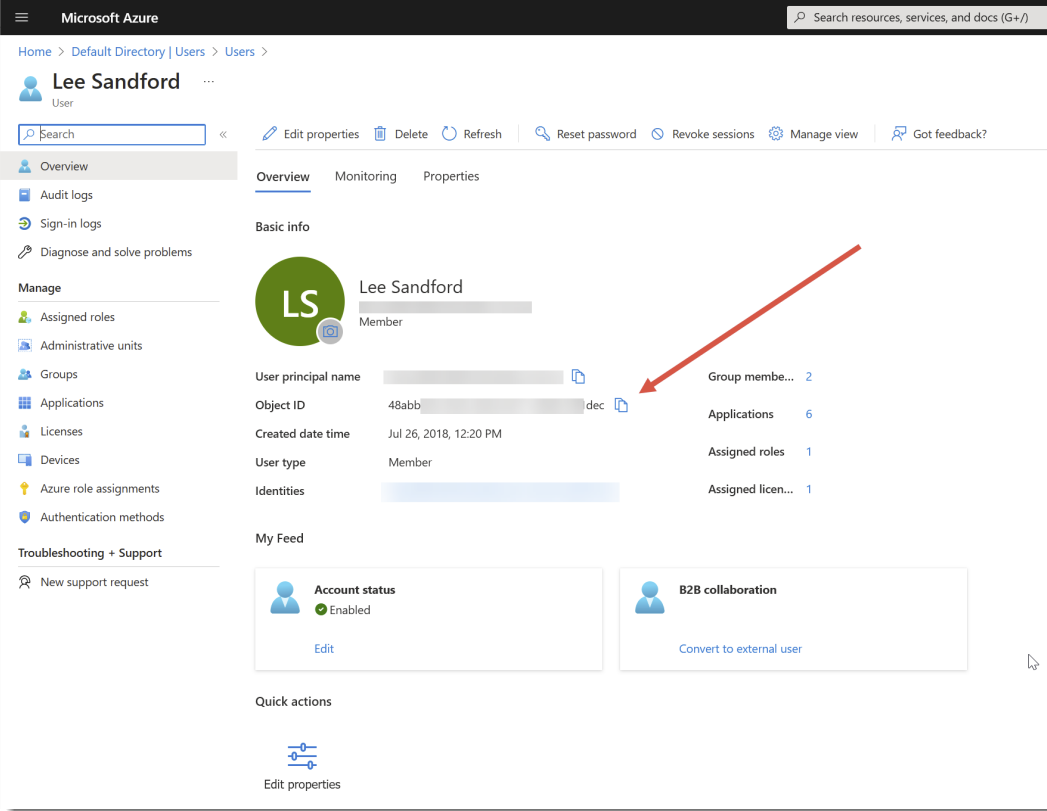
- Open any user you wish to send on behalf of, and take note of their Object ID. This user should have a valid email address assigned to their account:
- Log into Passwordstate, and go to Administration -> System Settings -> Email & Proxy Servers. Add in all the details of your application under Microsoft Exchange Online Details section, and click the Test Email button to confirm emails are sending. If you select the Save Emails to Sent Items option, you can log into your email client as the user you are sending emails from, and you will see any email Passwordstate sends out in their Sent items. This can be good for troubleshooting if the end user is not receiving any emails.
SMTP Mail Server Details
If you want to send out emails from Passwordstate by an SMTP server, you should set the approriate details for yoru email sevrer in this section.
| Setting Name | Description | Default Value |
|---|---|---|
| Email Server Host Name | Set the netbios, or FQDN, or IP Address of yoru email server in this field | Empty/Blank |
| Email Server Port Number | Set the Port Number your SMTP server needs to communicate on. Examples could be 25, 587, 465 etc. | 25 |
| Send From Email Address | Set the Email Address that you would like all emails to appear to be sent from. Users will see this email address in the headers of their emails they receive from Passwordstate | Empty/Blank |
| Use Mailbox to Send | If you want to specify an existing user account that has permissions to send out emails from your SMTP server, set this option to Yes | No |
| Send Mail via TLS | If your SMTP server supports the more secure TLS protocol, set this option to Yes. TLS communicates on a different port to standard SMTP traffic. Refer to your SMTP documentation for more information. | No |
| User Name/Password/Domain Name | If you have selected the option above Use Mailbox to Send to Yes, you should set the username, domain and password in these three fields. | Empty/Blank |
Click the Test Email button, and you will receive an email to your personal inbox, if all your SMTP server settings are configured correctly.
Proxy Server Details
There are certain features within Passwordstate that can reach out to the internet to retrieve data, all of which can be disabled if desired. These conditions are:
| Scenario | Feature Location |
|---|---|
| Passwordstate can contact our clickstudios.com.au website (13.75.255.213), to check an xml file for any new builds available. | Administration -> System Settings -> Check for Updates |
| If you use DUO Authentication to authenticate into Passwordstate, this can reach out to the DUO API which is duosecurity.com | Authentication for DUO is found under Administration -> System Settings -> Authentication Options |
| If you use SAML for authentication, this can reach out to the internet. Examples are using Azure or Google as your SAML provider, and the locations Passwordstate need to reach out to are dependent on which SAML provider you use. | Authentication for SAML is found under Administration -> System Settings -> Authentication Options |
| If you use the HaveIBeenPwned feature in Passwordstate, to check for known bad passwords, Passwordstate can reach out to https://haveibeenpwned.com/ API via the following URL: https://api.pwnedpasswords.com/range/ | Administration -> Bad Passwords |
| If you use the Yubico One Time Passwords for authentication, which will need to reach out to yubico.com | Authentication for Yubico OTP is found under Administration -> System Settings -> Authentication Options |
| Microsoft Graph API access may be needed if you wish to use Microsoft Exchange Online Emails as an email source. it's also possible to add in Entra ID domains as a source of users, which will also need outbound traffic to the Microsoft Graph API, which can be found at https://graph.microsoft.com | Administration -> System Settings -> Email & Proxy Servers or Administration -> Active Directory & Entra ID |
If you want Passwordstate to connect to any of the above internet locations, then set your Proxy server details in this section. Ensure you set the server name in the format of Servername:PortNumber. All outbound traffic will begin routing through your proxy server once these details are set.
| Setting Name | Description | Default Value |
|---|---|---|
| Proxy Server | Netbios, FDQN or IP Address of Proxy server. Example squid01:3128 | Empty/Blank |
| User Name | Username of account that has permissiosn to authenticate to Proxy Seerver | Empty/Blank |
| Password | Password of account that has permissions to authenticate to the Proxy Server | Empty/Blank |
X-Forwarded-For Support
When Passwordstate adds auditing data to the database, it records the IP Address of the client who initiated an action which triggered the audit event.
Passwordstate supports the X-Forwarded-For (XFF) HTTP header field for identifying the originating IP address of a client. This can be handy if you use any form of Load Balancing, Firewalls or Proxy Server caching, as this will ensure the correct IP Address of the end user client machine is reported in Passwordstate auditing, instead of the load balancer or proxy server IP Address.
You will need to configure the Load Balancer/Proxy etc first with the X-Forwarded-For feature, and then set the IP Address of the device in this System Settings page in Passwordstate. Refer to the 3rd party device documentation on how to configure their device with this feature.
You must specify the IP Address of these devices in Passwordstate, so they are "trusted" to add this header to the HTTP request.
Folder Options
| Setting Name | Description | Default Value |
|---|---|---|
| To create nested folders, users must have the following permissions on the parent folder (Admin access always allows this) | By default, if a user had Administrator access to a Folder, then they can create nested Folders beneath it. If the user either has View or Modify access to the folder, then this setting allows you give user to create any other Folders beneath it. | All options deselected by default |
High Availability Options Tab
| Setting Name | Description | Default Value |
|---|---|---|
| Specify how often the High Availability instance should check for new or updated account type images | How frequently the High Availability instance should check for new or updated custom account images. If there are any new or updated images, they will be written to disk on the schedule provided | 60 |
| Send an email alert to Security Administrators (role below) when a user accesses the Passive High Availability instance | When a user accesses the High Availability instance of Passwordstate, you can send email alerts to Security Administrators with the selected following role(s). This is useful as it gives you the opportunity to investigate why the user is accessing the High Availability instance, when they should be accessing the Primary instance. | System Settings |
Note: If you are using an Active/Passive configuration for High Availability, your HA instance will be 'Read-Only' for users. When in Read-Only mode, all actions are still audited, with audit data being merged back into the primary database. Even if the primary database is offline, it will be merged back in later when the database is once again available.
Hosts Tab
The Hosts tab has various options for default settings for newly created Hosts records, and also various connectivity settings when making connections to Hosts during Account Discovery, or Password Resets.
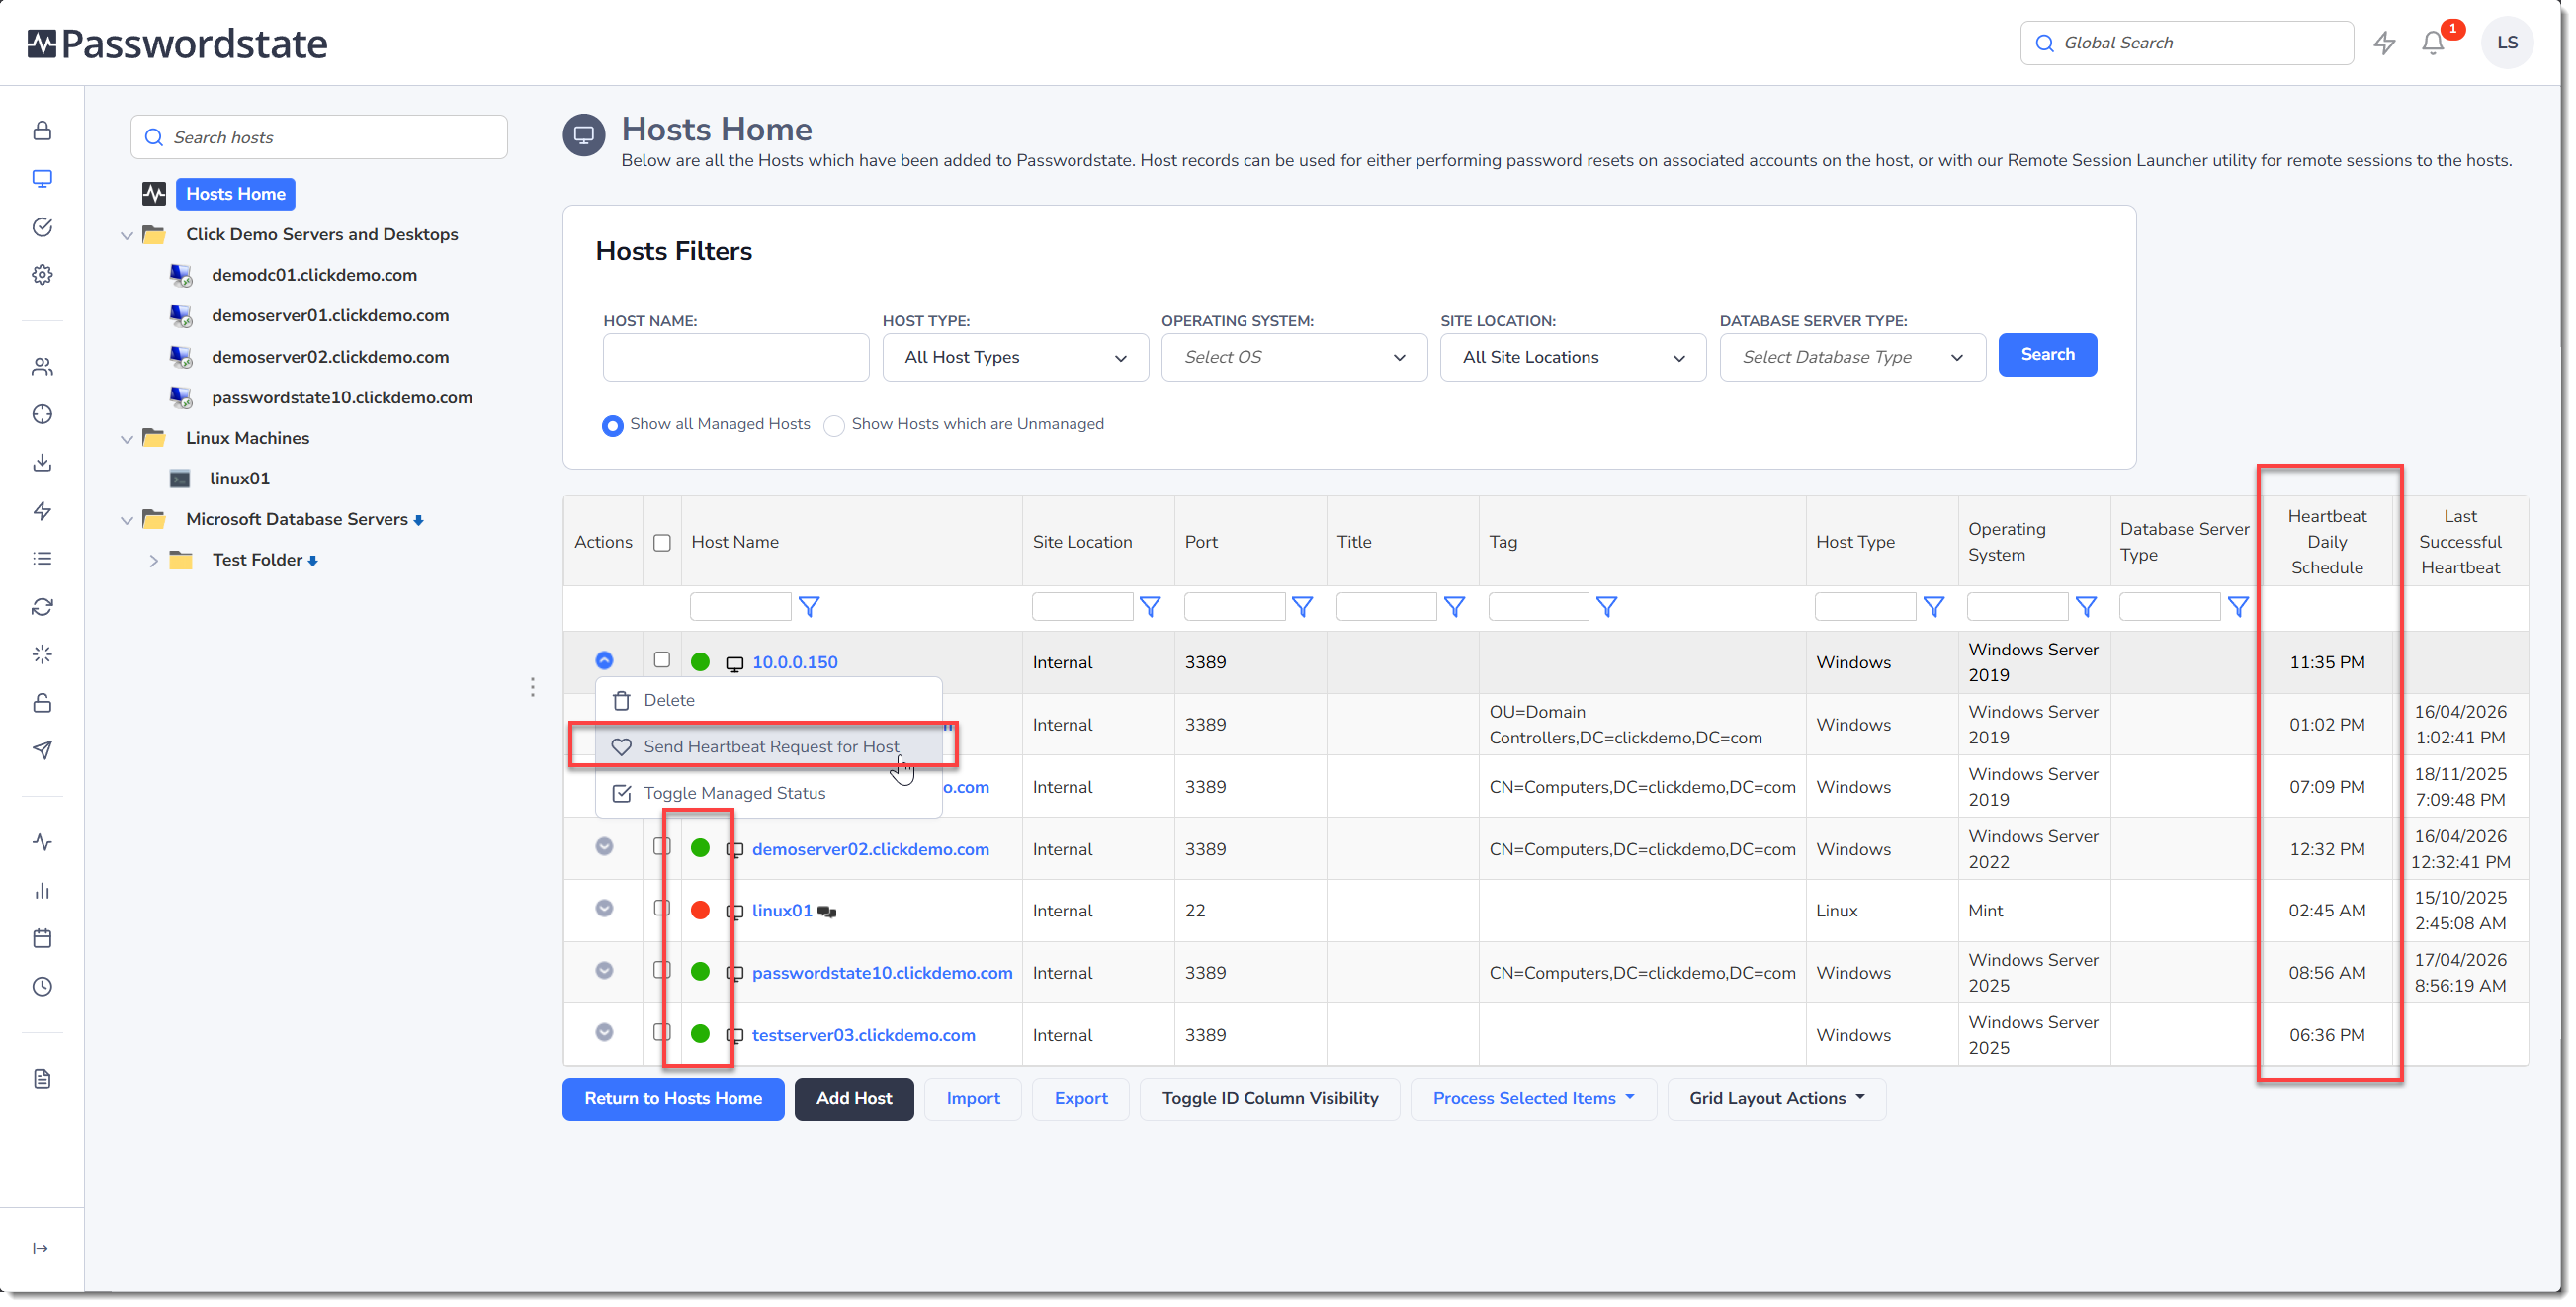
Each Host in the system has a random daily schedule configured to perform a host Heartbeat. When the Heartbeat schedule occurs, Passwordstate reaches out to the remote host to determine whether it is online. A Heartbeat test will first attempt to Ping the machine and if that fails, it will try an Open Port test. If one of these tests succeeds, then the result is a Success, otherwise it's a Fail.
The result of this heartbeat test is displayed as per the following screenshot, and you can trigger a manual Heartbeat test at any time, on any host. This page below is when browsing to Hosts Home -> View All Host Records:
Settings related to Hosts
| Section | Setting Name | Description | Default Value |
|---|---|---|---|
| New Host Record Default Settings | When adding new Host records into Passwordstate, use the following as the Default Virtual Machine Type | As Hosts are added into Passwordstate, where that be manually, or via a Discovery Job, this setting allows you to choose the default hosts type | VMWare |
| Host Heartbeat Polling | If a Managed Host cannot be reached for -xx- days in a row, then | This setting allows you to determine what happens to a Managed Host, if the Host Heartbeat feature has not had a successful result. Setting the Host to be Unmanaged effectovely archives the Host, but it still remains in the system. Deleting the Host will also delete any Password Records that is configured with the Host. | 60 days - Do Nothing |
| If an Unmanaged Host cannot be reached for -xx- days in a row, then | If a Host has been set to be Unmanaged, this setting allows you to control what happens to it, after a specific amount of time. Deleting the Host also deletes any Password Record that is configured with the Host. | 365 days - Do Nothing | |
| For the Heartbeat Ping Test, use a Packet Size of -xx- bytes | If your Hosts are failing the Heartbeat test, adjusting this packet size can be a good way to troubleshoot if this is a network issue | 32 bytes | |
| For the Heartbeat Ping Test, send -xx- echo requests, with a timeout of -xxxx- milliseconds | This feature allows you to adjust the how quickly a Host Heartbeat takes to complete | 2 echo requests - 1000 milliseconds | |
| For the Heartbeat Open Port Test, use a timeout of | Some hosts take longer to perform open port tetss on, so you can expand the time in this setting if needed | 3000 milliseconds | |
| Host Connectivity Timeout Settings | Set the connection timeout for the remote host | When any Discovery Job, Password Reset or Account Heartbeat occurs which is linked to any of your Hosts, this setting can be adjusted to allow for more or less time to establish a connection to the machine. | 30000 milliseconds |
| Set the maximum duration for any operation | When any Discovery Job, Password Reset or Account Heartbeat occurs which is linked to any of your Hosts, this setting can be adjusted to allow for more or less time to complete the execution of code on the machine. | 120000 milliseconds | |
| Remote Session Authentication Tokens | Specify Time to Live (TTL) for temporary remote session authentication tokens | Use this setting to allow for more or less time to establish RDP and SSH sessions to Hosts. | 10 seconds |
Job Scheduling Engine
The Job Scheduling Engine is where you set up an execute all kinds of Jobs to run from Passwordstate. These settings can relate to Account or Discovery Jobs, or possibly custom Powershell Jobs you have set up which are executing within your network.
| Setting Name | Description | Default Value |
|---|---|---|
| When executing Jobs against one or more Host Records, use the following number of multithreaded processes for connecting to hosts | Some jobs can connect to hunderds or thousands of Hosts on your network. This setting allows you to force Passwordstate to use more CPU threads to speed up the Job. | 10 Threads |
| Purge Job History older that (x) days | All Jobs have a history of results, and this setting allows you to determine how long the history of that Job stays in the system. | 30 Days |
| For PowerShell Jobs, keep a maximum number of script revisions per Job of | Custom Powershell Jobs are scripts that can be developed overtime, and as a result the script may have many different revisions. Setting this option to 0 disables this feature, otherwise you can configure this to remove older script revisions if desired. | 0 revisions |
| For PowerShell Jobs, purge Executed Script Snapshots older that (x) days | Whenever any Powershell scrpt is executed, a snapshot of the full script it saved. This allows you to go back and check exactly what code was executed, if required. This setting allows you to purge these snapshots after a specific amoutn of time. Leaving the default value of 0 means these snapshots never get deleted form your system. These snapsshots are saved directly in the Passwordstate database, and take up minimal room. | 90 Days |
| For PowerShell Jobs, user must have access to all the inputs in order to change the PowerShell script | Custom Powershell jobs can have Inputs assigned tot hem, which can be data from different areas of Passwordstate such as data from Password Records as an example. This setting allows you to prevent a user who is running the Custom Powershell job from modifying the script before running it, if they do not have access tot he data (input) in the system. | Yes |
| For PowerShell Jobs, look for the following phrase on the last line of the script output to determine successful execution | When creating custom Powershell Jobs, you can send a specific word back to Passwordstate to confirm if the Job was a success. You can customize this word in this setting. | Success |
| For PowerShell Jobs, look for the following phrase anywhere in the script output to determine a failed execution | When creating custom Powershell Jobs, you can send a specific word back to Passwordstate to confirm if the Job was a failure. You can customize this word in this setting. | Failed |
Miscellaneous
The Miscellaneous tab has multiple settings which don't necessarily apply to any of the other Tabs.
| Setting Name | Description | Default Value |
|---|---|---|
| Default Locale (Date Format) | Applies date formatting rules to any date fields you see in Passwordstate. If users are located in a different region to what is set system wide, they can specify their own date format as part of their Preferences. | English (Australia) - d/MM/yyyy |
| Inactivity Time Out | Allows you to specify the period in which users will be automatically logged out of Passwordstate if their session is inactive. | 10 minutes |
| Specify the Base URL for your site, which is used within the body of emails, permalinks, etc | This URL field is used for several features within Passwordstate, and must be accurate for the following features to work properly: Links in emails, Browser Extensions, Permalinks, Self Destruct Messages, Reports. | Custom URL you set during the install of Passwordstate |
| Force HTTPS - Redirects all Web Tier traffic to HTTPS and blocks API requests (403 Forbidden) if HTTPS isn’t used - Requires an IIS HTTPS binding on port 443 | When set to Yes, if the user types HTTP into the browser address bar, they will be redirected to HTTPS - which securely encrypts all traffic between the user's browser and the website. The API will return a 403 Forbidden message if HTTPS is not used. | Yes |
| Show a loading animation when expanding or collapsing nodes if the Passwords Navigation Tree has more than this number of nodes | If you have many Password Lists and Folders visible in the Navigation Tree for your users, there may be a small delay in expanding/collapsing tree nodes. If this is the case, you can display a loading animation icon during the expand/collapse process - so your users are aware something is in progress. This generally isn't required, but may be desirable if you have 500+ Password Lists/Folders. | 500 nodes |
| Retries when generating a password to ensure it meets the selected Password Strength Policy | When using the Password Generator feature to generate new passwords for a Password List, the Password Generator tries to create a password which matches the Password Strength Compliance level set for the Password List. Depending on the settings for the selected Password Generator Policy, it's possible the generating of passwords may get itself in an endless loop trying to match the Password Strength Compliance level, so this setting tells the generator when to give up trying and simply use the last generated password. | 250 retries |
| Limit the size of scheduled HTML email reports to | When scheduled reports are emailed out to end users, you have to choice to send them embedded in the body of the email in HTML format, or attach the results in a CSV file. This setting allows you to cap the amount of data that is sent in the HTML based report. For larger reports, we recommend sending the results as a CSV. | 1.0 MB |
| Enable the -UseSSL parameter in PowerShell Invoke-Command scripts | Enable the -UseSSL parameter for PowerShell script usage, which uses the Secure Sockets Layer (SSL) protocol to establish a connection to the remote computer. WS-Management encrypts all PowerShell content transmitted over the network. The UseSSL parameter is an additional protection that sends the data across as HTTPS, instead of HTTP. | No |
| Use case-insensitive contains comparison when evaluating Blacklisted Passwords | If the use of Blacklisted Password detection is enabled on Password Lists, this setting means the blacklisted password can be detected anywhere within the string, not just the blacklisted password on its own. i.e. "mypassword" would be deemed as a blacklisted password, as it contains the word password. | No |
| Prevent Security Administrators from adding themselves to Local Security Groups, and from adding any user accounts to those groups on the User Accounts screen | If you wish to allow or restrict Security Administrators from adding their own account to any Local Security Groups, then you can use this setting for that purpose. | No |
| In the Passwords Navigation Tree, sort alphabetically by | By default, sorting in the Passwords Navigation Tree is done by Folders first (at the top), and then Password Lists beneath them - just like a Windows File System. You can change this behavior if required, where sorting is simply done alphabetically, regardless of Folder/Password List node type. | Folders first, then Password Lists |
| When displaying URL columns in grids, display the URL value as a | If you have a Password Record with a URL assigned to it, there are two formats the URL can be displayed in when viewed in the Passwords grid - either a hyperlink text field, or hyperlink Icon - both of which will launch the URL when clicked on. | Icon Hyperlink |
| Hide the password value when editing a Privileged Account Credential in Administration – Privileged Account Credentials | Shoulder surfing is the unauthorized viewing of sensitive information by observing a user’s screen, typically by someone physically nearby. This option further strengthens the security of Passwordstate, by now showing passwords on the screen for these highly privileged accounts. | No |
| Allow users to manage only the credentials they have explicit access to in Administration – Privileged Account Credentials | If you have multiple teams who need to add/edit Privileged Account Credentials, but each team is not meant to see or have access to each other's credentials, then this option allows this. | No |
| Allow documents to be uploaded into Passwordstate | If you don't want your users uploading documents into the Passwordstate database, you can set this option to No. | Yes |
| Limit the size of documents which can be uploaded to | If needed, you can also limit the size of documents which can be uploaded into Passwordstate. | No Restrictions |
| Restrict uploading of documents to the following extensions only | In addition to limiting the size of documents, you can also limit the type via their extensions i.e.docx, .mp4, etc. | docx,xlsx,doc,xls,rtf,pdf,txt,crt,cer,pem,key,pfx,p12,der,p7b,p7c |
| Disable the popup Guided Tour for new user accounts | If you do not wish new user accounts to see the popup Guided Tour window when they first log into Passwordstate, then you can disable this feature - the guided tour is still available under the Help menu if required. | No |
| On the Permalink screens, allow the following types of user roles to see the list of email addresses stored in Passwordstate | If you wish to hide all the email addresses registered in Passwordstate on the Permalink screens,you can restrict visibility to just Security Administrators by selecting this option | All Users |
| For Provide a Reason setting, ensure reason conforms to Regex Pattern Match below | If you wish input for the Provide a Reason setting on Password Lists to conform to a certain set of formatting rules, you can use this Regex Pattern Match setting | Empty/Blank |
| For Provide a Reason setting, show the following usage instructions | For the Provide a Reason setting on Password Lists, you can guide users as to the expected input required by using this setting | Empty/Blank |
Mobile Access Options
The Mobile Access Options tab allows you to specify multiple settings for how the Passwordstate native apps for iOS and Android behave for your users.
In order to use the native iOS and Android Apps for Passwordstate, you must install the Passwordstate App Server module. This Appserver sets up a website that you mobile phones must connect to in order to sync data to and from their mobile apps.
Instructions to install the Passwordstate App Server can be found on this page: AppServer Install Instructions
Once installed, you can configure different settings for your Mobile Apps on this page.
| Section | Setting Name | Description | Default Value |
|---|---|---|---|
| Mobile App Settings | Protect against brute force dictionary authentication attempts by locking out an active session after the following number of failed login attempts | As the Mobile Access website is generally externally accessible from your internal network, this setting will mitigate against any brute force authentication attempts by locking out authentication attempts when this setting has been reached. | 3 failed login attempts |
| When adding new permissions to Password Lists, enable Mobile Access by default | When adding new permissions to a Password List, you can use enable/disable Mobile Access by selecting the appropriate option here. | Yes | |
| Select whether you would like Passwords Masked or Visible | You can choose whether to automatically show passwords in the Mobile App by default, or mask them. To view a masked password, you simply press and hold over the top of the masked password, and then you will be given various options. | Mask | |
| Prevent Password Lists with "Additional Authentication" option set from being used within the Mobile App | Password Lists have a setting where you can choose to use an additional authentication method, before getting access to the credentials in the Password List. The Mobile App does not have the same feature as the main UI, and this setting allows you to prevent, or allow, these Lists to be available in the Mobile App. | Yes | |
| Prevent Password records which are configured for "Check In/Out" from being used within the Mobile App | Password Records can be configured with a feature called Checkout/Checkin, which can give the users exclusive access tot hose records in the main Passworddstate website. The mobile apps do not support this feature, so you can choose whether or not to sync these types of Password records into the mobile apps witht his setting. | Yes | |
| Select the Password Strength Policy the user's Master Password for Authentication must adhere to | Users authenticate to the Mobile App using a master password of their own choice, which can be set on their Preferences screen. To ensure users are using strong passwords, you can select which Password Strength Policy their master password must adhere to. | Default Policy | |
| Specify the number of days the user can access their offline cache before they need to re-authenticate again to the Passwordstate App Server | When the number of days is reached for this setting, the users will need to re-authenticate to the Passwordstate App Server to re-synchronize their data. | 7 days | |
| Mobile App URL and Security | Specify the URL for your Passwordstate App Server installation | Once you have installed your Passwordstate App Server, you need to specify your URL here. | Empty/Blank |
| Reset App Pairing Secret for Passwordstate App Server | This is a security feature, with the App Pairing secret being automatically created for you. If you ever need to generate a new secret, you can do so | App Pairing Secret is Currently Set | |
| Passwordstate App Server's SSL Public Key | If your AppServer website ever needs the certificate changed, you'll need to requery the SSL public Key on the certificate using this button. This is another security feature, for mitigating against Man-in-the-middle attacks. | Empty/Blank |
Important: Changing the Passwordstate App Server's URL, SSL Certificate, or the App Pairing secret, will require your users to rescan the Mobile App Server QR Code on their Preferences screen.
Password List Options Tab
The Password List Options Tab provides multiple settings which are applicable to Password Lists in Passwordstate.
| Setting Name | Description | Default Value |
|---|---|---|
| Allow users to export passwords from their Private Password Lists | If you wish to prevent users from exporting passwords from their Private Password Lists, you can do so by selecting this option. | Yes |
| Allow Password List Administrators to export passwords from Shared Password Lists | If you wish to prevent users from exporting passwords from any Shared Password Lists, you can do so by selecting this option. | Yes |
| Select which Code Page to use when Importing or Exporting data | When importing or exporting data, you can specify the default Code Page which will be used for character encoding - A Code Page consists of a table of values that describes the character set for a particular language. By default, all Password Lists will use the Code Page you specify here, but can be changed to use a different Code Page by editing the Password Lists settings. | Use Web Server Default Code Page |
| When creating nested Password Lists, users must have the following permissions on the parent Folder | By default, if a user had Administrator access to a Folder, then they can create nested Password Lists beneath it. If the user either has View or Modify access to the folder, then this setting allows you to specify if they are allowed to create any Lists beneath it. | All options are deselected by default |
| Modify permissions for Password Lists can (Add, Edit or Delete Passwords) | When a user is given Modify permissions to a Password List, the default options allows the user to add new passwords, and edit or delete existing passwords. You can modify this default behavior by unchecking one or more options here. | All options are selected by default |
| Allow users who have modify rights to a Password List to delete the Password List | By default, only Administrators of Password Lists have the ability to delete the entire Password List. This option allows you to give users with Modify Access to tability to delete the Password List. | No |
| To access the Recycle Bin for Password Lists, you must have at least the following permissions on the Password List | With this option, you can control which users are allowed access to the Password List Recycle Bin, based on their permissions on the Password List - either Administrator or Modify rights | Modify Rights |
| Prevent Security Administrators from granting themselves password access in the Administration area, either directly or through security groups they belong to | If you wish to prevent Security Administrators with the Password Lists role from being able to grant themselves access to Password Lists via the Administration area, you can check this option. | No |
| When creating a Password List and copying permissions from another list or template, also grant permissions to the creator | When creating new Shared Password Lists, if permissions are being copied from another Password List or Template, this option allows you to also add permissions for the user who is creating the Password List - so instead of just cloning permissions, you can also add the creator's account as well. | Yes |
| Hide the Inbuilt Password List Templates from all users | Passwordstate comes with some default Inbuilt Password List Templates which can be used as a basis for creating new Password Lists. If you do not want your users to use these Inbuilt Templates, this option allows you to hide them. | No |
| When copying settings from a Template to a Password List, also copy the following field values | By default, the Password List Name and Description fields aren't populated when copying settings from another Password List or Template. With these two options you can choose to copy them if needed. | All options are deselected by default |
| On screens that show Password List Templates | When creating a new Password List, users may have the ability to base all settings off a Password List Template. These Templates can have different permissions for different users assigned to them. This setting allows you to control if users are able to see all Templates in the system, or only the ones which they have been given explicit access to. This setting can be handy if you want different teams in your organisation to have different templates to choose from, but not necessarily see other team's Templates. | Show all templates regardlessof the user's permissions |
| When copying and linking settings from a Template to a Password List, allow a different image for the Password List to be selected | If you want to be able to select a different image to be associated with a Password List when copying settings from a Template, then set this option to Yes | Yes |
| When creating a new Shared Password List, let the user override any settings or permissions copied from a Template by a User Account Policy or User Preferences | When creating Shared Password Lists, it's possible to copy settings from Templates, and users can configure which template to copy from under their own personal preferences. Security Administrators can also set up a User Account Policy to copy settings from a Template each time a new Password List is created. This setting will prevent the users from changing any settings during the creation process, so the new Password List is exactly the same as the template it is copying from. | No |
| When creating new Private Password Lists, if there is a User Account Policy setting which copies settings from a Template, allow the user to override these settings | When creating Private Password Lists, it's possible to copy settings from Templates, and users can configure which template to copy from under their own personal preferences. Security Administrators can also set up a User Account Policy to copy settings from a Template each time a new Password List is created. This setting will prevent the users from changing any settings during the creation process, so the new Password List is exactly the same as the template it is copying from. | No |
| When creating a new Password List, and copying settings from a Template, automatically select the option to link the Password List to the Template | When creating a new Password List, and you copy settings from an existing Password List Template, you can choose to automatically link the Password List to the template if required. | No |
| When creating a new Password List, and the settings are being Linked to a Template, allow users to uncheck the option for linking it to the Template | If you want to enforce a Password List to be linked to a template, then you can set this option to No - the users will not be able to uncheck the option which links the Password List. | No |
| Allow users to copy/move/link passwords to Password Lists which they have View access to | It's possible for your users to copy or move passwords around between different Password Lists they have access to. By selecting this option, you allow them to copy/move/link passwords into Password Lists they only have View Access to. If deselected, they will only be able to do so to Password Lists they have Modify or Admin access to. | No |
| When copying/moving/linking passwords between Password Lists, allow users to view all Password Lists, not just the ones they have access to | When your users copy/move/link passwords between different Password Lists, by default they will only be able to see the 'destination' Password Lists on the screen which they have been given access to. It's possible you may have a requirement to allow them to copy/move/link into Password Lists they don't have access to, and by selecting this option they will be allowed to do this. | No |
| When searching for users in order to grant them access to Password Lists, only show users who are in the same Security Groups as the person granting the access | There are various screens under the Passwords, Hosts or Jobs pages where users can apply permissions for other user accounts, which gives those users access to a certain features or data. By selecting this option, they will only be able to see/search for users who are in the same Local or Active Directory Security Groups as themselves. | No |
| When a new User Account is added to Passwordstate, automatically create a Private Password List for the user | If you would like all new User Accounts added to Passwordstate have a Private Password List created for them, you can set this option to Yes - and also name what the Password Lists should be titled as. Users can then make modifications to settings on these Password Lists when they first access them if required | No + My Private Passwords |
| When a new User Account is added to Passwordstate, automatically create a Shared Password List for the user | Similar to the above feature, you can also create a new Shared Password List for the user, when their account is created/added into Passwordstate | No + [FirstName] [Surname]'s Passwords |
| Show the Account Types label next to the Image within each of the Password Grids | In each of the different Password Grids, it's possible to display the Account Type column. In this column you can show just the image for the Account Type, or the image and the label for the Account Type | Yes |
| Hide the 'Password Last Updated' column on each of the Password Grids | If you do not want the Password Last Updated Column showing in each of your Password Lists, you can set this option to Yes. | No |
| When a new Shared Password List is created, apply the following permission to the user who created the list | When new Password Lists are created, the default option is to provide the user Administrative rights to the Password List. If required, you can change this default behavior to either Modify or View permissions | List Administrator |
| Allow permissions to be applied multiple times for a user/security group to the same Password or Password List | By default, whena user or group is given access to a List, only the highest level permission value will be stored on the list. This setting allows you to assign mulitple levels of permissions. This is a legacy setting from an older build of Passwordstate, and shoudl typically not be set to Yes. | No |
| Allow users to view Password List and Folder permissions when they are not Administrators of the Password List | Under certain circumstances, you may wish to allow the application of multiple permissions to a Password List, Password record or Folder, for user accounts or security groups. If this is a requirement, you can check this option. | Yes |
| For Private Password Lists, hide the menu option 'Convert to Shared Password List' | Under each Password List grid there is a drop-down list called List Administrator Actions. The majority of options in this drop-down list are only accessible to Administrators of the Password List. If a user does not have Administrators rights to the Password List, it might still be useful if they can see what other users or security groups have access to the Password List. By enabling this option, the View Password List Permissions feature will be available to them - they will only be able to view permissions, not change them. | No |
| When new Shared Password Lists are created, grant Security Administrators with the selected role below admin rights to the Password List | As new Password Lists are created, you can also choose to automatically grant one or more Security Administrators of Passwordstate administrative rights to the Password Lists. You can do this by selecting the All Security Administrators option, or just the ones who are assigned a specific Security Administrator role. | Do Not Provide Admin Access |
| When a Password List is deleted, send an email alert to Security Administrators with the following role | If you want Passwordstate Security Administrators to be notified immediately when a Password List is deleted, set this option to the appropriate Security Administrator role. | Password Lists |
Password Options Tab
The Password Options Tab has multiple settings applicable to Password values being visible on the screen and Blacklisted Password detection.
| Setting Name | Description | Default Value |
|---|---|---|
| Synchronize the 'Deleted' status of Linked Password records across all affected Password Lists | When Password records are copied & linked between different Password Lists, you can use this option to specify whether all of the linked records are moved to the Recycle Bin when one of them is deleted. If the option is not selected, the other linked records will remain visible in each of their respective Password Lists. | Yes |
| Enable the View & Compare History of Changes menu option for Password records for users who have the following permissions to the Password List | There is a View & Compare History of Changes menu action for each and every Password record. You can control which users are allowed to access this menu, based on their permissions to the relevant Password List. | All options are selected by default |
| On the View & Compare History of Changes screen for Password records | When viewing the History of changes to a Password record, you can choose to either show, mask, or hide the password field on the screen | Show the value of the password fields |
| Show the menu 'Copy or Email Password Permalink' in the Actions menu for Password records | If you do not wish users to email password permalinks directly from Passwordstate, you can disable this using this option | Yes |
| Prevent users from using their 'Personal' Password Generator Policy settings | If you don't want user to be able to user their Personal Password Generator policy settings, you can disable it my setting this option to no. | No |
| Allow users to use the 'Expire Password Now' menu when they only have View access to the password | If a password is configurd for automatic resets with other systems, such as Active Directory as an exemple, expiring a passwrod on these records will automatically reset the password for that account to a random password. This setting allows you to grant a user with View access to the password record the ability to expire passwords from the Actions menu. | No |
| When adding new password records where the Password List is configured for Password Resets, do you want to automatically check the Password Reset and Account Heartbeat checkboxes | On the Add/Edit Password screens, you can choose the default behaviour for the Enabled for Resets and Heartbeat checkboxes - this will apply to all Password Lists which are enabled for resets. | Yes |
| When clicking on the Password Generator icon on the Edit Password screen, highlight and reveal the new password to indicate to the user a new password has been generated | The intention of this feature is to make it obvious to the user they have clicked on the Password Generator icon, and that the password has changed. Please note the highlight does not occur with the Chromium Based version of Microsoft Edge. | Yes |
| For Password records in the Recycle Bin, automatically delete these records after the number of specified days below, based on the date the record was deleted | With this feature, you can choose to not automatically purge records from the Recycle Bin, or you can purge them after a set period of time. | Do Not Delete |
| With the Password Generator on the menu Tools - Password Generator, select the following Password Generator Policy as the default | You can also select which is the default Password Generator Policy the users can use, and prevent them from selecting a different policy as well. If a Password List is configured to Force the use of a specific policy, then that setting will override this one. | My Personal Generator Options + No |
| With the Password Generator icon in the top right-hand side of the screen, use the following Password Generator settings to generate random passwords | If you do not want users to use their personal Password Generator settings for the Password Generator on the top right-hand side of the screen, then you can force the use of a different one using this setting. | My Personal Generator Options |
| For the Passwords column in grids, show a fixed character length for the password i.e all records set to *********** | When your users add or edit password records, you can choose to either alert them when 'blacklisted passwords' are detected, as per the list stored in the Blacklisted Passwords screen, or you can allow blacklisted passwords to be used. If a blacklisted password is detected, you can specify which Password Strength indicator you would like to be assigned to the password record. | 0 |
| When users are 'Requesting Access' to passwords, hide the following fields due to possible sensitive information being stored in them | From the Passwords menu on the left hand side of the screen, users are able to request access to either Password Lists or individual Passwords they don't already have access to - assuming you have enabled this feature for them. As viewing password related data can be sensitive by its very nature, you can choose to hide various fields on the screen from your users, either the Username, Description or Notes fields. | All options are delelected by default |
| Allow users to create password records when they only have Guest permissions to the Password List | When a user is given access to individual passwords in a Password Lists, as opposed to permissions being applied to the Password List itself, the user is given Guest rights to the entire Password List. This is so the Password List will show in the Navigation Tree on the left-hand side of the main screen. By selecting this option, you will allow users who have Guest access to also create new passwords in the selected Password List. If this option is enabled a user creates a new Password record, they will be given Modify rights to the individual Password record they are creating | No |
| Allow users to create password records when they only have View permissions to the Password List | When a user is given View access to a Password List, by default they cannot add password records to the List. By setting this option to Yes, they will be able to add new records. Even after the user adds new records when using this option, they will still only have View access to all records in the Password List. | No |
| Automatically hide visible passwords based on the following conditions | It's possible to use Fixed Length Password Masking in Passwordstate, as an added security measure. By using this feature, the screens which show a masked password like ****** will all be of the same length, regardless of how many characters the Password field consists of. | Set Time - 10 Seconds |
| On screens, or via the API, where you can generate multiple random passwords, enforce limits on the following features | By clicking on any masked passwords in the grid view, i.e. *******, or the icon on any of the add/edit/view password screens, the password will be revealed to you. There are 3 different options for how quickly you wish the password to again be masked, and they are: Set Time - one set time period for all passwords in seconds, regardless of their length and complexity. Password Complexity - here you can specify 5 different time intervals in seconds, each for the different Password Strength ratings. Password Length - here you can specify up to three different time periods based on the length of the password fields i.e. if the password field is 20 characters in length, you probably would need it to be displayed longer on the screen compared to a record which is only 5 characters long | Number of Passwords = 100. Maximum Password Length = 500. Number of Word Phrases = 500 |
Password Reset Options
This page relates to password records that are set up for automatic resets with other systems, with a majority of settings relevant to On-Premise Active Directory accounts:
| Section | Setting Name | Description | Default Value |
|---|---|---|---|
| Active Directory Accounts | When resetting passwords for Active Directory accounts, validate the passwords match before allowing a password to be changed | This setting forces a Heartbeat check to confirm the password stored in Passwordstate matches what's stored in AD, before a password reset is to occur. This can act as a security measure to prevent users of Passwordstate making changes to AD accounts if they don't know what the password currently is i.e. it will prevent them from adding a record with any password value, and then performing a reset after that | No |
| For Password Lists which are enabled for resets, prevent changes to the Username, Domain and Host Name fields when editing password records | For Password Records that are set up for automatic password resets, this setting can prevent users from modifying the Username, Domain or Hostname on the record. It does this by making the field Read Only for all users, regardless of permission level, so users cannot attempt to reset a password for an account the original password record wasn't created for. | Yes | |
| Enable the Password List setting of 'Show Active Directory Actions for Passwords which are enabled for Reset' | If this option is enabled, it will provide a setting on your Password Lists, which when enabled will reveal a new tab on the Edit Password screen called Active Directory Actions. This tab allows vaious funcitonality for Active Directory account, such as enabling or disabling the Active Directory account, or maybe forcing the user to change the password at the next login as an example. | Yes | |
| After an Active Directory account password is updated, wait for the following time period before starting any associated Password Reset Tasks (Dependencies) | If you have Active Directory Accounts set up be used as Identities for Windows Services, IIS Application Pools or Scheduled Tasks, this setting allows you to pause any resets out on those Identies, after the AD password has been reset/updated. This would generally be used to allow your Domain Controllers to replicate changes for the account, before password resetting of any Windows Services, etc, were to happen. | 60 Seconds | |
| Miscellaneous Settings | Purge any failed Password Reset data after the following number of days | If a password record is set up for automatic resets, and a reset fails for any reason, the password that it was attempting to be update to can be found in the Recent Activity Auditing gris on the Password List. This settin helps clean up that auditing data after a time frame of your choice. | 90 Days |
| Select which types of Password Lists are allowed to be configured to perform Password Resets | You can also specify what types of Password Lists can have the option Enable Password Reset enabled - you can restrict this for either Private or Shared Password Lists if required. | Shared Password Lists | |
| Path to where you have installed the Oracle Data Access Components (ODAC) | If you are also performing Password Resets and Account Validation for Oracle accounts, you can set the path to the installed Oracle Access Data Components here (ODAC) - this only needs to be modified if you've installed to a different path other than C:\oracleodp | C:\oracleodp |
Self Destruct Messages
The Self Destruct Messages features allows you to send password record related messages to recipients, or just general messages with whatever content you like.
There are 3 types of Self Destruct Message websites which can be used, and they are:
- The Self Destruct site that is embedded within your normal Passwordstate installation. This is all installed and set up automatically when installing the core Passwordstate product.
- The external Push/Pull deployment option. With this version, the site is installed separately to your main Passwordstate website, and all data to the Self Destruct Message website is "pushed/pulled" from your main Passwordstate instance. This install of the Self Destruct message website uses a local SQLite database, and has no requirements to communicate back to your Passwordstate web server or database. Ideally, this version would be used if you had users who wanted to receive Self Destruct Messages from outside your company firewall. The idea being you install this Push/Pull version in your DMZ, and there's no open port requirements from your DMZ back into your internal network for this to fully function.
- You can install the AppServer module separately to your main Passwordstate website. This AppServer version connects directly to your Passwordstate SQL database, so this option is not ideal if hosting in a DMZ. You would only use this option to host the Self Destruct messages on another server on you internal network, perhaps to take some load off your main Passwordstate webserver. This AppServer is rarely used for Self Destruct messages, as the Self Destruct feature is very light on resources.
Some notes about this feature are:
- Recipients of Self Destruct Messages does not need a license in Passwordstate in order to view messages, they just need to be able to reach your Self Destruct website, where ever you host it.
- The intention of the Self Destruct Message is that it will automatically be deleted (Self Destruct) if not viewed in the specified time period, or after a specific amount of times the message has been read.
- The Downloads for the Push/Pull version or the AppServer can be found on Passwordstate Administration Home page
- Install Guides for the AppServer or Push/Pull version can be found on the Installation Instructions page on the Click Studios website.
- When users view Self Destruct Messages, the website is also mobile friendly.
| Section | Setting Name | Description | Default Value |
|---|---|---|---|
| Self Destruct Settings | Enforce the use of Passphrase protection for every Self Destruct Message sent | By default, whoever receives a Self Destruct message will be able to view it simply by clicking on the link Passwordstate sends out to them. This setting allows you to force users to set a passphrase in order to unlock and read the self Destruct message. | No |
| Allow users to see the value of Passphrases when composing Self Destruct Messages | This setting when enabled with mask the passphrase on the screen, when a user is creating a new Self Destruct message. It can be used in conjunction with the "Default Passphrase" setting below if needed. This will mean the Self Destruct message they send will be protected with a Passphrase that they do not know the value of. | Yes | |
| Select default value for option 'Automatically self-destruct this message if not viewed in': | Configure this setting to self destruct he message after a time frame of your choice. The message will no longer be readable once this time expires. | 3 Days | |
| Select default value for option 'Allow the self-destruct message to be viewed (x) times': | Configure this setting to allow the end user to read the message as many times as you like before the message self destructs. | Once | |
| Allow users to send Self Destruct Messages via the API | Passwordstate has an API that you can use to script the sending out of Self Destruct messages, instead of sending them through the GUI. This setting can prevent messages from being sent out via the API. | Yes | |
| Default Passphrase: | If you want to set a default passphrase that all new Self Destruct messages are protected wiht, set the value of that in this field. | Empty/Blank | |
| Separate Site URL: | Leave this field blank, if you are using the default embedded Self Destruct website. If you have installed either the ApPServer module, or the Push/Pull version of the Self Destruct Portal, set the URl in this field. All Self Destruct messages will have link this URL for your end users to access the message. | Empty/Blank | |
| Push/Pull Deployment | Use Push/Pull Deployment of Self Destruct Website: | If you have installed and are intending on using the Push/Pull version of the Self Destruct Messages portal, set this option to Yes. | No |
| Encryption Key | As part of the install process, you will be asked to generate and provide an Encryption key which you can do from this setting. | Empty/Blank | |
| Communications API Key | As part of the install process, you will be asked to generate and provide a Communications API key which you can do from this setting. | Empty/Blank |
It's also possible to customize the look and feel of your Self Destruct landing page, which you can configure in this sections in the screenshot below. Instructions on how to upload your own logo and changing the color scheme can be found on the screen:
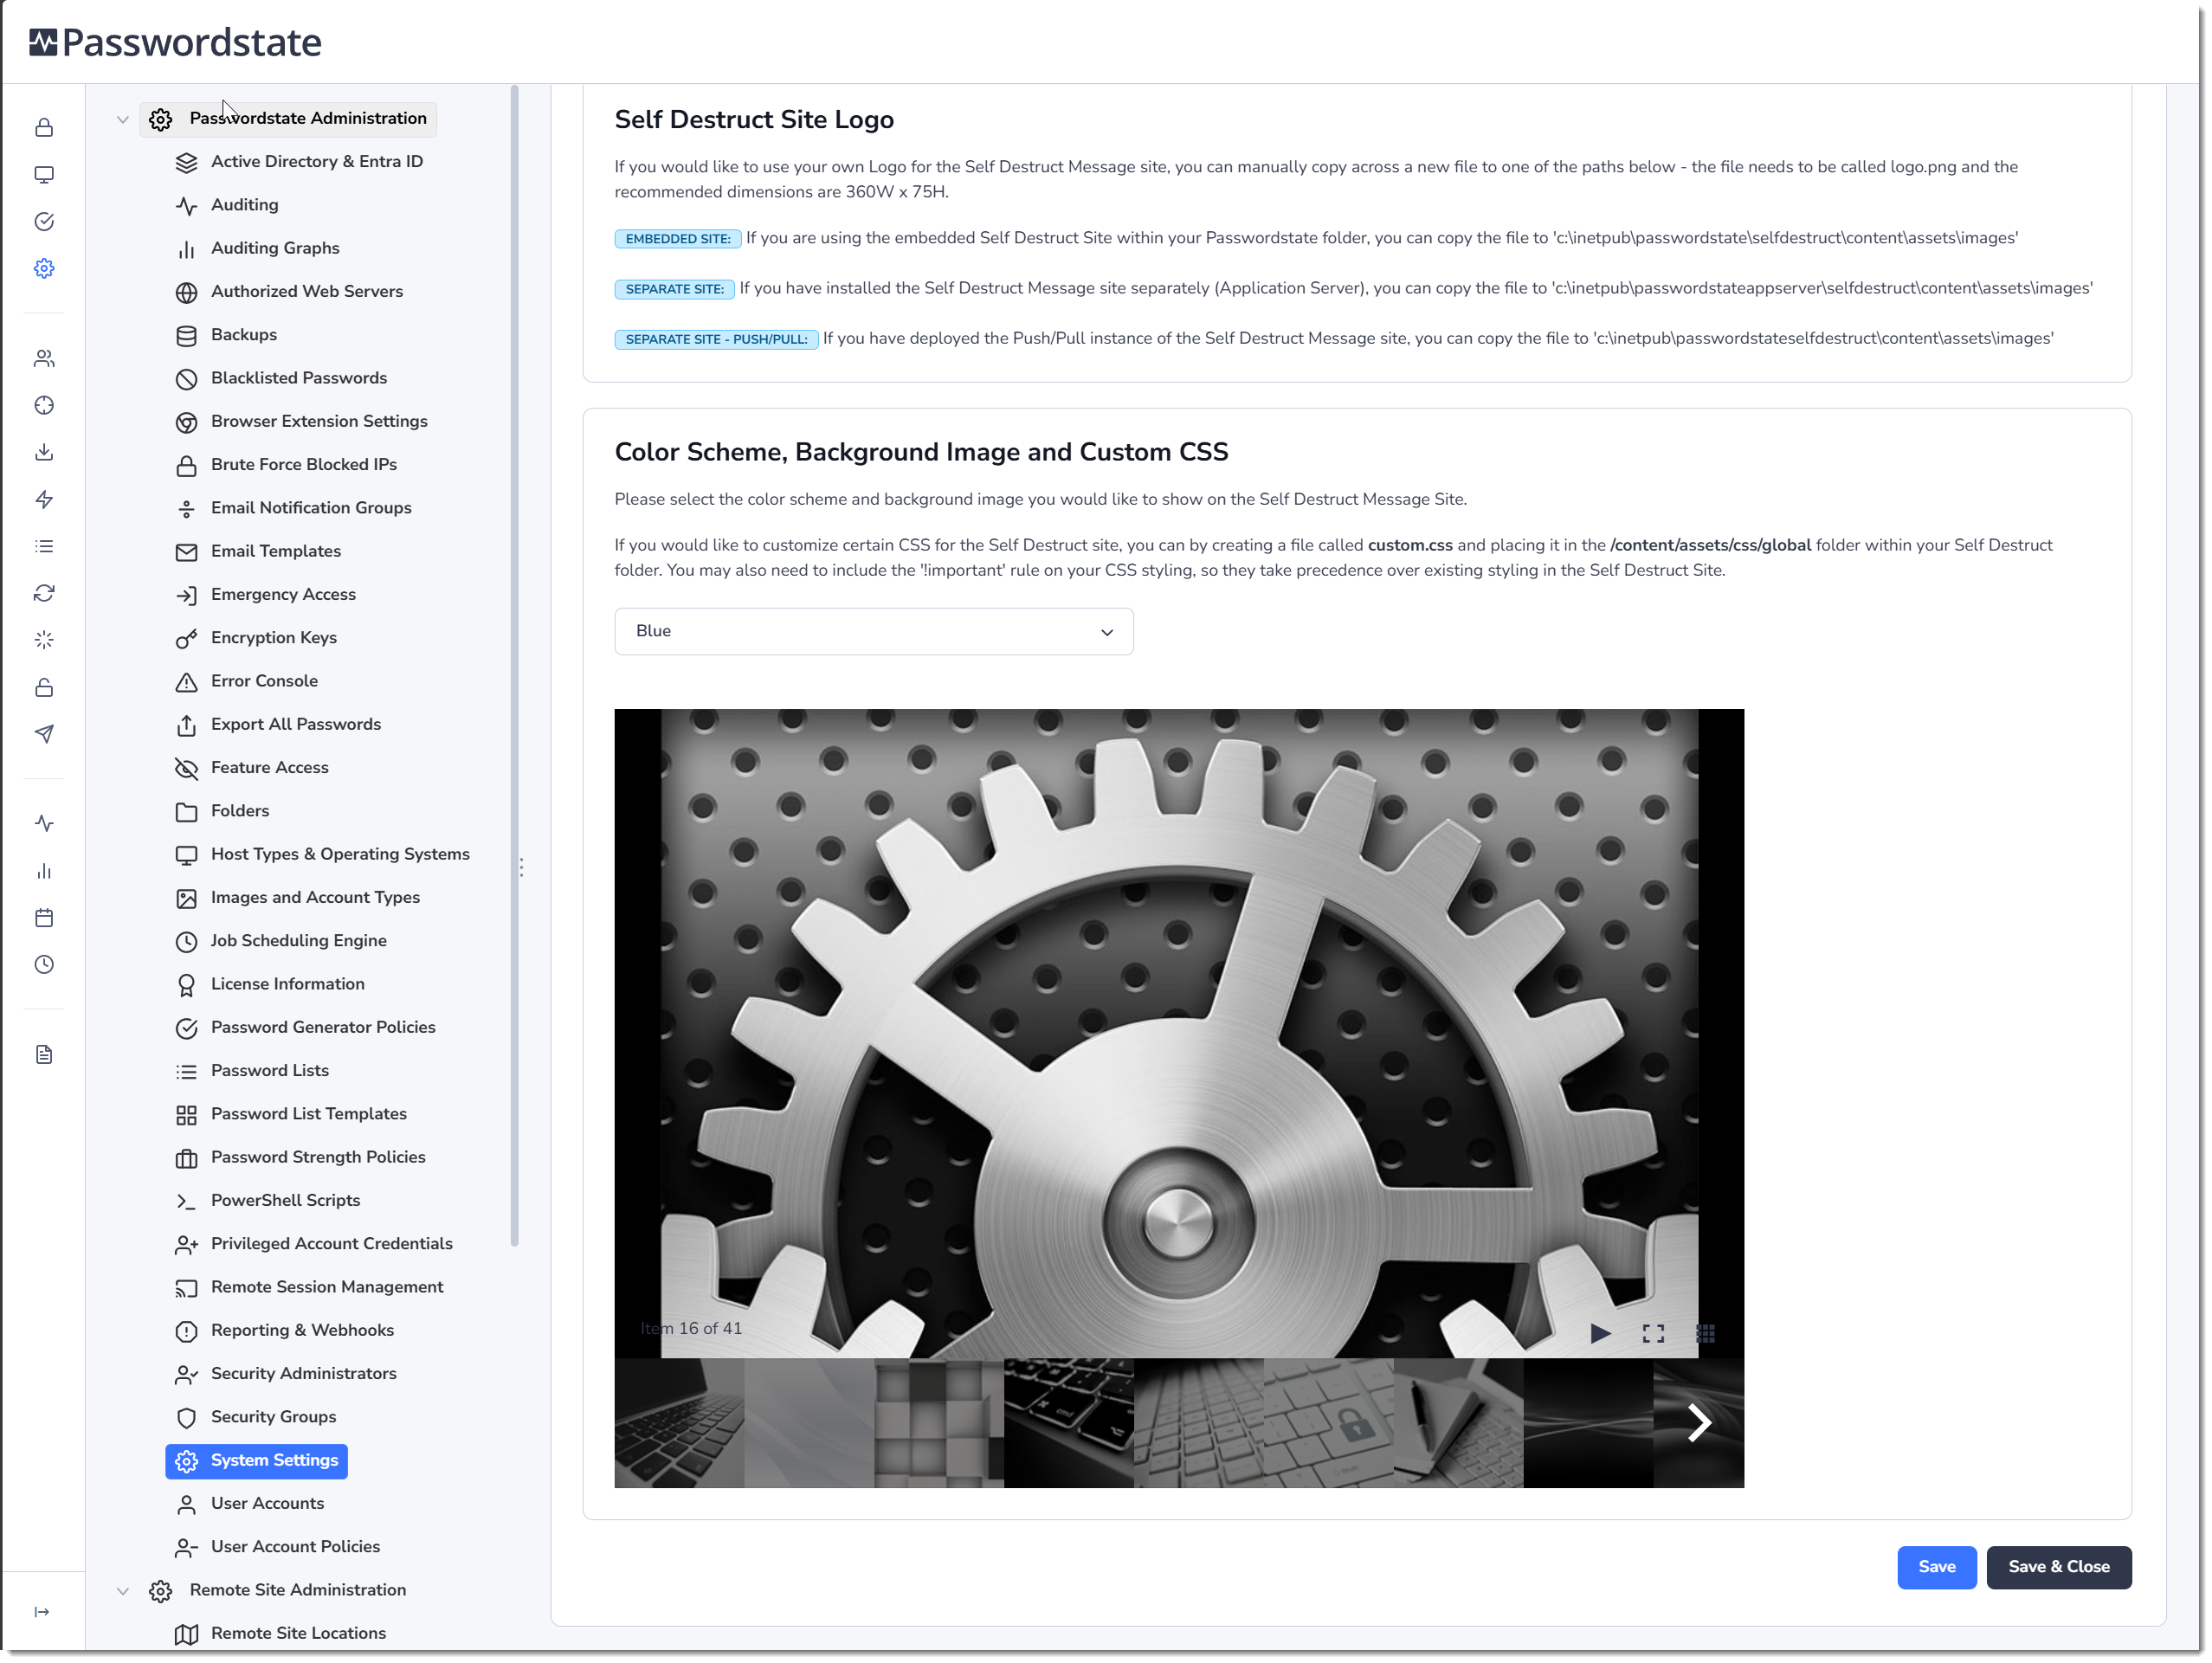
Syslog
If required, you can send all Auditing data to one of your own internal SysLog servers. The Passwordstate Windows Service which checks the your database once every minute for new data to send, and it also keeps track of the latest auditing record which was successfully sent. This results in only sending each auditing record over once to your server. No auditing data is removed from Passwordstate as part of this process, it reads the database, and sends over any new activity every minute.
Syslog Server Details
When configuring your Syslog server on this page, you should set the format of the syslog server name in either Netbios, FQDN or IP Address. An example of all three is syslog01, syslog01.clickdemo.com, or simply 192.168.1.50. Also specify the port your syslog server received dat on, and the date format your server uses.
Communication to Syslog servers can also be done over UDP, TCP, or TCP + TLS, a more secure option for transmission. If using TLS, you'll need to upload a password protected certificate in a format that your syslog server supports.
Note: The only auditing data which is not sent to your syslog server, is auditing data related to Private Password Lists.
| Setting Name | Description | Default Value |
|---|---|---|
| Syslog Server | Set the name of your syslog server in this field. | Empty/Blank |
| Port Number | Set the port number your Syslog server is listening on. | 514 |
| Date Formatting | Change the date formatting to match your syslog server. | yyyy-MM-dd HH:mm:ss |
| Protocol | Select the appropriate protocol your Syslog sevrer communicates on. | UDP |
Syslog Formatted Event Data
By default, the data sent across will all be from your Auditing table (which you can see on Administration -> Auditing in the GUI) in the format below. Each of the variables in square brackets are replaced with real data as it is sent, so [Description] as an example is the full text describing the auditing event:
[AuditDate] [PasswordstateServerIPAddress] Passwordstate: [Description] Client IP Address [IPAddress]
You can also format your own custom data structure on this screen i.e. JSON, XML, etc, and they can span multiple lines in the provided textbox. The dropdown lists on this page give examples variables you can use, from the table of your choice, and the variables will be updated with appropriate data when syslog events are sent.
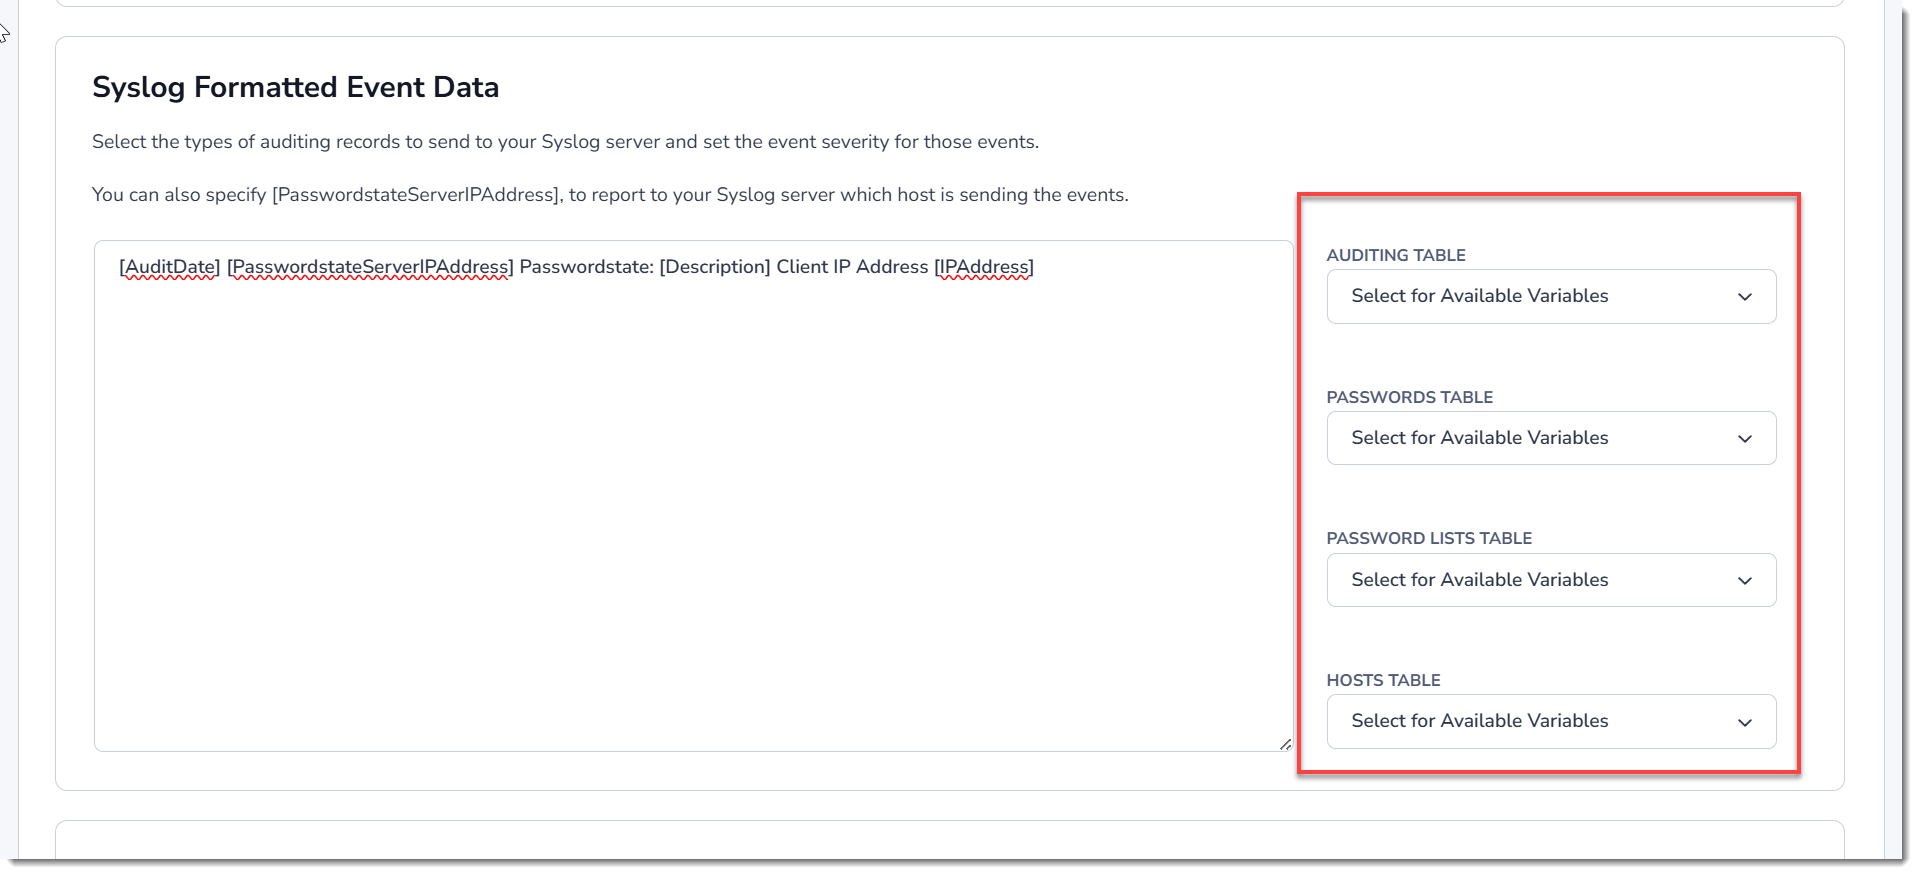
Syslog Events
By default, all auditing events are sent across to your syslog server, and this section allows you to either disable certain auditing events from being sent across, or you can change the event severity. For example, for the auditing event Export all Passwords you may want to set this to be an emergency event when passed over to your syslog server:
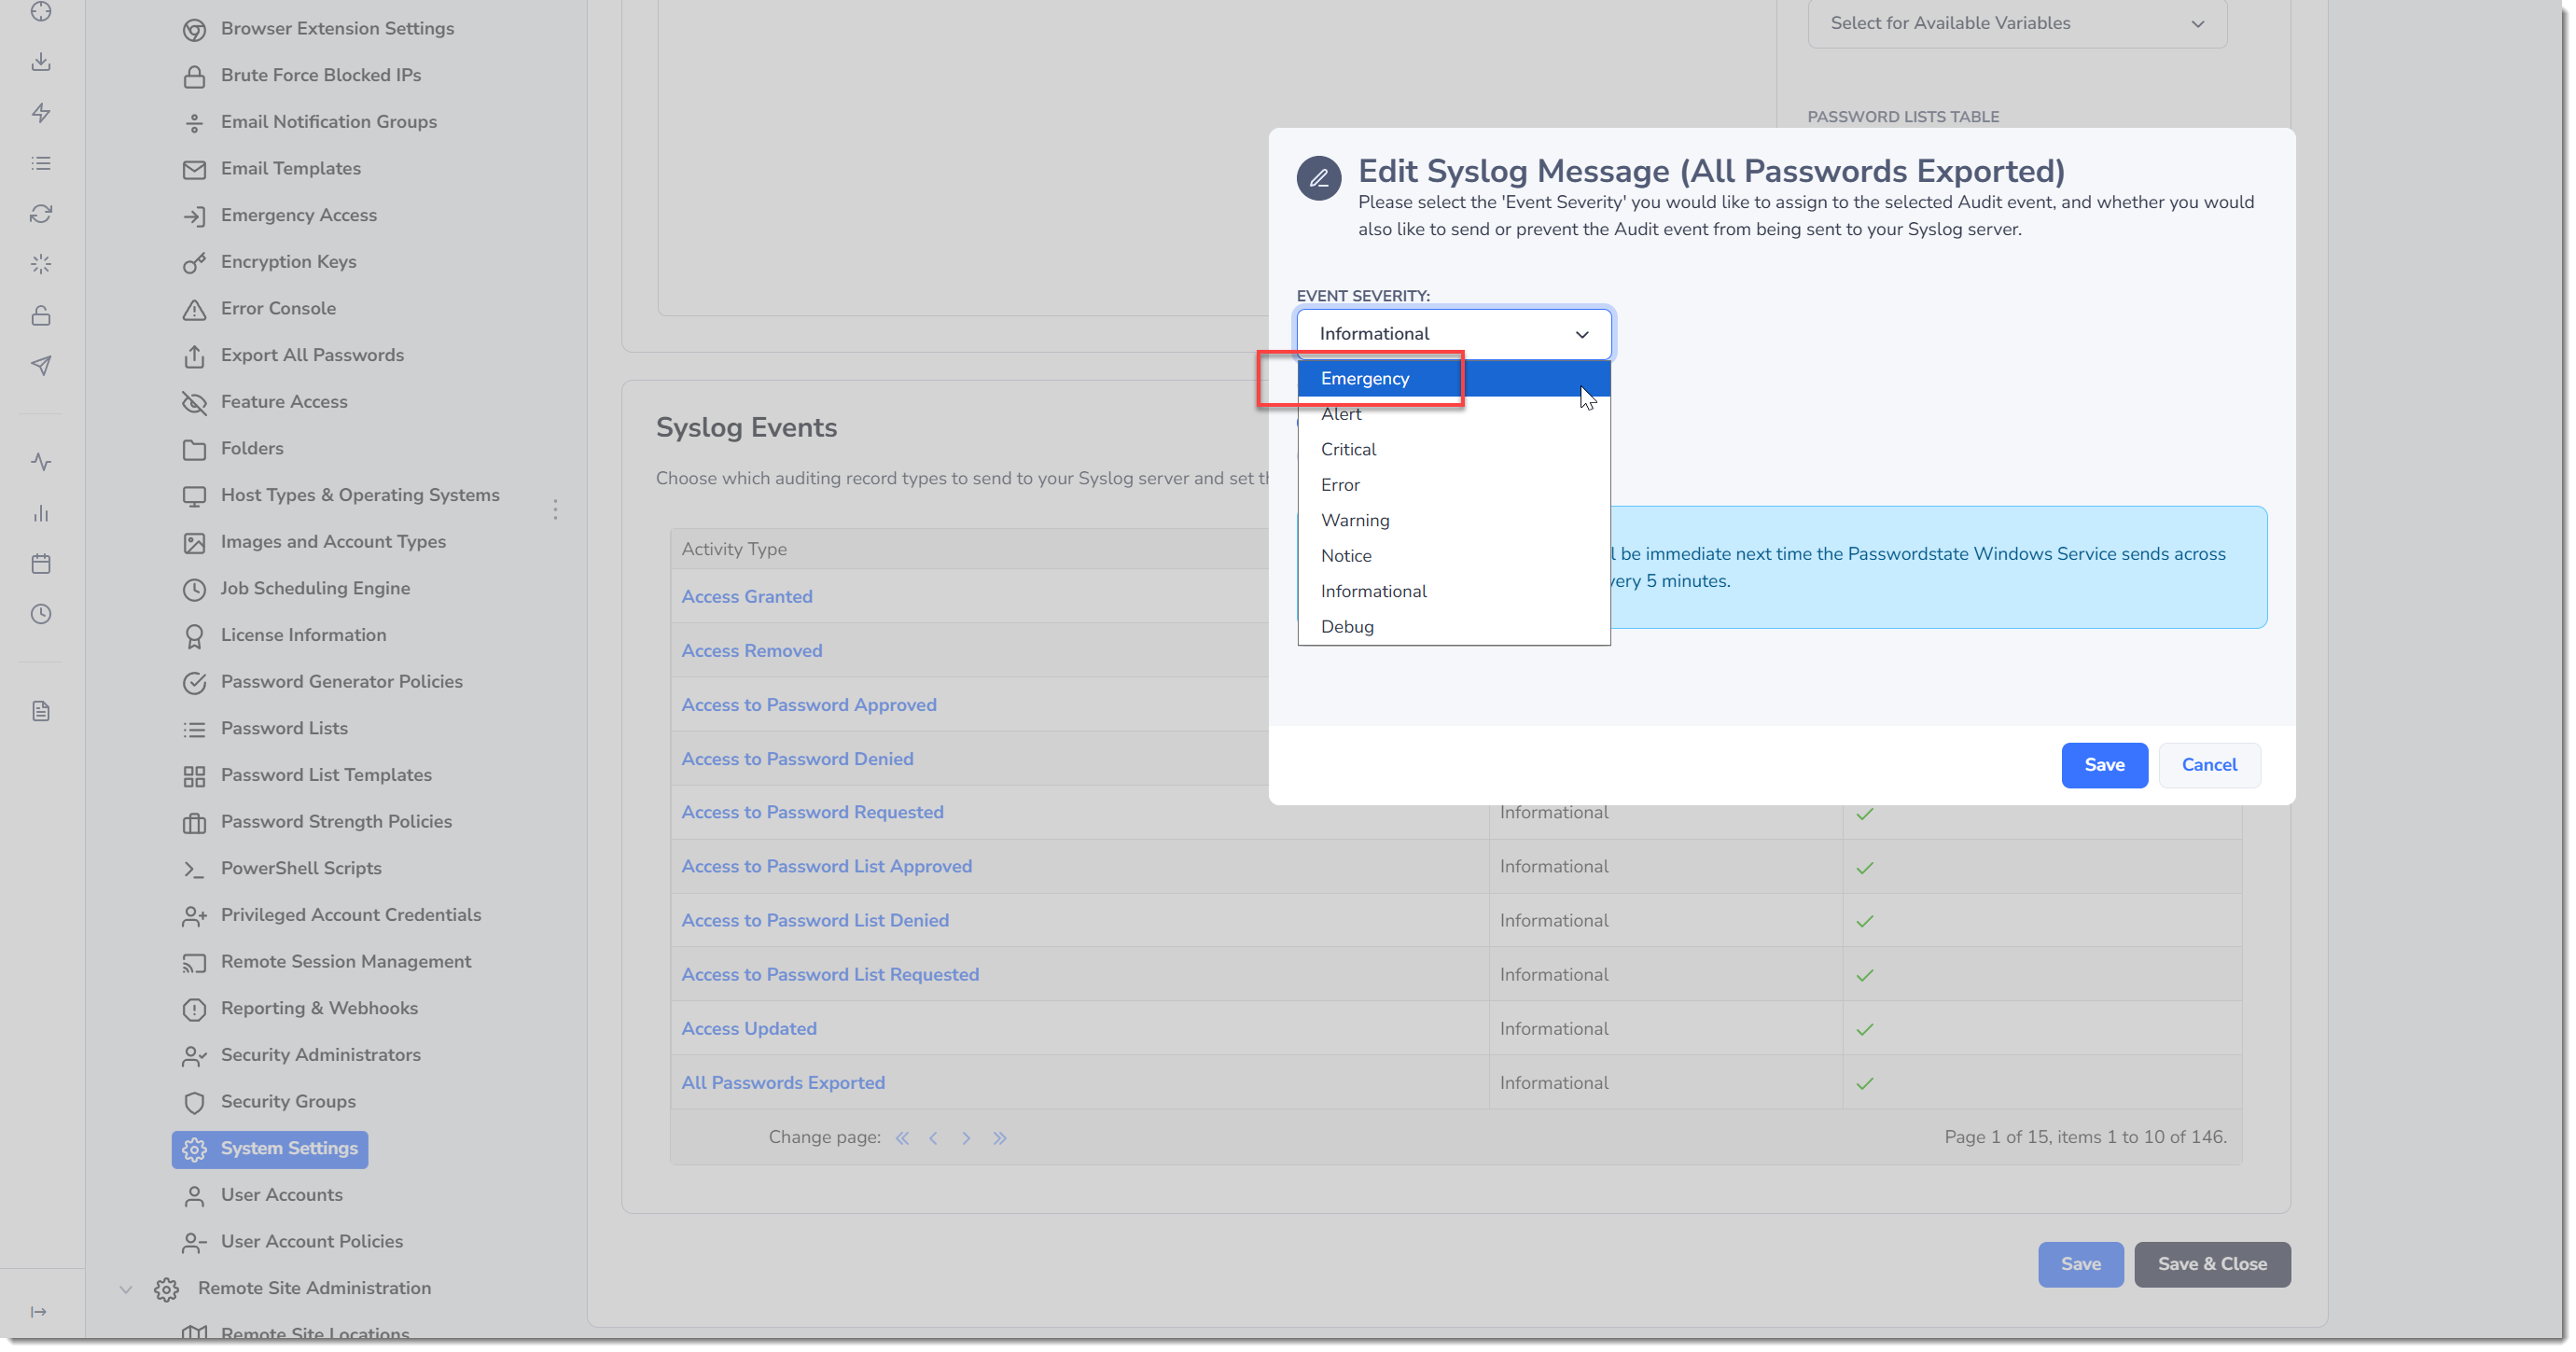
User Acceptance Policy
The User Acceptance Policy tab allows you to specify a popup 'User Acceptance Policy' (UAP) which users must read when they access the Passwordstate website.
A default body of text is provided, but it can be customized to suite your organization.
There are also a couple of options for the UAP:
- No policy Required
- Yes Mandatory for each new session (every time your users initiate a new session when they visit the site, they will be presented with the UAP popup)
- Yes Acceptance Required (Once the user has read and accepted the policy, they will not be prompted again)
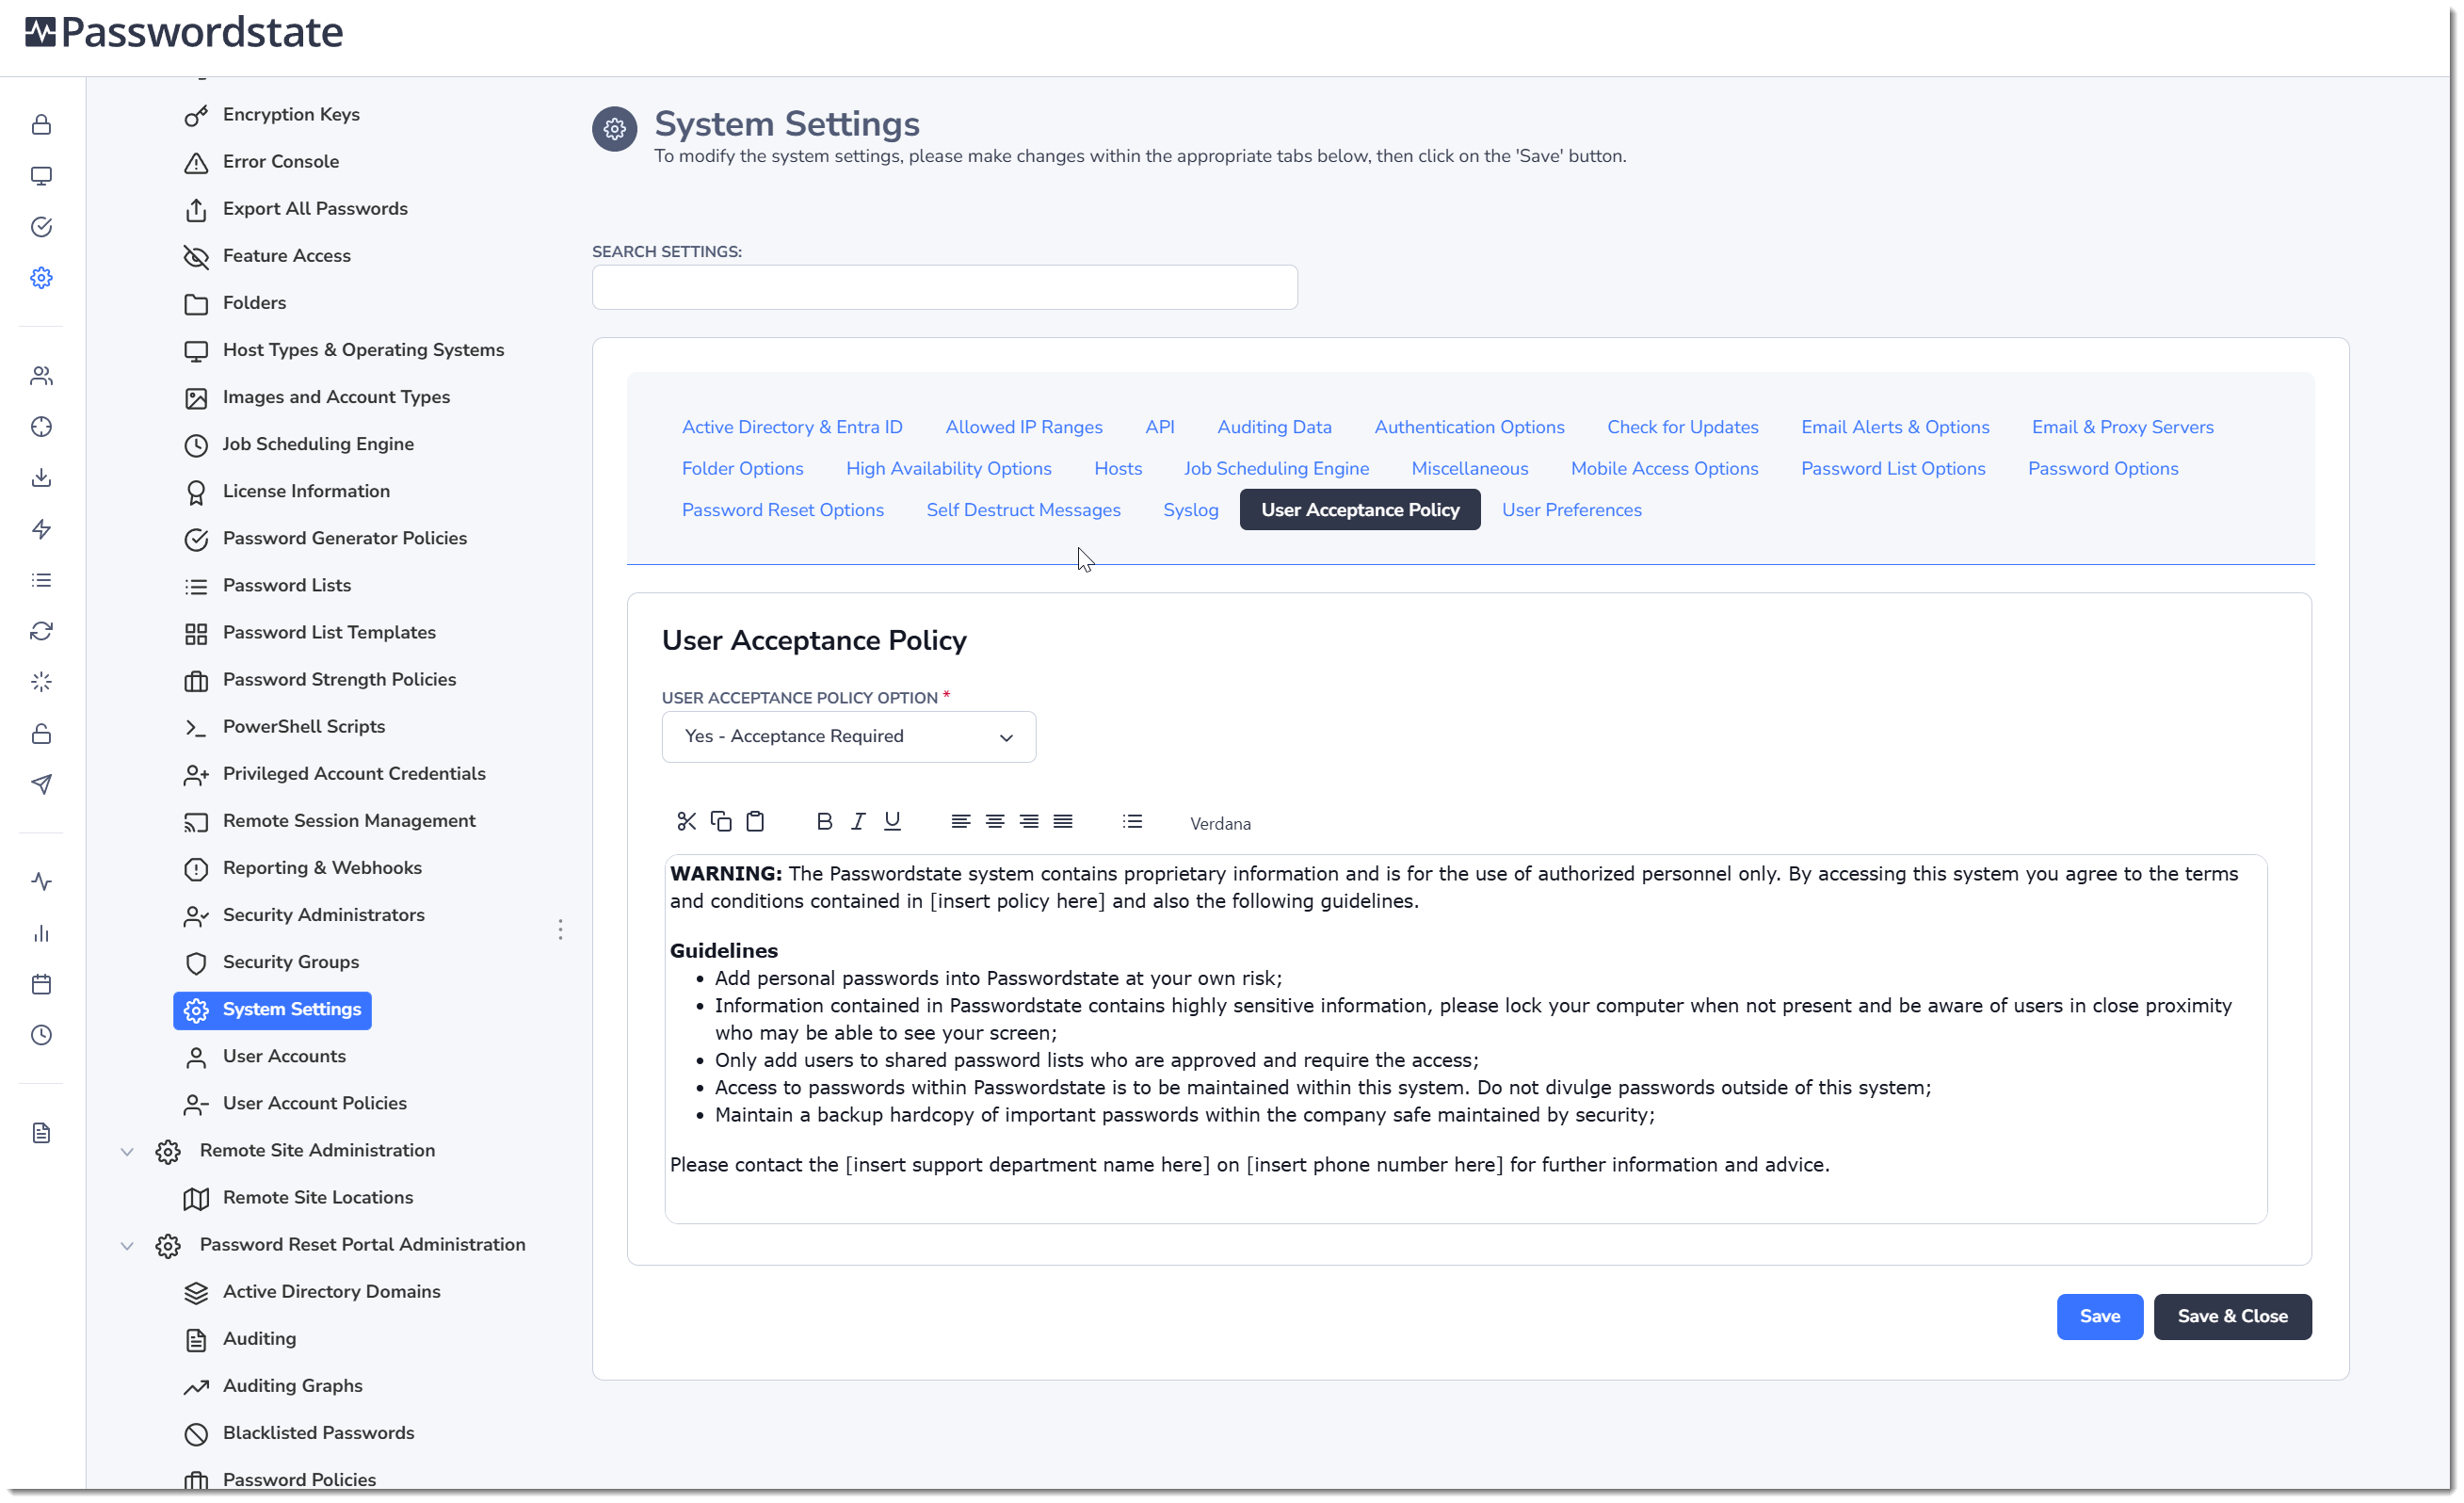
User Preferences
Under Administration -> Feature Access -> Menu Access it's possible to completely disable or hide most menus your end users see in Passwordstate, which can simplify the UI. This User Preferences tab under System Settings allows you further granular control over what users can see under their own personal preferences page.
Everything is enabled by default, and deselecting one or more of these options removes that tab for all users.
For example, you may want to hide the Authentication Options tab for each user, simply deselect it on this page, and it will not appear in their UI immediately: