SQL Server Transactional Replication Installation
Instructions to install SQL Server Always On Availability Groups.
Please note these instructions are only a guide. If you have issues installing or using SQL Server, please refer to Microsoft's documentation.
Overview
This document will provide instructions for configuring SQL Server Transactional Replication for High Availability of the Passwordstate Database.
These instructions are created using SQL Server 2019 Standard edition and are intended as a guide only. If you have any technical issues with SQL Server, please contact Microsoft for support
Note: When using the High Availability module of Passwordstate, your distribution and publication databases must reside on SQL Server 2012, 2014, 2016, 2017 or 2019 Standard or above – SQL Express can only act as a subscriber to SQL Server replication. You must also be using the same version of SQL Server for both database servers.
Below is some information about a test environment used to document this process, to help you understand our instructions easier:
tranweb01.halox.net
- Role – Passwordstate primary web server
- Microsoft Windows 2019 Server OS
- Primary Passwordstate website installed and is connected SQL on transql.halox.net
transql01.halox.net
- Role – Passwordstate primary database Server
- Microsoft Windows 2019 Server OS
- Microsoft SQL Standard 2019
- Hosts a Passwordstate database with data stored in this database from several months of using Passwordstate in a non-high availability configuration.
tranweb02.halox.net
- Role - Passwordstate secondary web server
- Microsoft Windows 2019 Server OS
- Has HA instance of Passwordstate installed, but not yet connected to a database. Instructions for HA Install located here: High Availability Installation Instructions
transql02.halox.net
- Role – Passwordstate secondary database Server
- Microsoft Windows 2019 Server OS
- Microsoft SQL Server Express 2019
Domain account:
- halox\sqlha
- Is a member of the Domain Users group only
Local SQL account used to authenticate Passwordstate websites to SQL
- passwordstate_user
Prerequisites
- This process assumes you have a working install of Passwordstate, connected to a database called Passwordstate, running on an instance of SQL Server Standard or above.
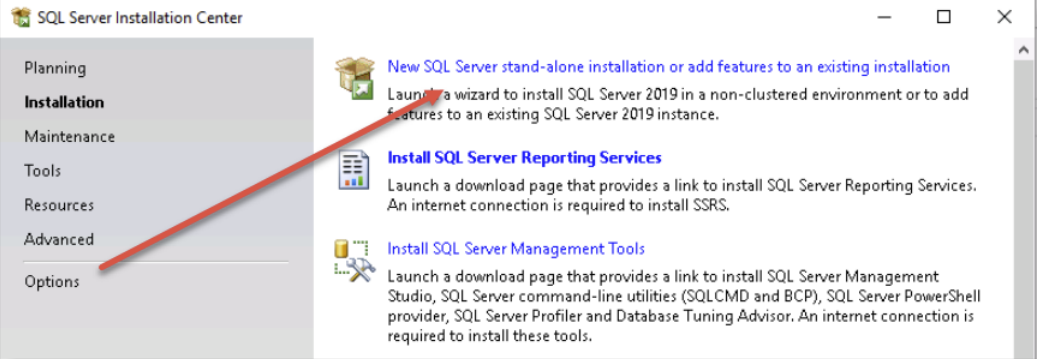
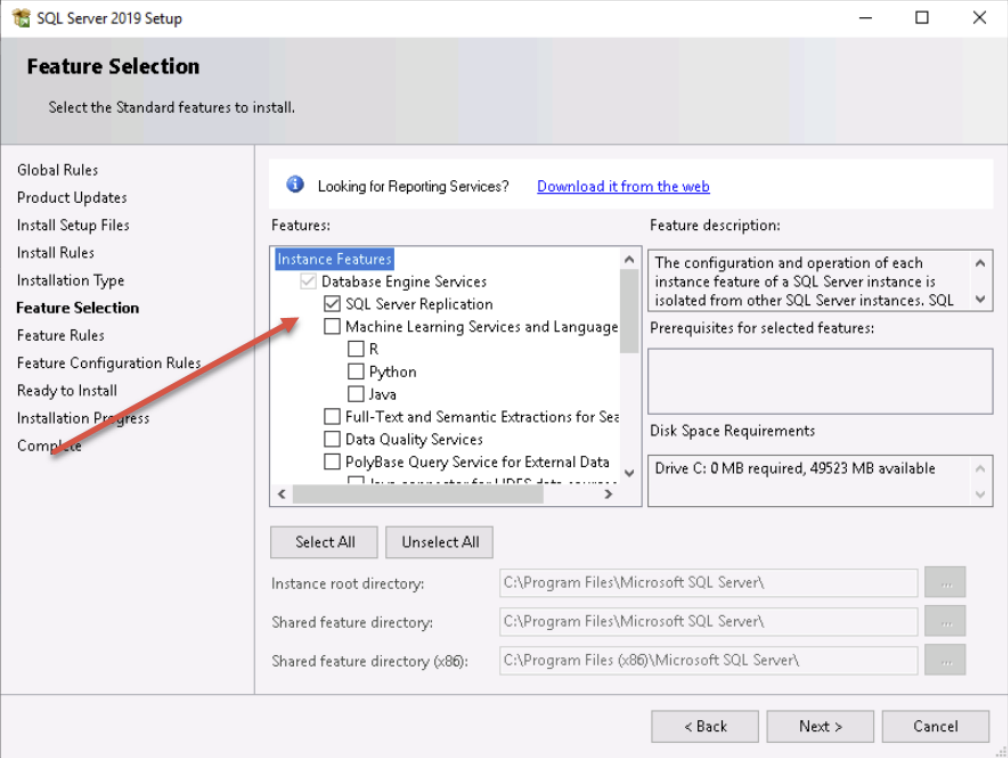
- Prior to starting this process, you should ensure that you have the SQL Server Replication feature installed on both your primary, and secondary database servers. You can install this by running your SQL Server installation, and selecting the following options:
- Select New SQL Server stand-alone installation or add new features to an existing installation
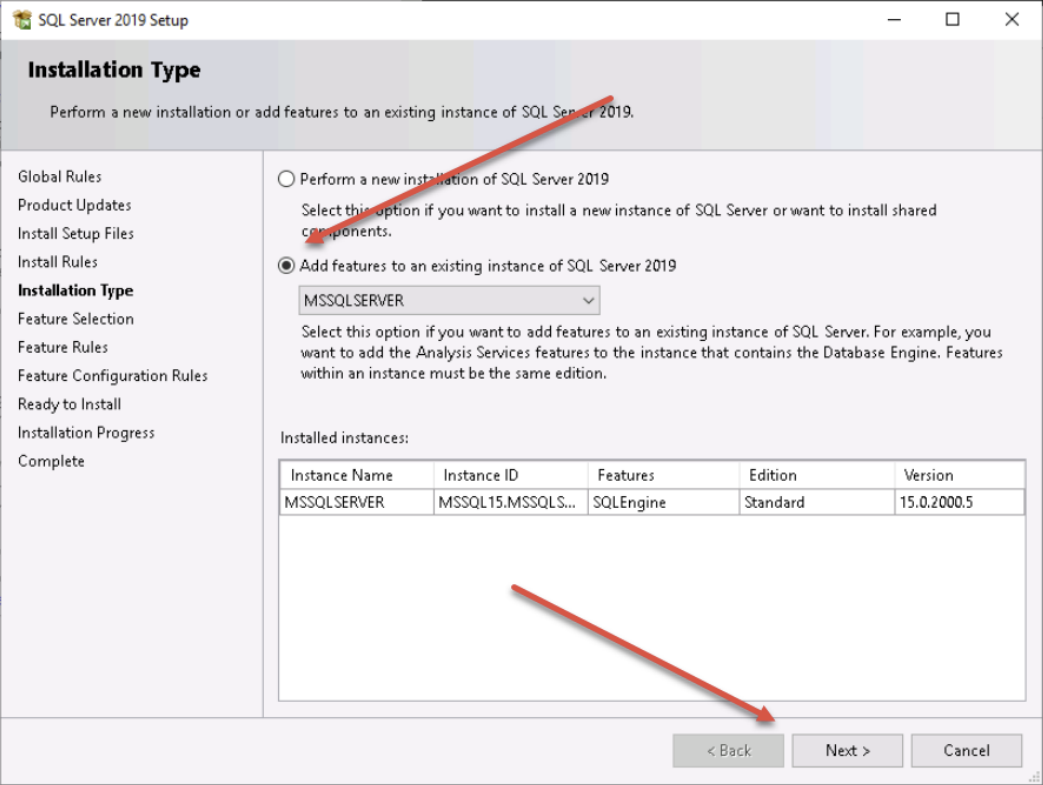
- Select Add features to an existing instance of SQL Server, and select the appropriate instance
- Select the SQL Server Replication feature if it isn’t already selected, and then run through the rest of the process to finish the installation
- You will need a domain account with Domain User rights. For this process we have created an account called halox\sqlha in Active directory.
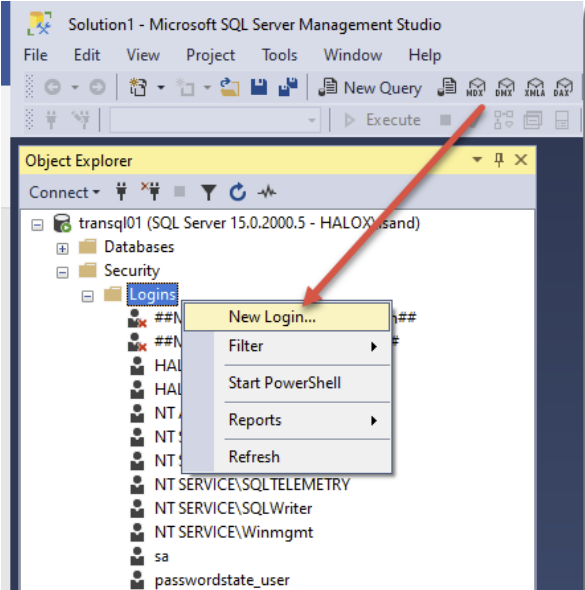
- Add this account into both SQL Servers using SQL Management Studios Tools by expanding Security -> Logins and selecting New Login
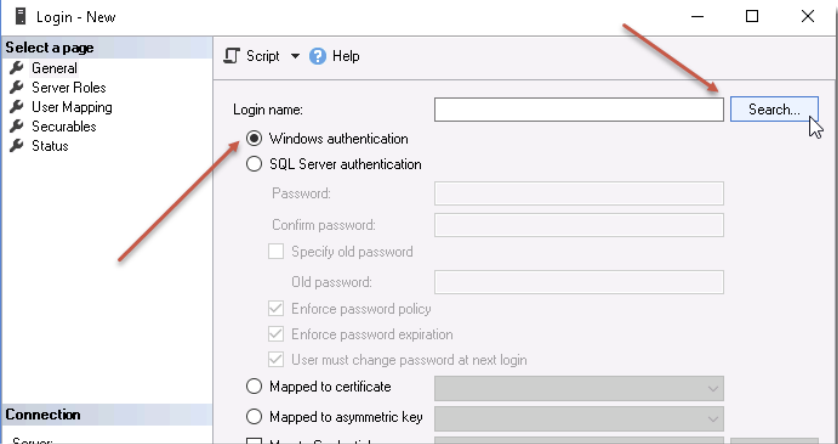
- Select Windows Authentication and then click Search
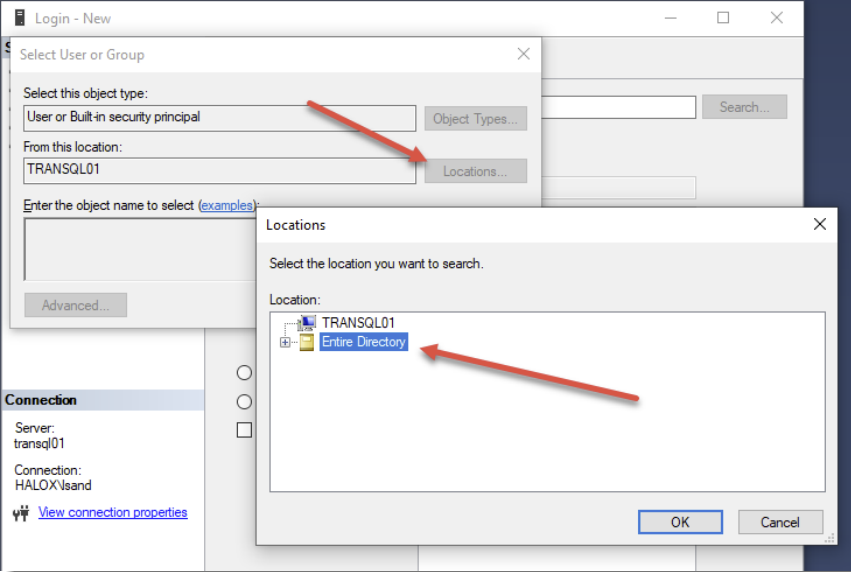
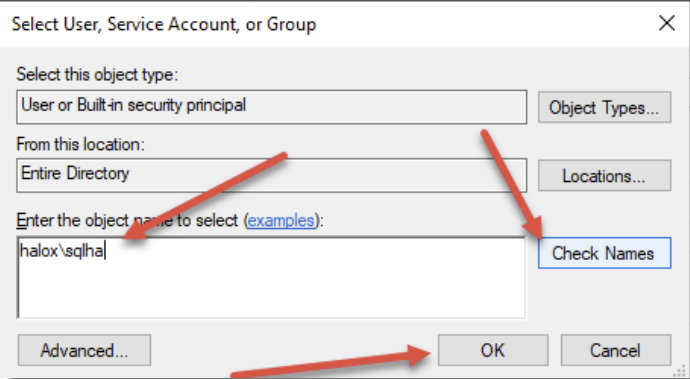
- Click the Locations button, and then select Entire Directory:
- Enter your domain account in the format of domain\username and click Check Names, and then click OK
- Finally, click OK
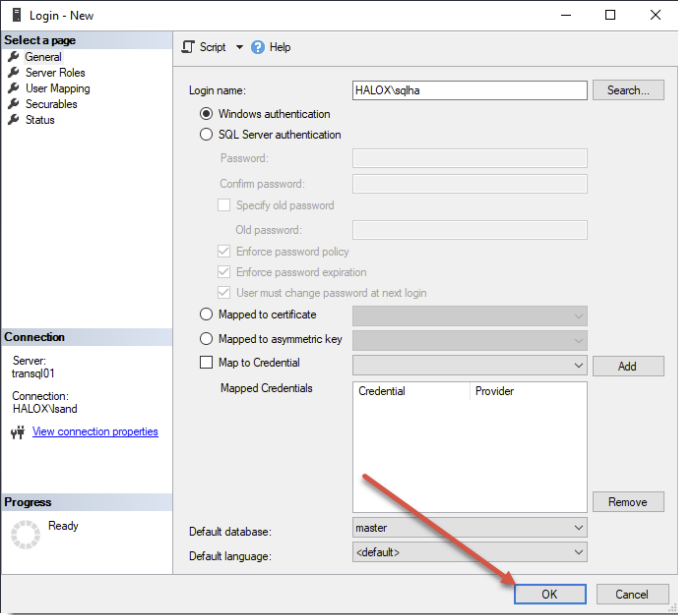
Ensure you repeat this process for your second database server, and then proceed to the next step.
- Later in this process you will need to specify a folder for the Transaction Replication snapshots to be stored in. Microsoft require this folder to be local to the Database server, and not a shared UNC path, even if it’s a mapped drive to a shared UNC path.
- If you have a second disk in your server, like a D drive for example, then it is preferred that you use this drive. For this documentation, we are using the C drive.
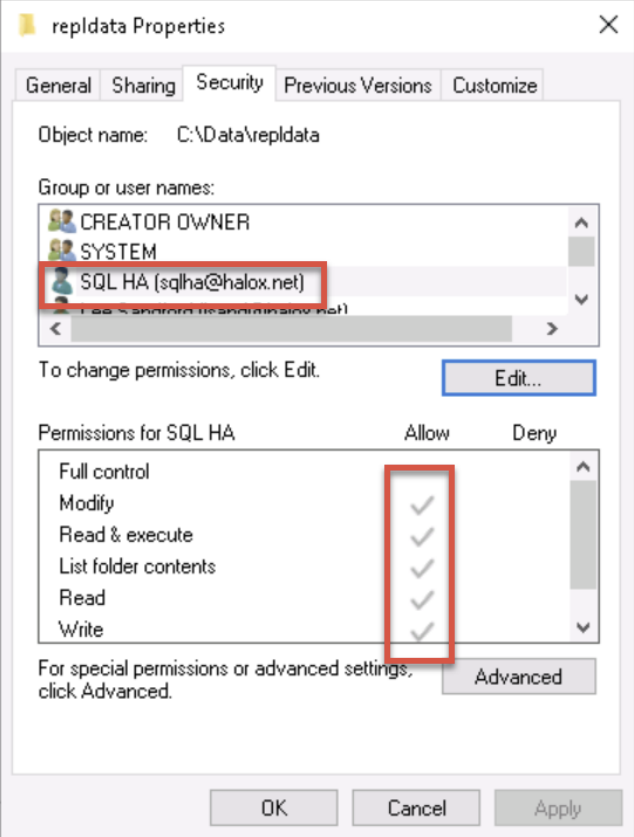
- You will need to grant your domain account (halox\sqlha) Modify rights to this folder on your primary SQL Server. In this case the default folder in the wizard and the one we’ll use is C:\Data\repldata
Configuring the Distribution Database
This section of the document outlines the process required to set up your primary database server as a Distribution Database. This is a once off process and may already be configured if you are using Transaction Replication for other applications on this server.
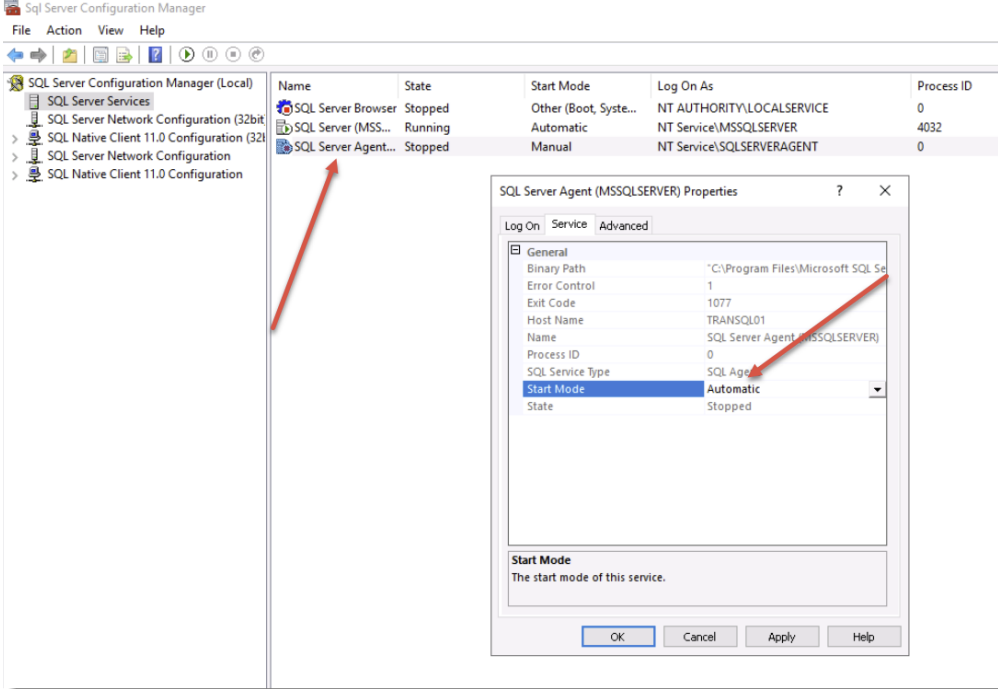
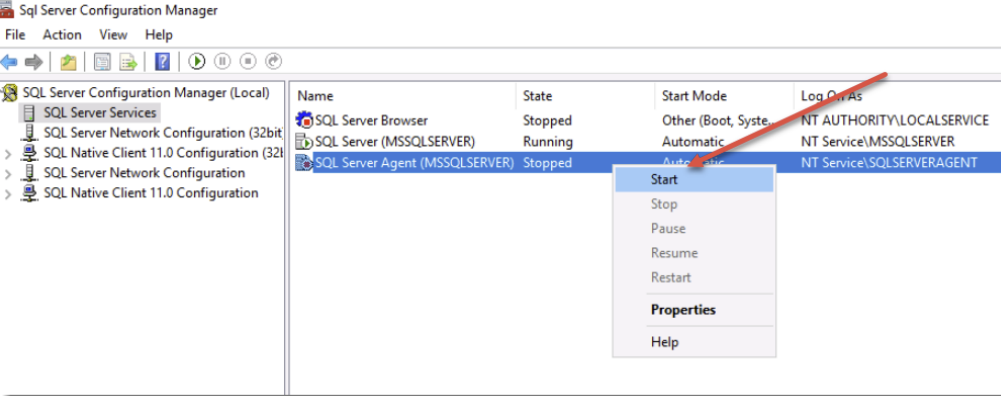
First, we need to configure the SQL Server Agent to start automatically. This service is what sends replication data to the remote SQL server. Follow these steps below to set the service correctly:
- Open SQL Server Configuration Manager on your primary database server, and go to the properties of the SQL Server Agent service and choose Automatic for the Start Mode property:
- Now Start the service:
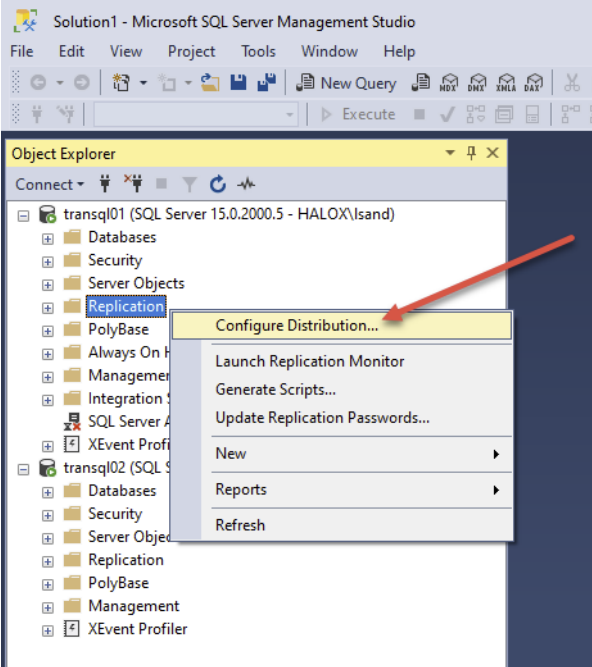
- Now we’ll configure the Distribution Database. Using SQL Management Studio Tools, right click Replication and select Configure Distribution
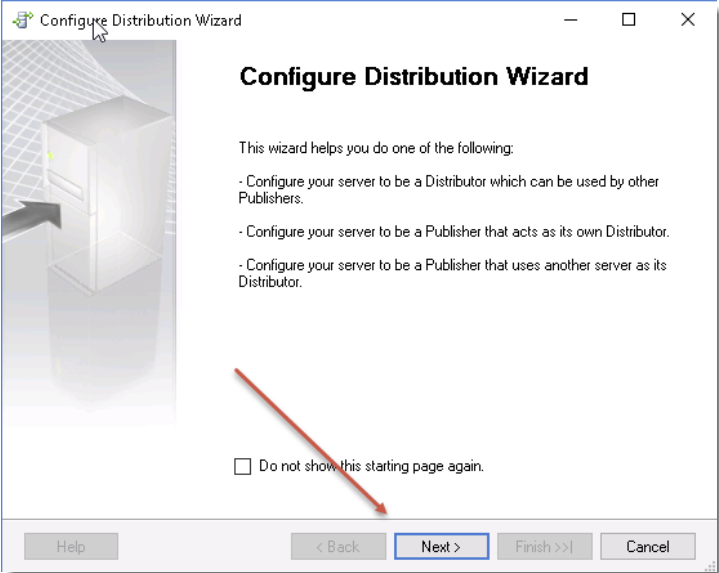
- Select Next
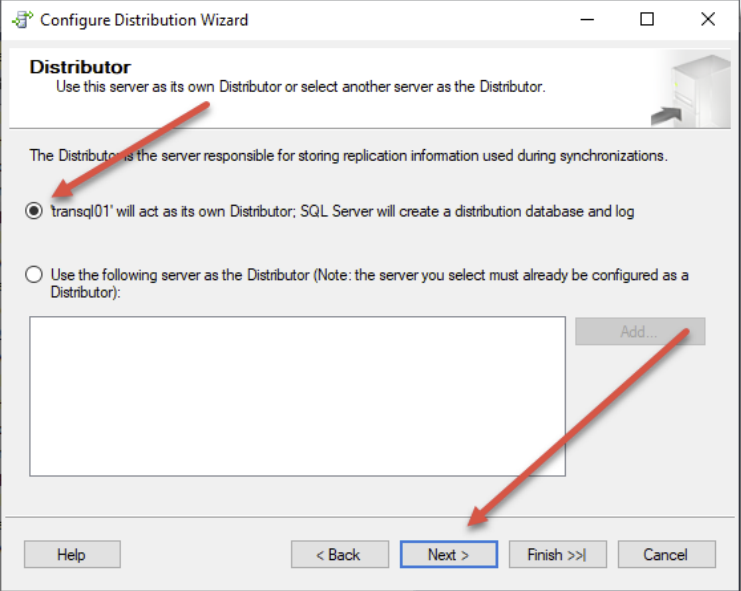
- Confirm transql01 is selected and click Next
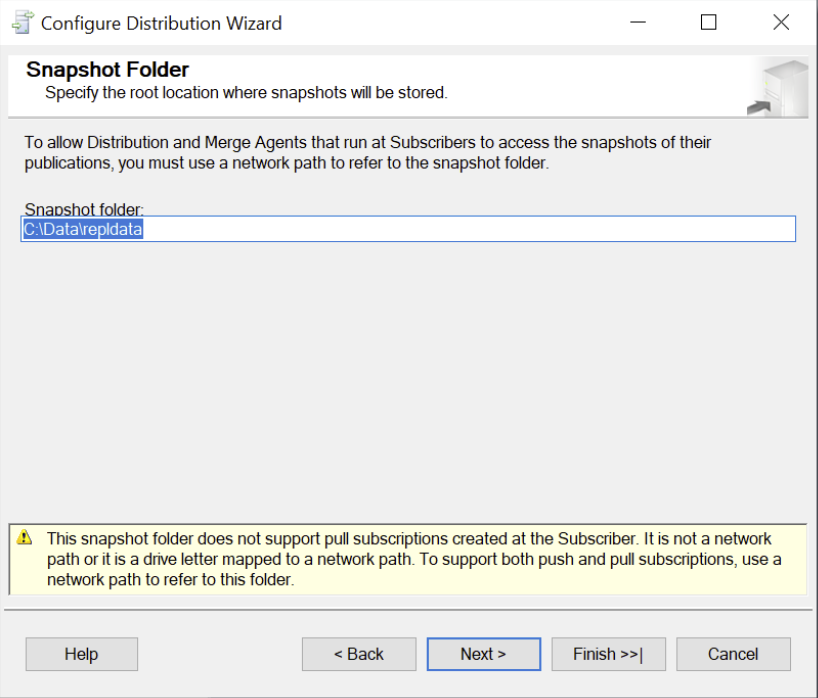
- On the Snapshot Folder screen, it is preferable to enter another disk on the server to store these snapshots. Don’t use a UNC path to a network share, or map a drive letter to a UNC path for this screen. Change the path to the folder you created earlier in this process, (C:\Data\repldata), and click Next
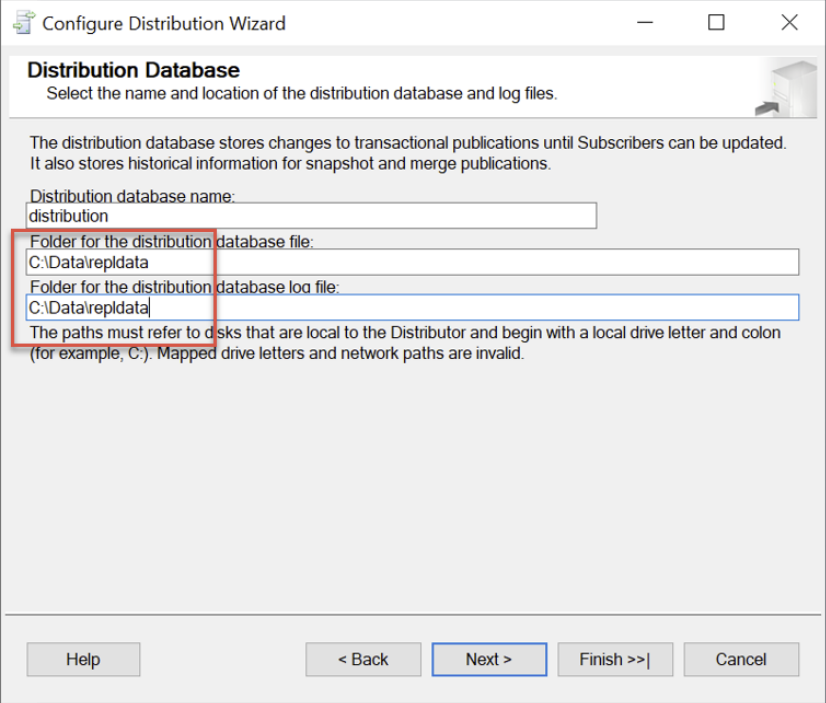
- On the Distribution Database page, change the paths for the database file and the log file to your snapshot folder, and click Next
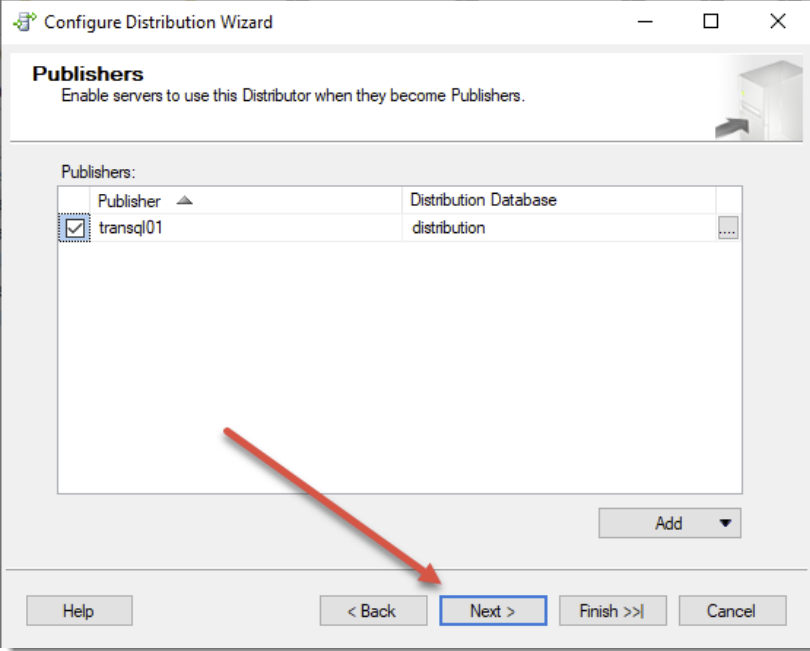
- Ensure your Primary database server is selected and click Next
- Select Configure Distribution and click Next
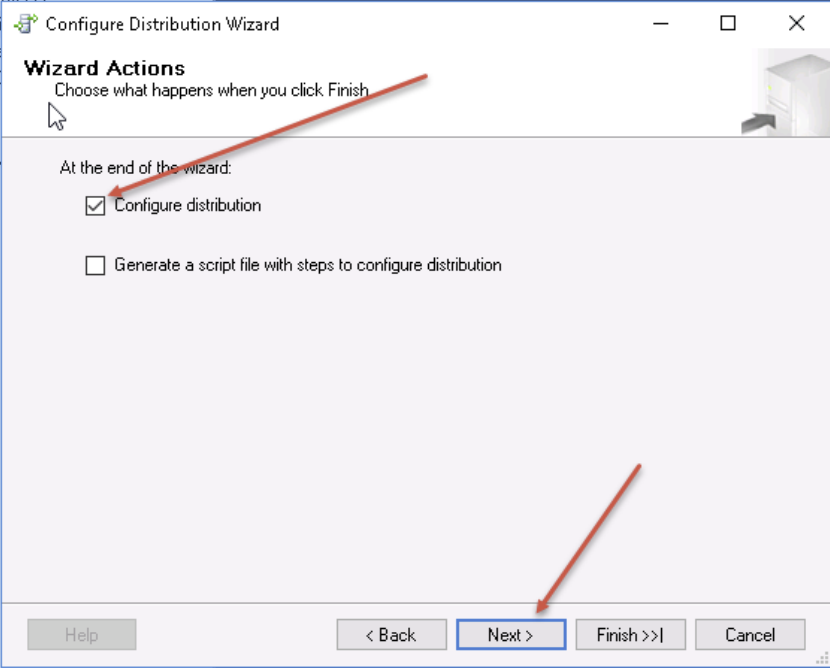
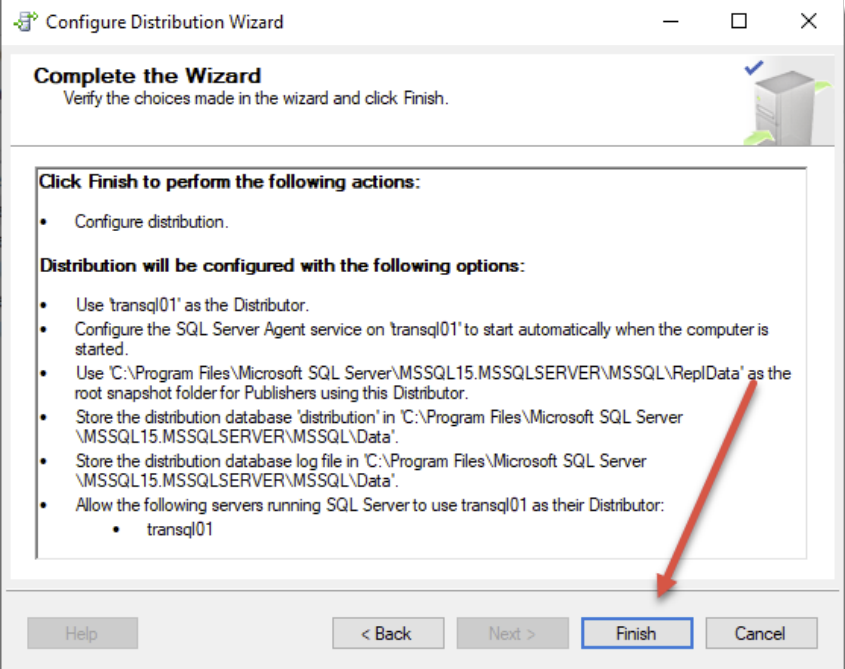
- Click Finish
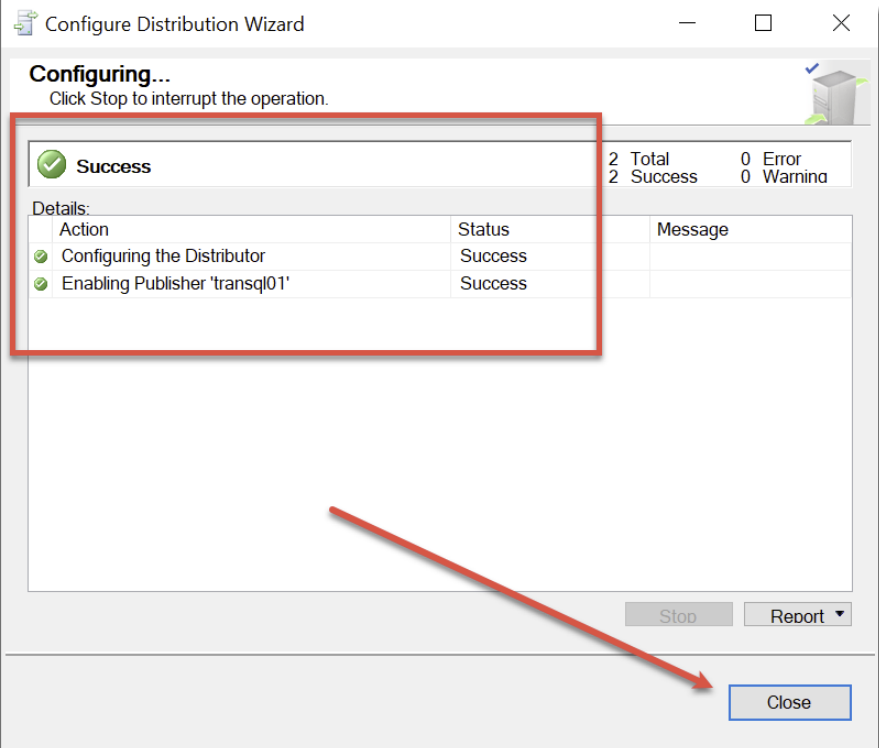
- The Distributor will now be configured, and when finished it will show “Success”. You can now click Close:
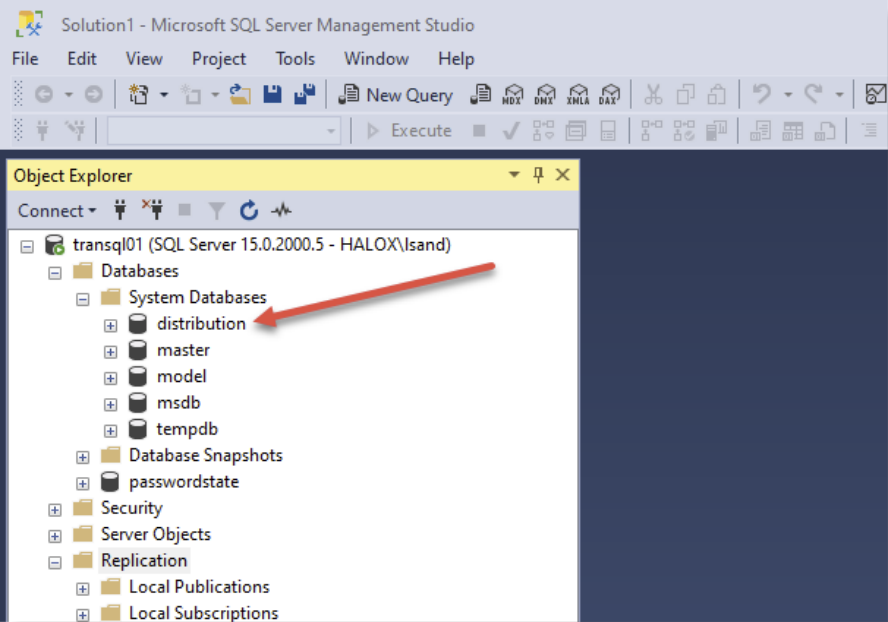
- Under System Databases, ensure the Distribution Database has been successfully created
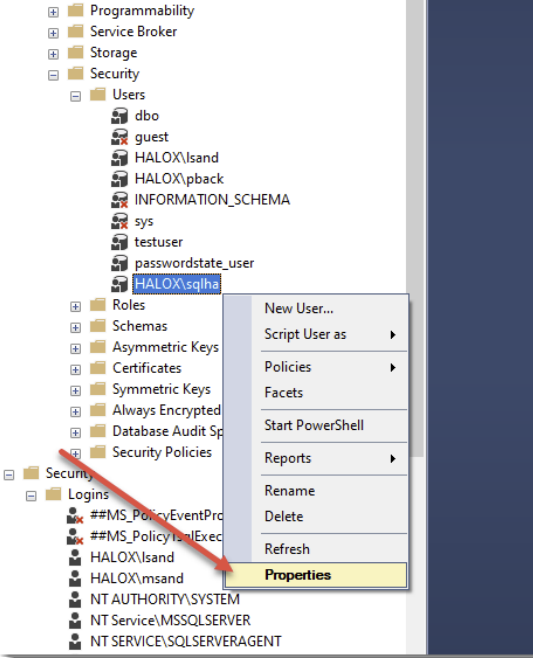
- Expand Security -> Logins and select Properties for the domain account which will be used for replication, in this case it is halox\sqlha
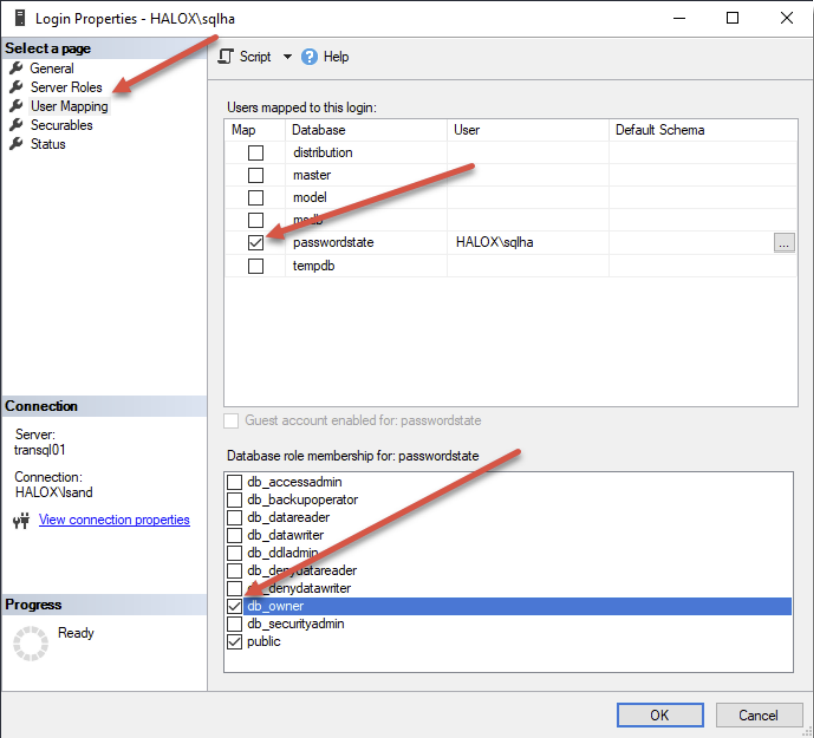
- Select User Mapping, tick the Passwordstate database, and enable db_owner rights
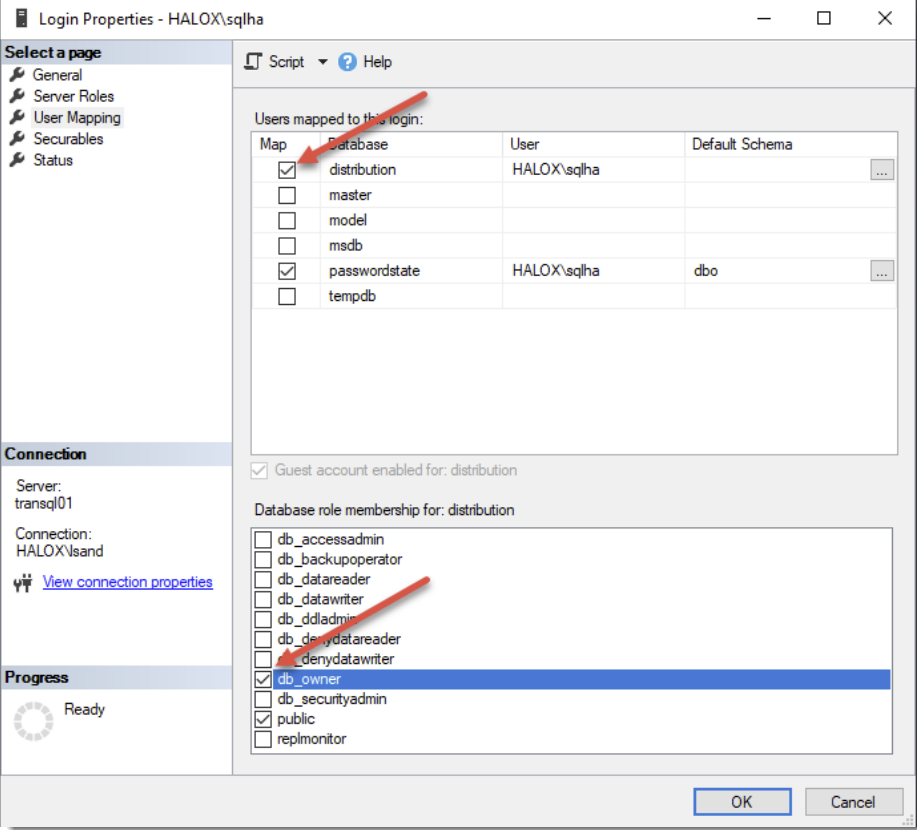
- Next, tick the Distribution database, select db_owner rights, and click OK
Creating the Publisher
- Open SQL Management Studio Tools and connect to transql01.halox.net
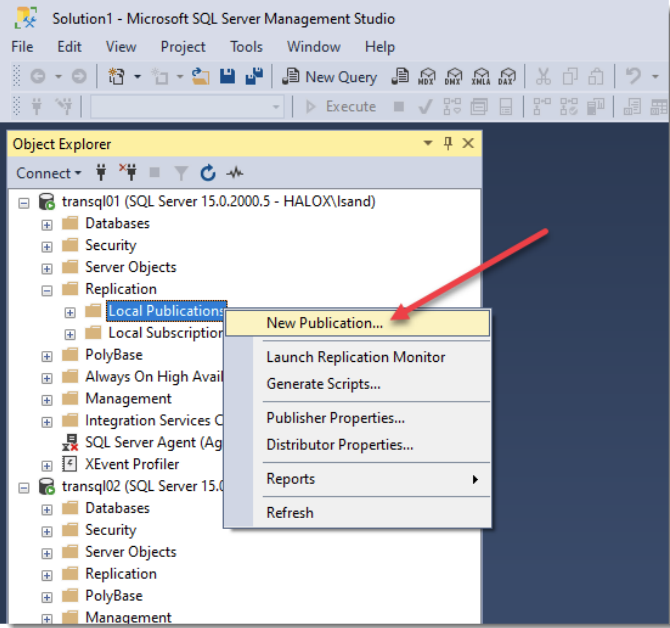
- Expand Replication, right click Local Publication and select New Publication
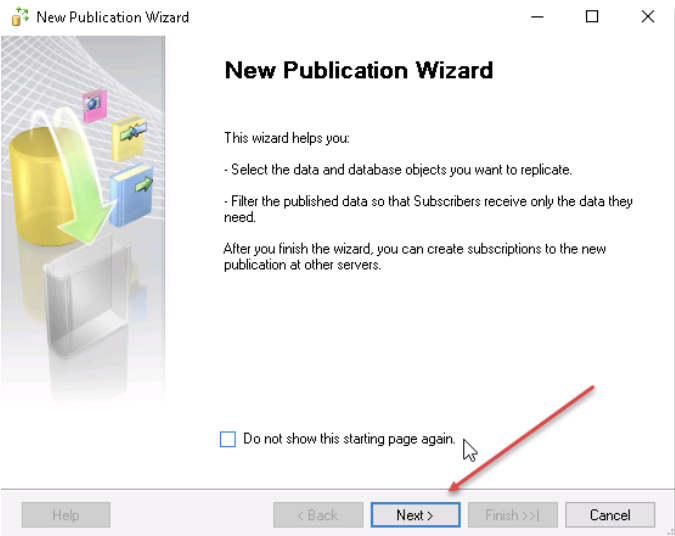
- At the New Publication Wizard page, click Next
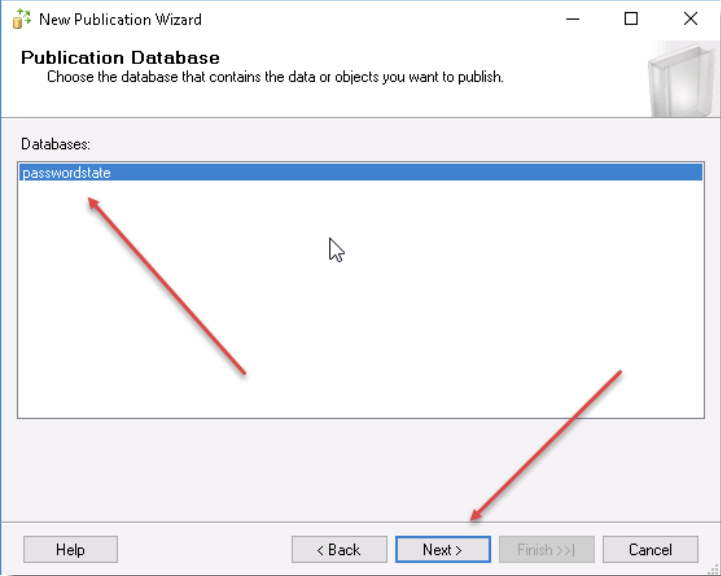
- Select the Passwordstate database and click Next
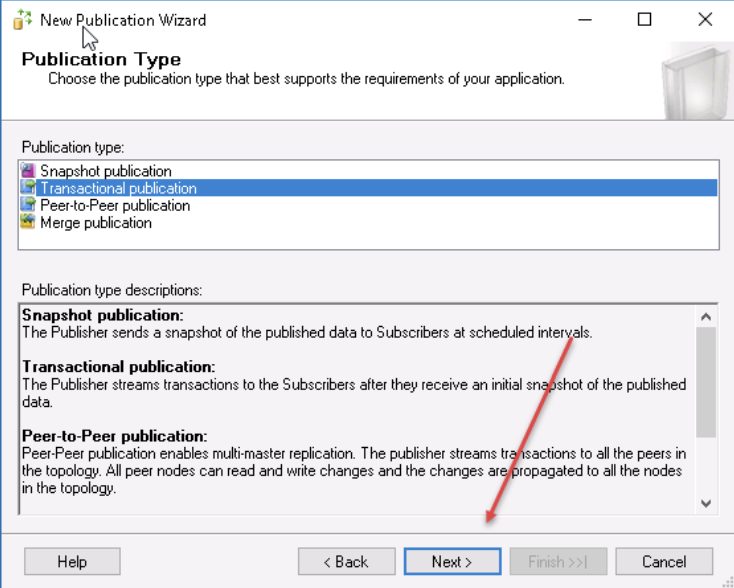
- Select Transactional Replication, and click Next
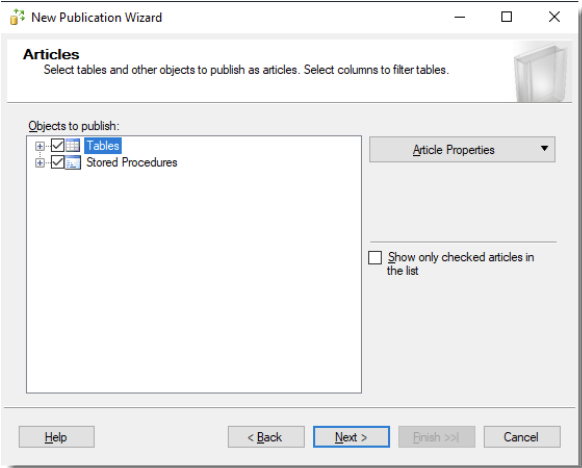
- Tick the Tables & Stored Procedures checkboxes, and then select the Set Properties of All Table Articles
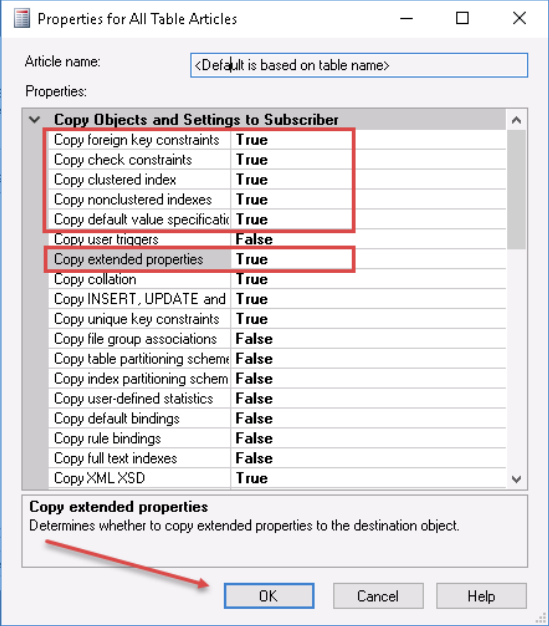
- Set the following options to True if not already set, and click OK, and then click Next
- Copy foreign key constraints
- Copy check constraints
- Copy clustered index
- Copy non-clustered indexes
- Copy default value specifications
- Copy extended properties
- Copy unique key constraints
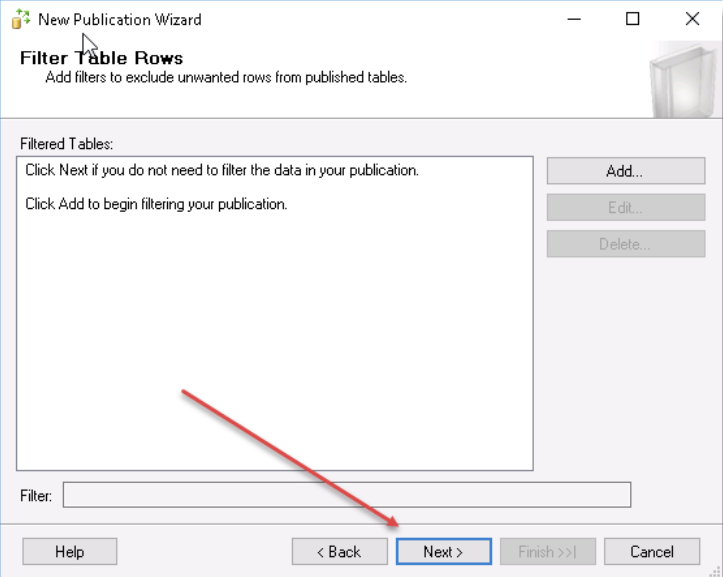
- Click Next without adding any filters
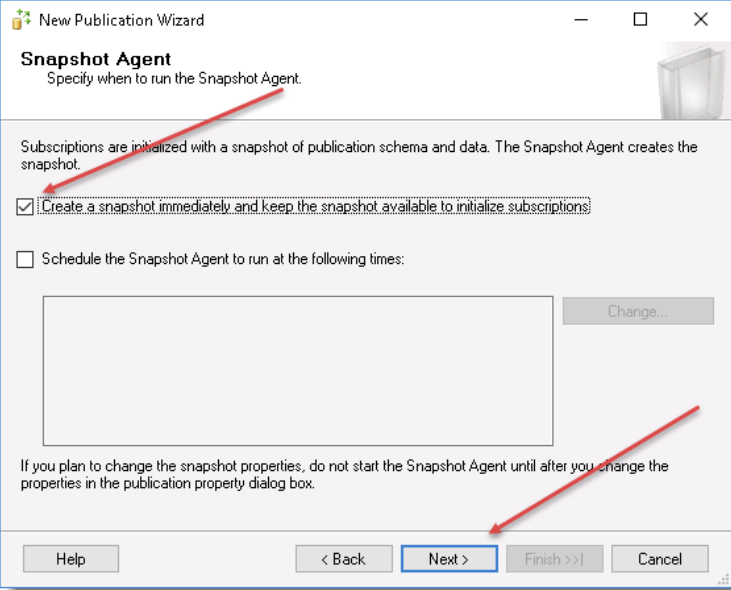
- Tick Create snapshot immediately, and click Next
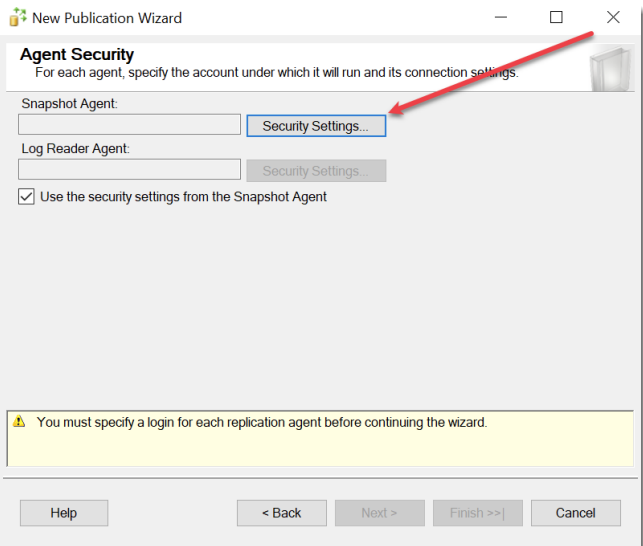
- Click the Security Settings button
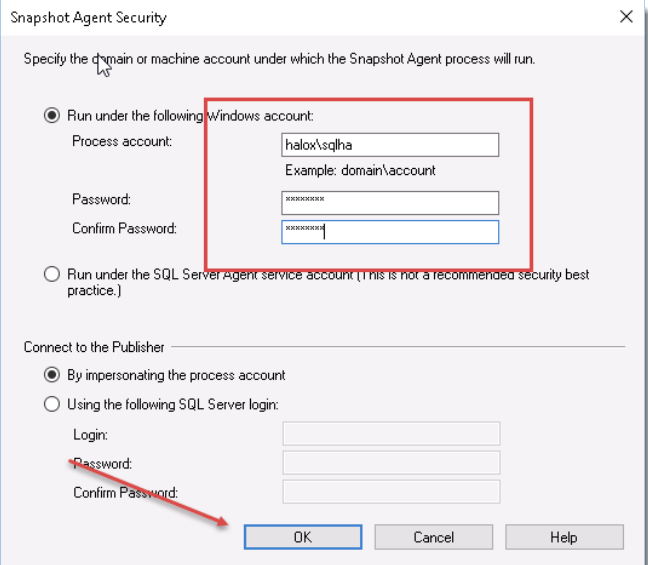
- Click Security Settings button and set you domain account in the format of domain\username, and apply the correct password, and click OK
- Click Next
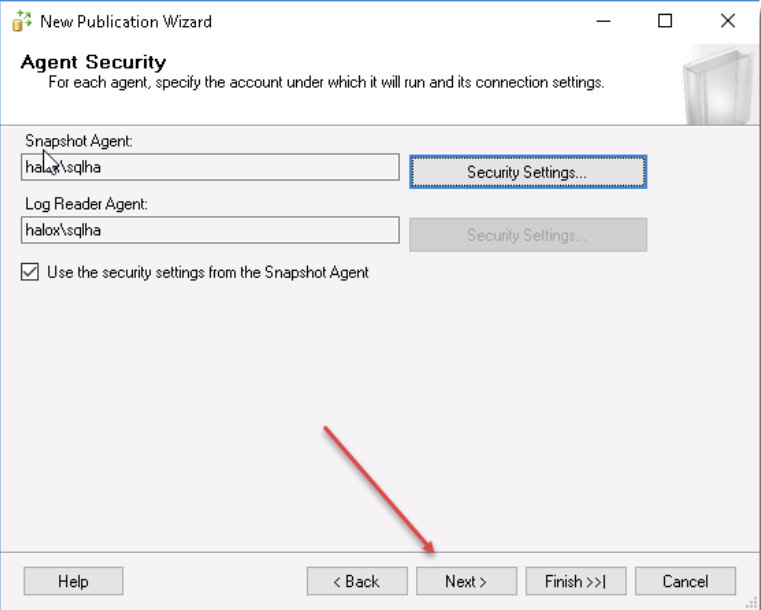
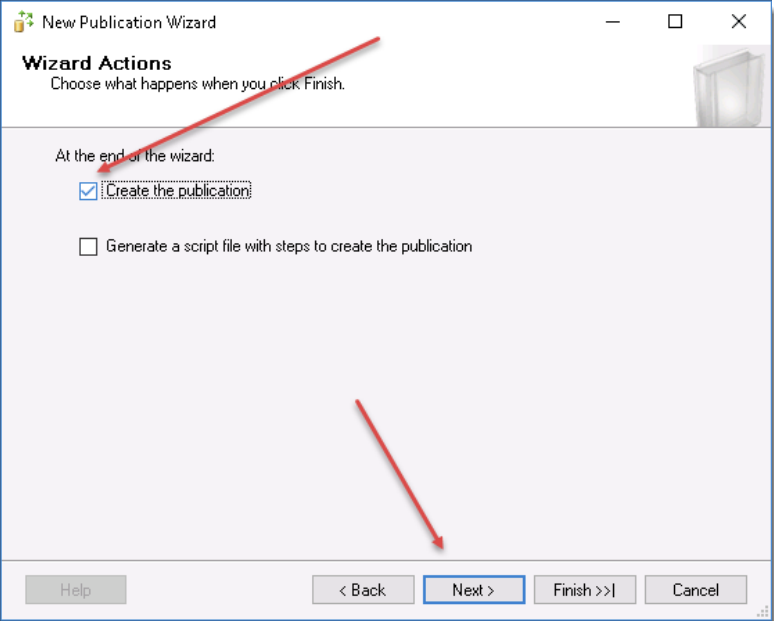
- Select the Create the Publication option, and click Next
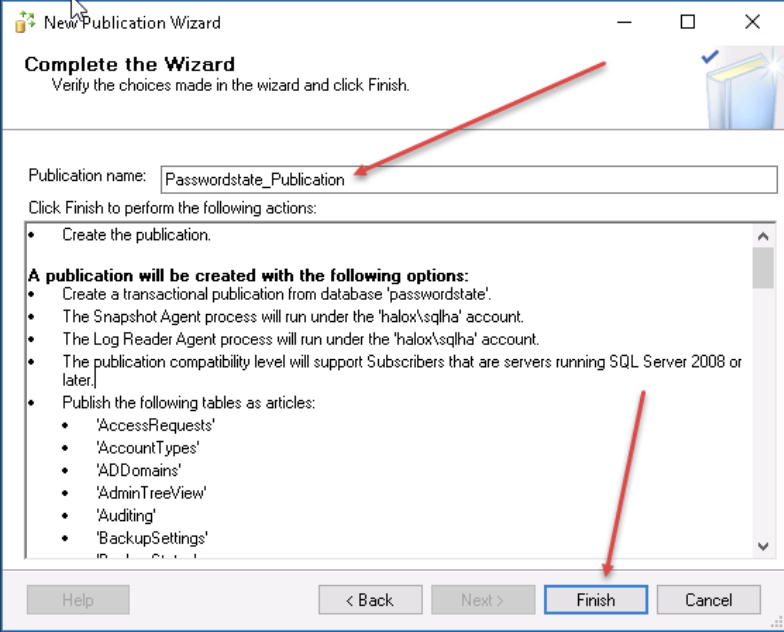
- Give the Publication a relevant name, such as Passwordstate_Publication, and click Finish
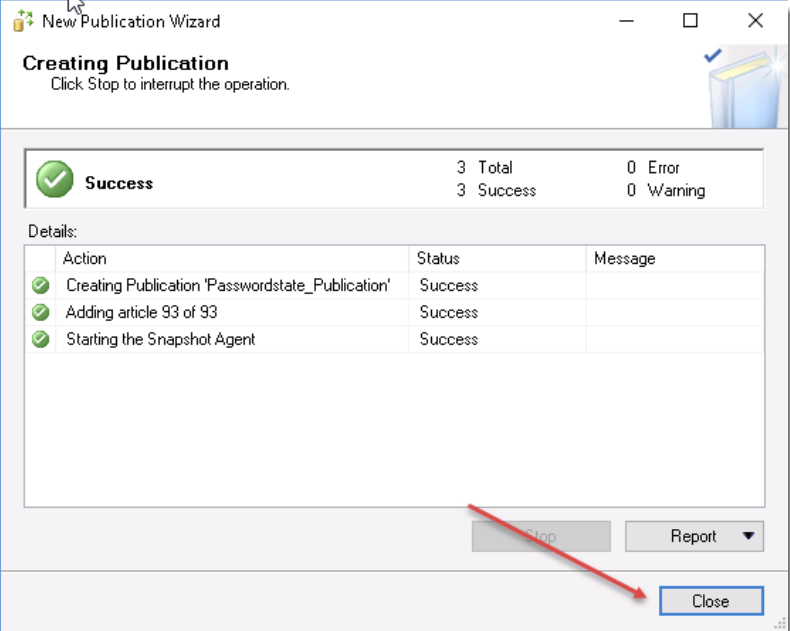
- After the Publication has successfully completed, click Close
Creating the Subscriber
Once the publisher is created the next step is to create the subscriber for it.
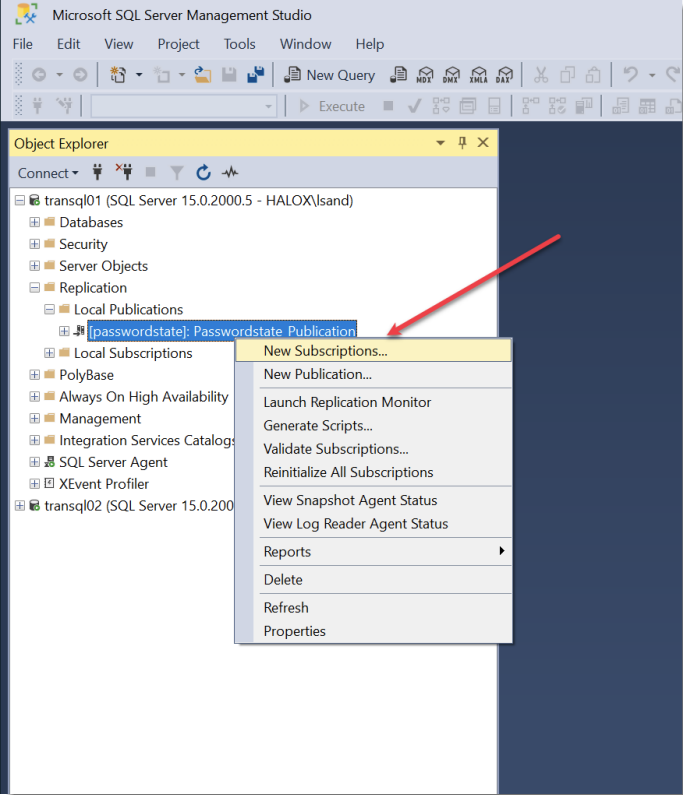
- In SQL Server Management Studio, ensure you are connected to transql01, right click Passwordstate_Publication and select New Subscriptions
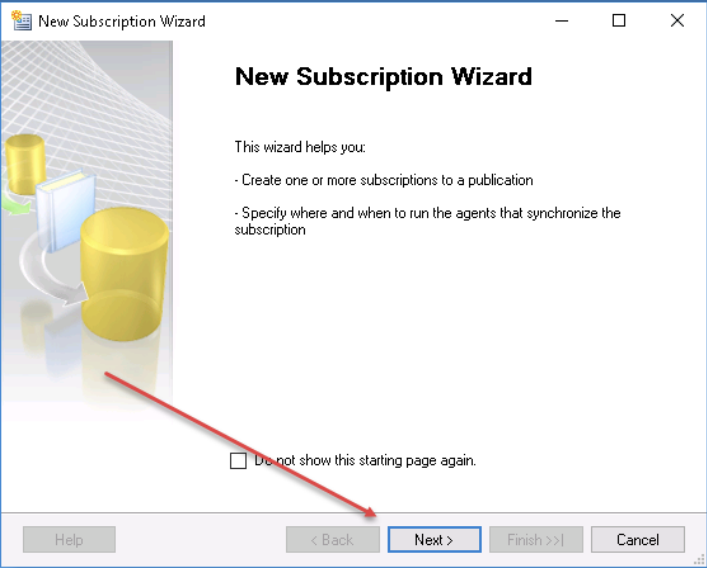
- At the New Subscription Wizard, click Next
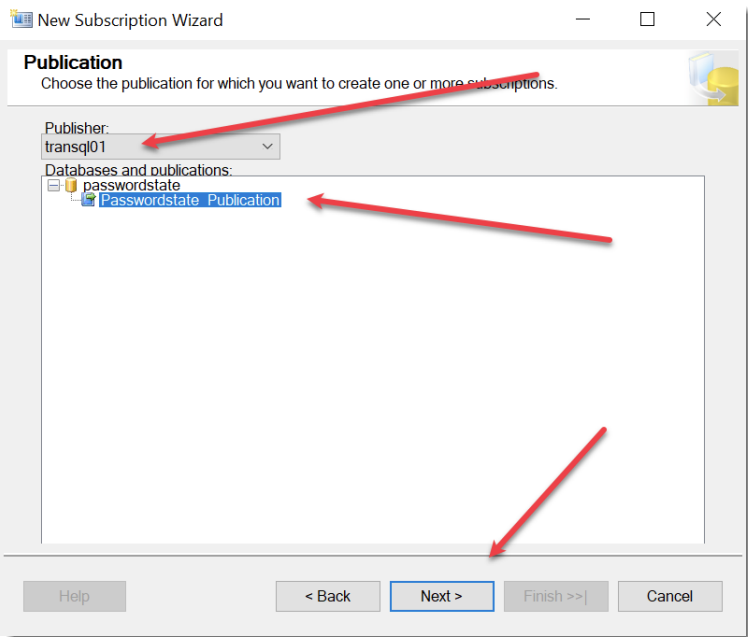
- Ensure you have transql01 selected as the Publisher, and also the Passwordstate_Publication, and click Next
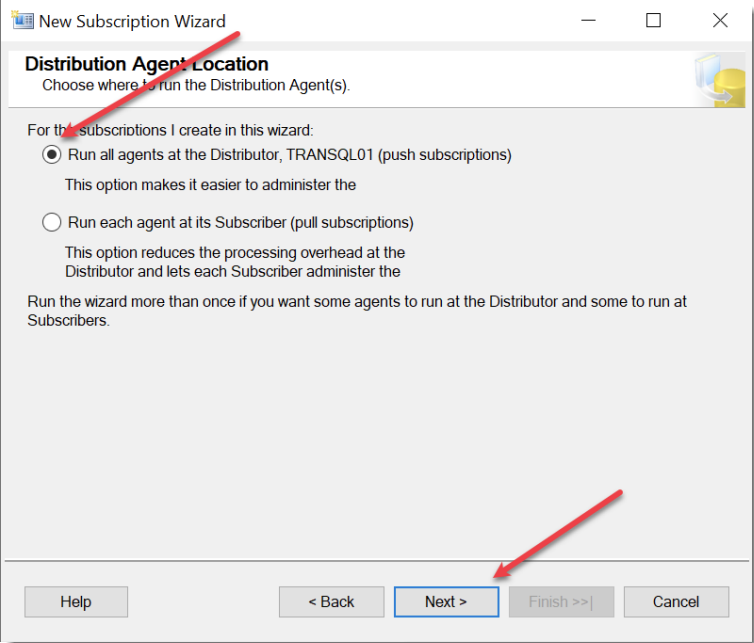
- Select Run all Agents at the Distributor, and click Next
- Click Add SQL Server Subscriber
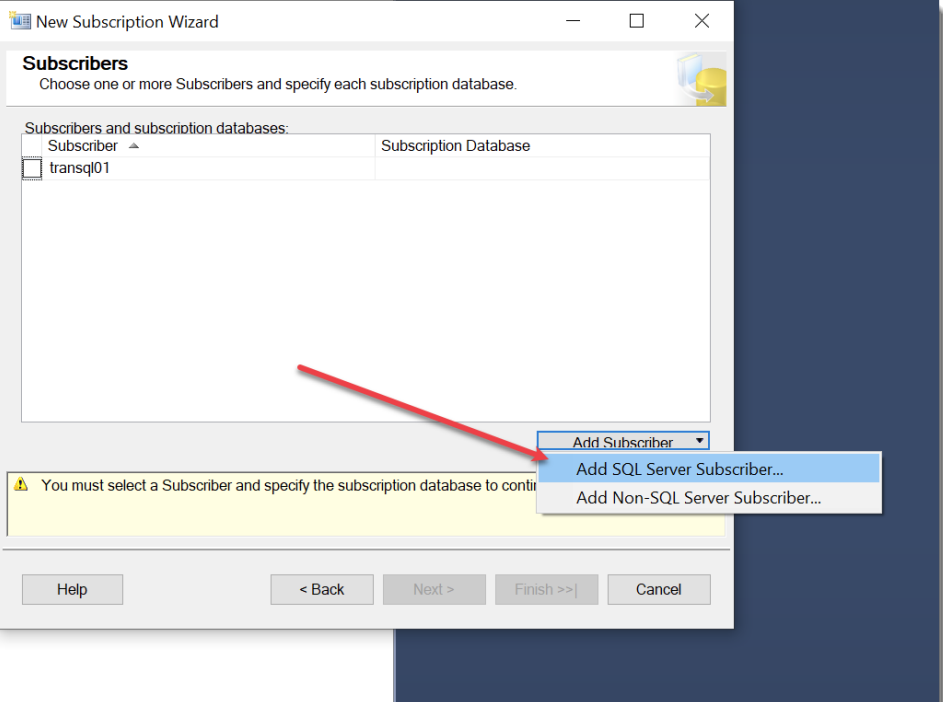
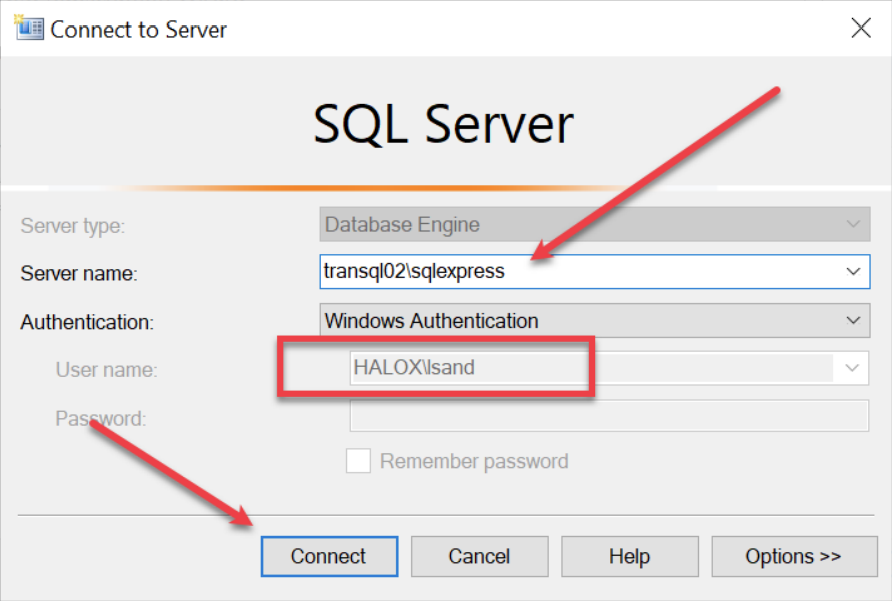
- Type in the name of your second database server, (transql02\sqlexpress), that you’ll be replicating data to. By default, it will try to use the currently logged-in user, (halox\lsand), to establish the connection. If this account does not have permissions in SQL on transql02, you’ll either need to grant it permissions or use another account that does, such as the local SA account for transql02 server.
Ensure you include the instance name on this remote server if appropriate:
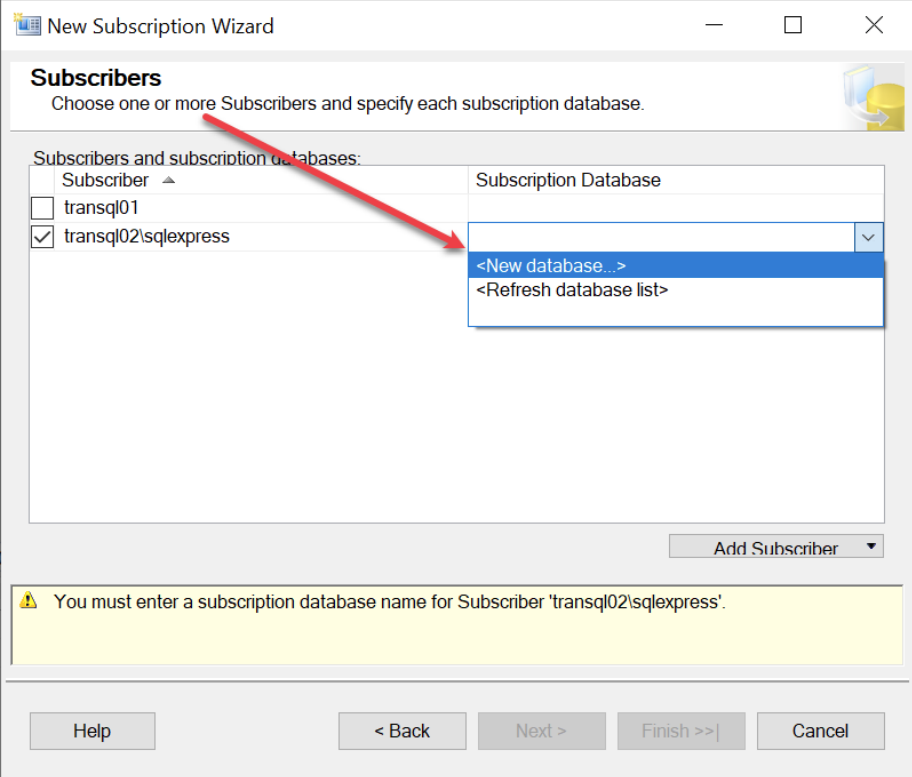
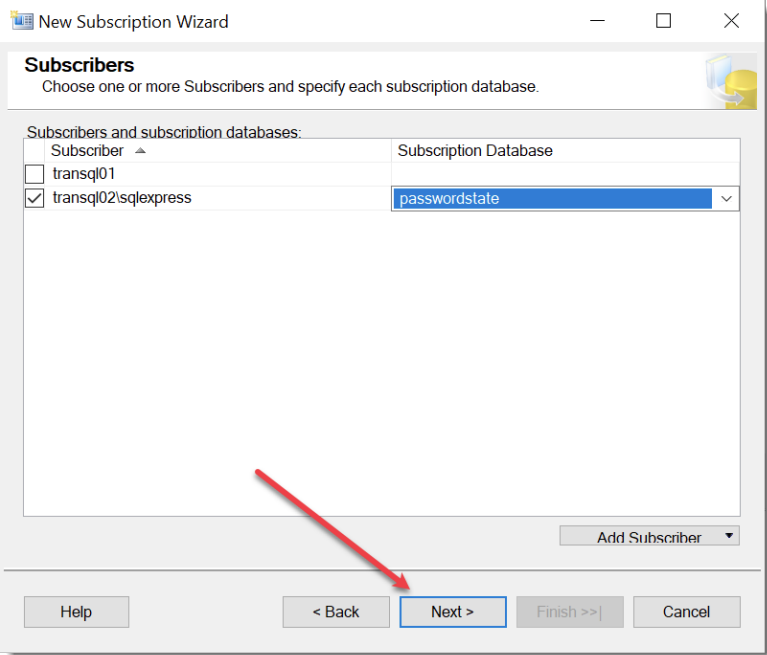
- Tick transql02\sqlexpress and select New Database
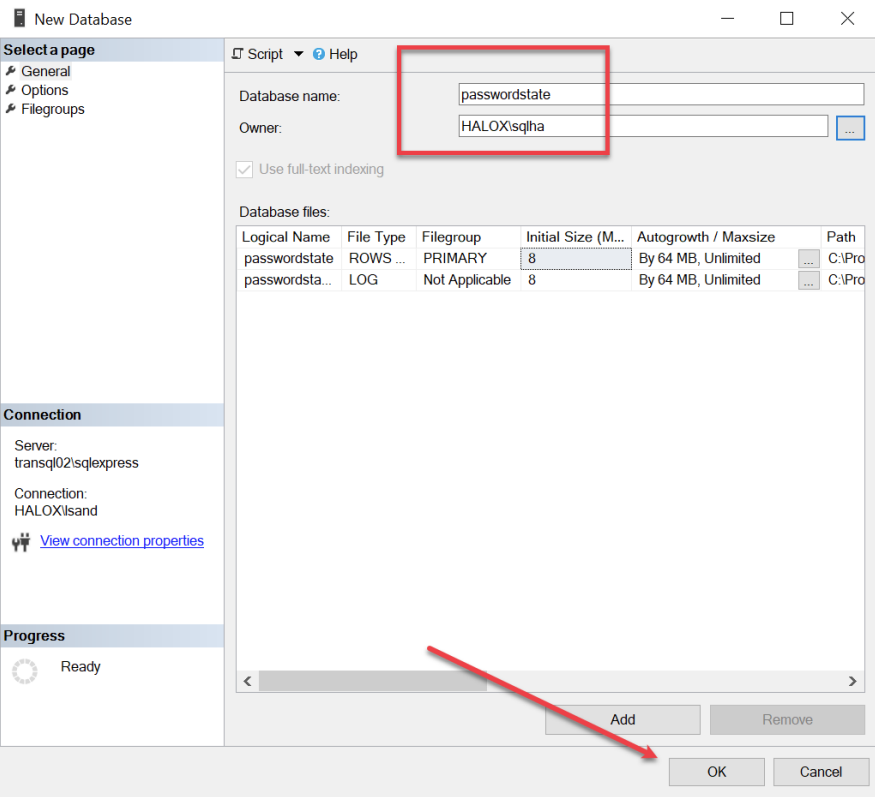
- Set the database name to be passwordstate, and then click the button to set an Owner of the database
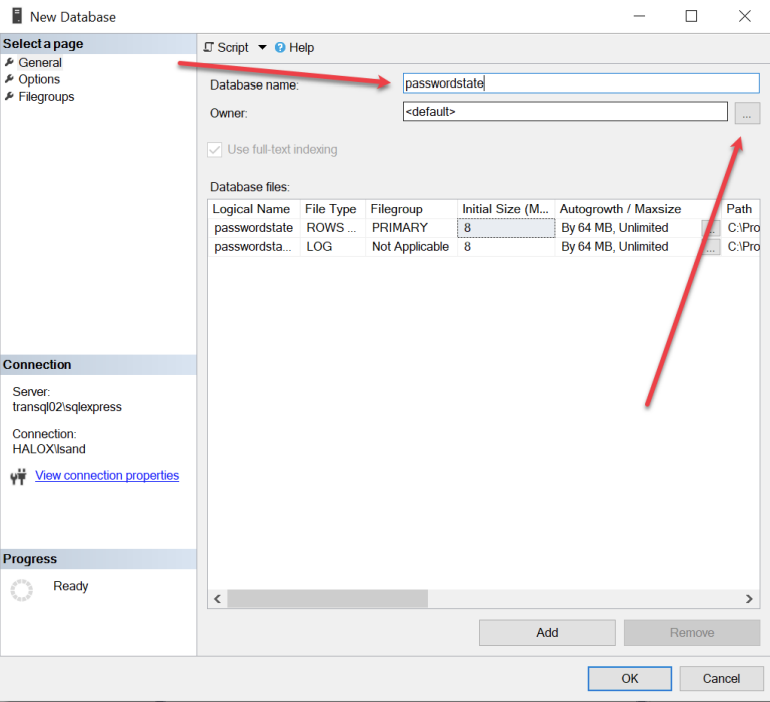
- Click the Browse button and select the halox\sqlha account and click OK
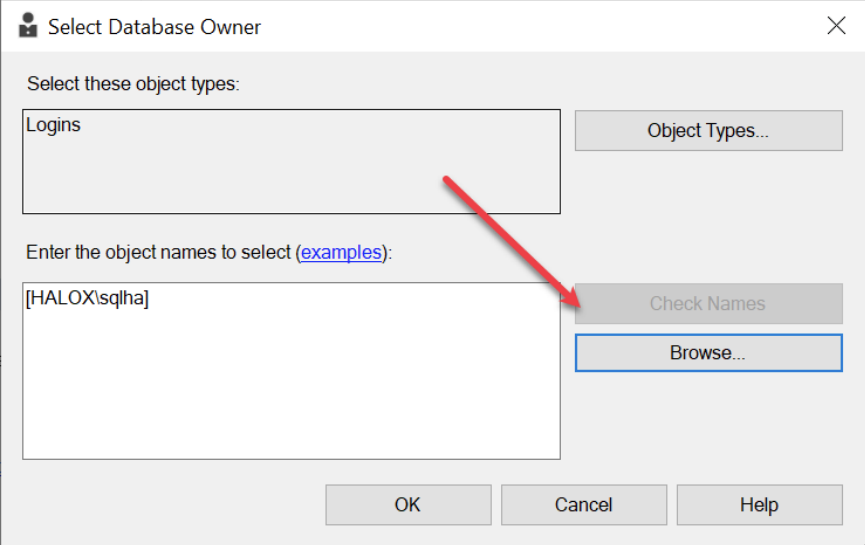
- Click OK
- Click Next
- Select the button shown in the screenshot below
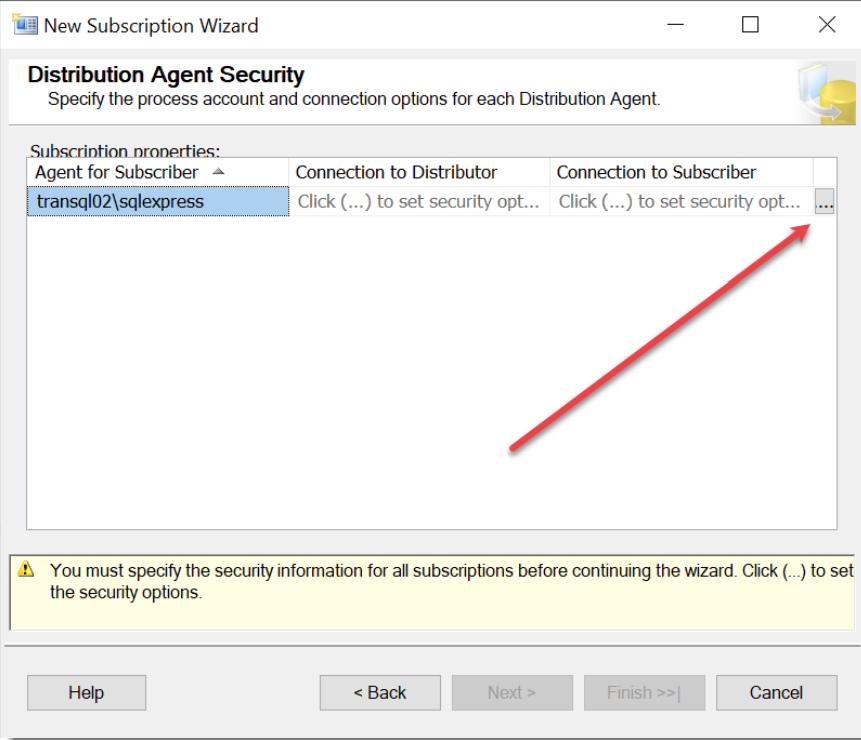
- Set you domain account in the format of domain\username, and apply the correct password, and click OK
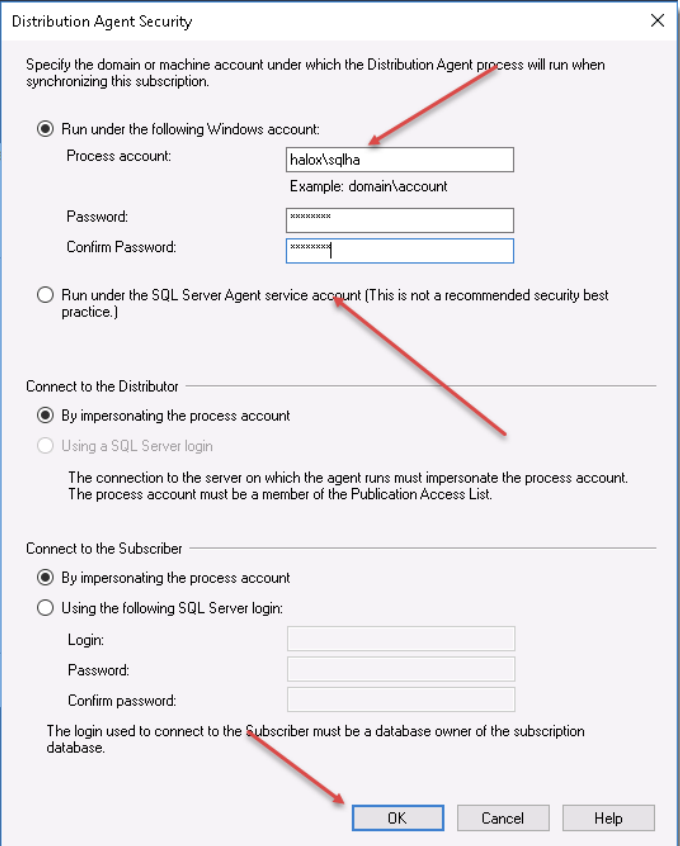
- Click Next
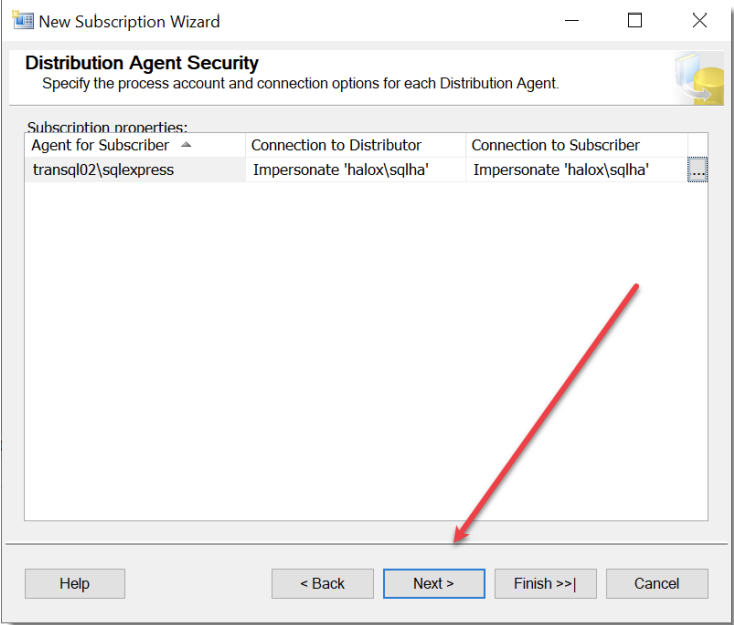
- Select Run continuously, and click Next
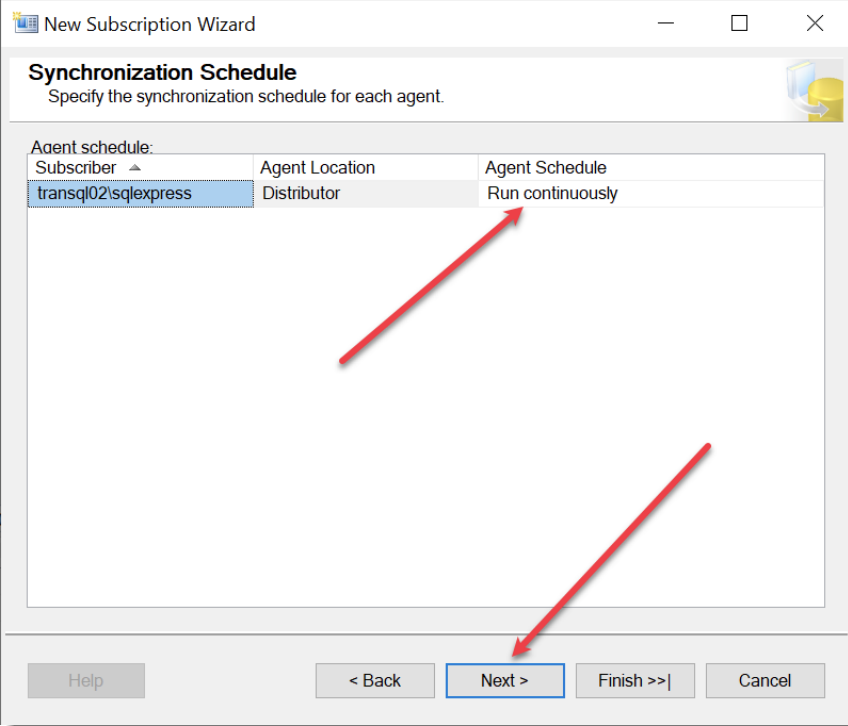
- Ensure you select to Initialize Immediately, and click Next
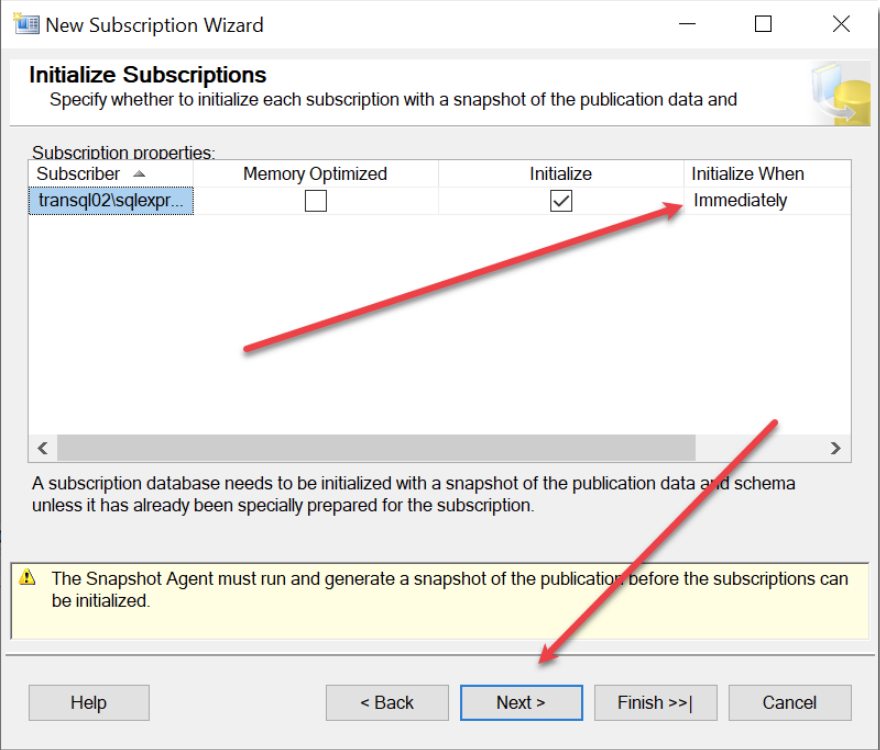
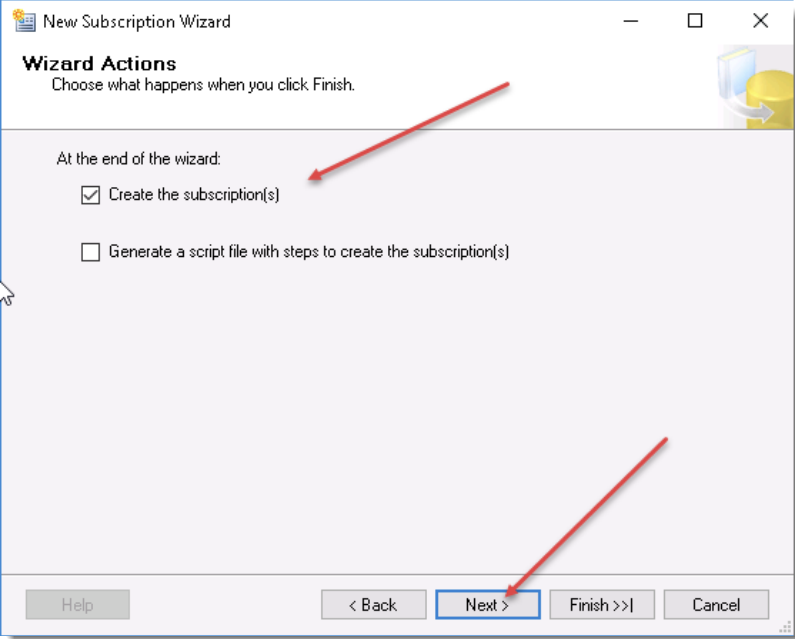
- Tick Create the Subscriptions, and click Next
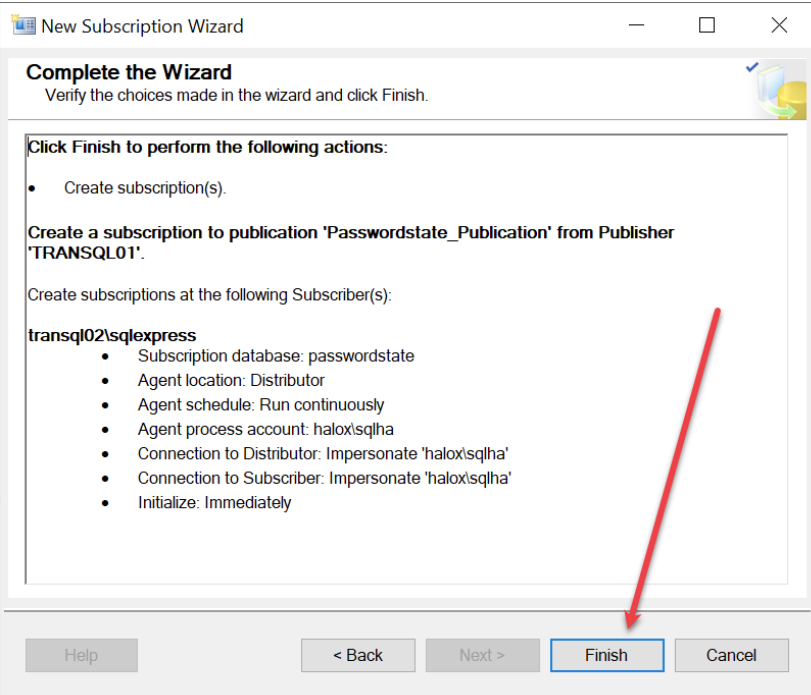
- Click Finish
- After successfully creating the Subscription, click Close
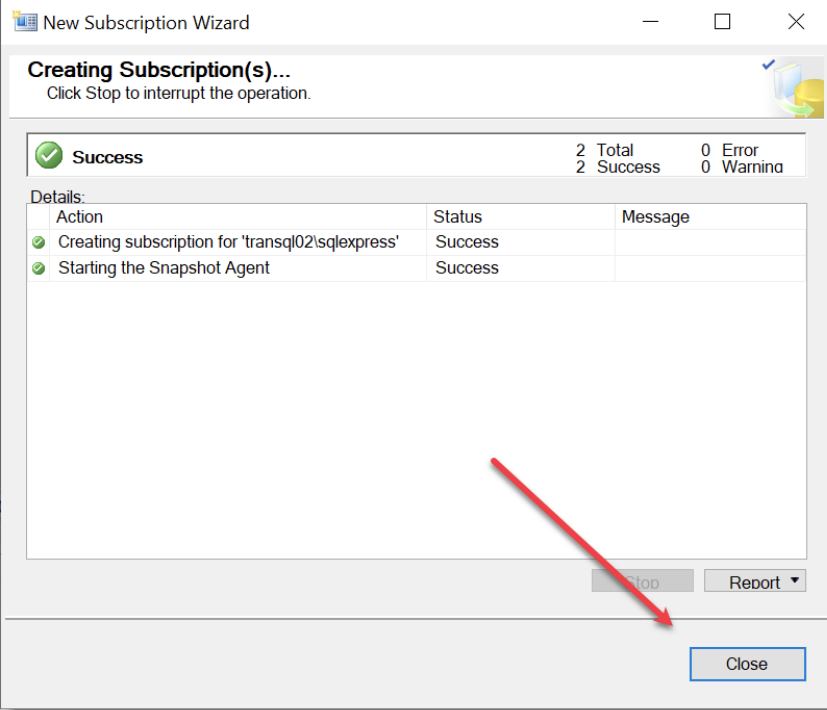
Note: If creating the subscriber fails at this point, and you are using SQL Server 2019, this may be caused by a bug in SQL. Please see How to troubleshoot Transaction Replication for a fix for this issue.
Connect Passwordstate to your replicated Database
Now that you have your data replicating to a second database, you can set up your second Passwordstate website so you can have instant read only fail over access. Please note you will need the High Availability Module in Passwordstate for this, as this allows for two production instances of Passwordstate running in real time.
To set up your second Passwordstate website, please follow these instructions: High Availability Installation Instructions
Prior to installing your second website using the instructions above, you’ll need to add your passwordstate_user SQL account into your second database instance.
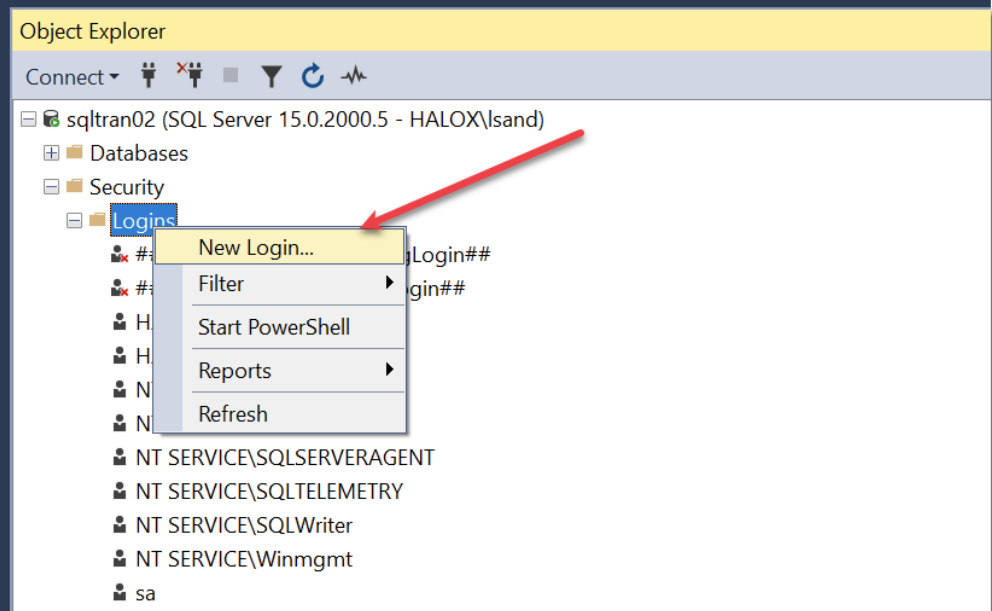
- Open SQL Management Studio Tools and connect to your second database server, and under Security -> Logins, select New Login:
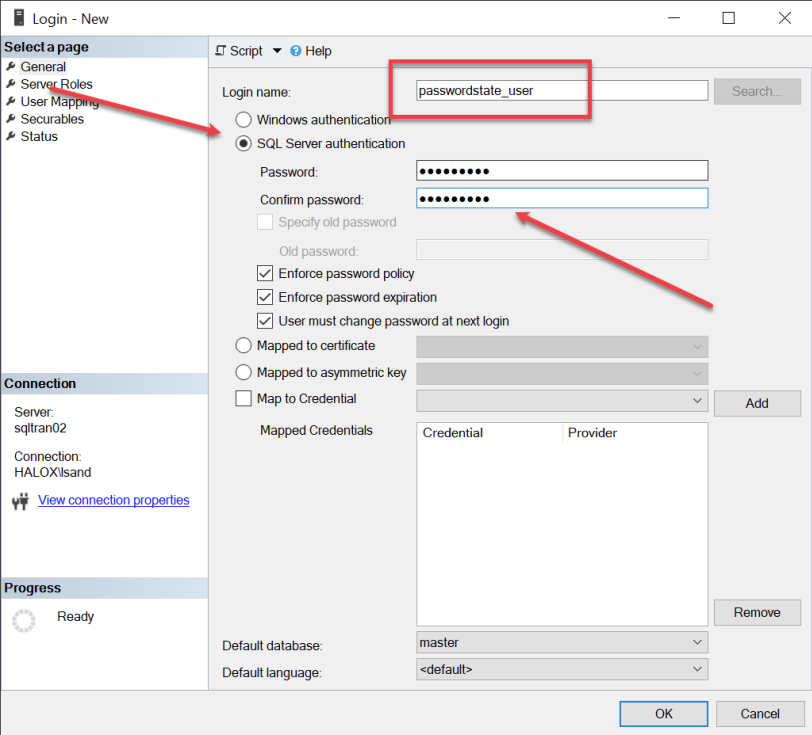
- Ensure you select SQL Server Authentication, and set your name for the account and a password. Note these details will be used during the initial install of your High Availability server:
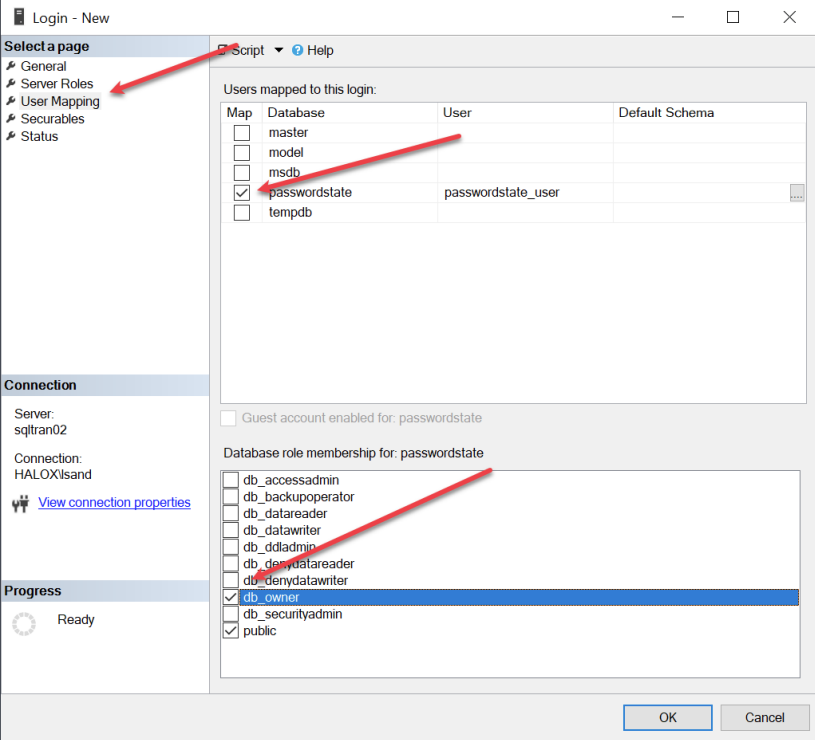
- Now you need to give this new account db_owner rights to the Passwordstate database:
Transactional Replication Considerations
Allow large blocks of data to replicate:
If using transactional replication, you will need to run the following SQL Statement against your primary and your secondary database as a once off process. This will allow replication of documents to occur between the two databases.
The below statement configures SQL Server to allow an unlimited size document to replicate, as by default SQL is configured with a maximum size limit.
SQL
GO
EXEC sp_configure 'show advanced options', 1 ;
RECONFIGURE ;
GO
EXEC sp_configure 'max text repl size', -1 ;
GO
RECONFIGURE;
GO
How to troubleshoot Transaction Replication
- Ensure your SQL Services are started on both servers and are running under the default accounts
- Ensure your domain account, which was halox\sqlha in this document, has the following permissions:
- It must have db_owner rights to both Passwordstate databases on both servers
- It must have db_owner rights on the Distribution database on your Primary database server
- It must have Modify permissions to the snapshot folder on your primary database server
- If you Launch the Replication Monitor from the Publication, it will give you any errors if you are experiencing them.
- A quick test to see if replication is working between the two Passwordstate databases, is to run the following SQL Query in SQL Management Studio when connected to each database server. This will return a count of the Auditing table, and you should get the exact same results from both queries if replication is working successfully
SQL
USE Passwordstate
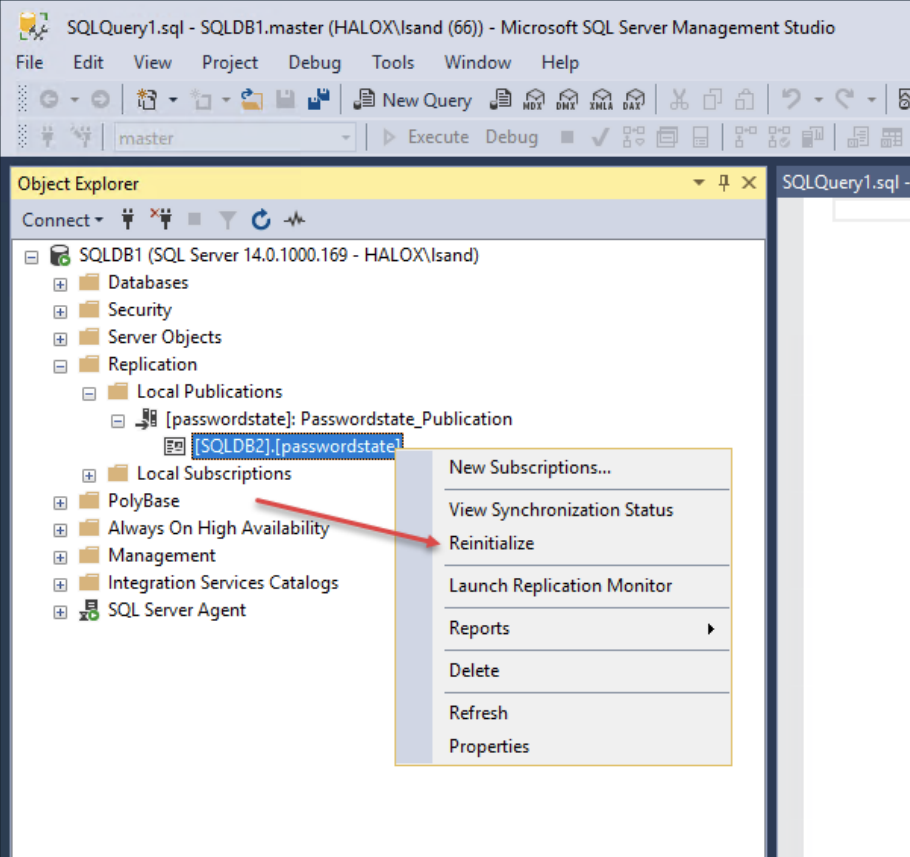
SELECT COUNT(*) FROM Auditing- Check your snapshot folder for any files. If there are no files then replication is not working. Check all permissions are set correctly, and possibly reinitialize the replication
SQL Server2019 Issue
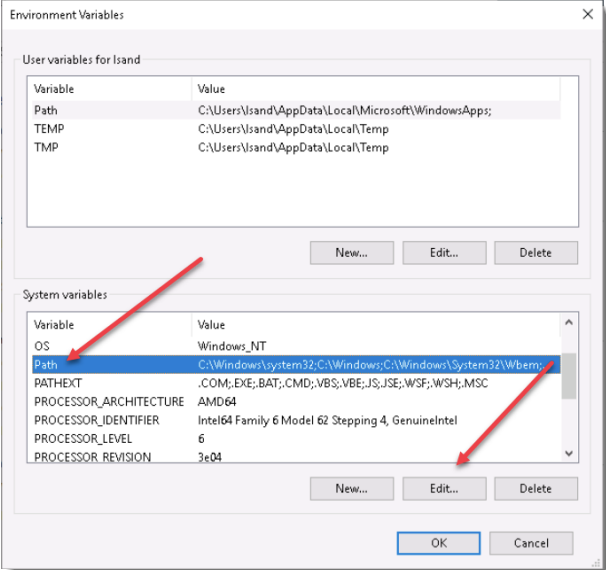
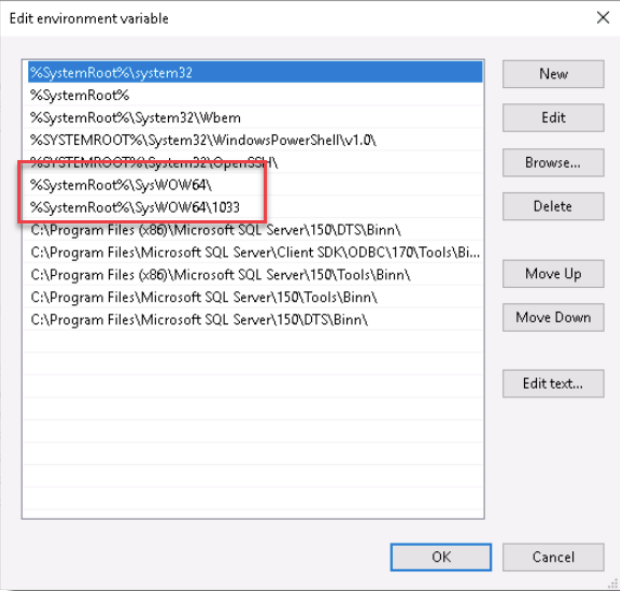
SQL Server 2019, at the time of writing this document, contained a bug which affected the creation of snapshots. If you find that your replication is failing try adding the following environment variables to your System Path on your primary database server:
%SystemRoot%\SysWOW64\%SystemRoot%\SysWOW64\1033