
Active Directory & Entra ID
The Active Directory & Entra ID screen is used primarily for two purposes:
- Adding Active Directory (AD) domains or Entra ID Identity Providers (idP) will allow you to begin adding in users and synchronizing security groups into Passwordstate, which will give those users a valid login to begin using the software
- Adding Active Directory domains will be used when performing password resets for privileged accounts on those domains
Active Directory Domains
When adding in a new On-Premise Active Directory domain, there are a few things to consider:
- Each domain must be assigned a Privileged Account which will be used to read user accounts and security group attributes, and sync this data into Passwordstate.
- This privileged account requires Read Only access to the domain, and this account can be setup on the Privileged Account Credentials screen.
- By default, it is recommended this account is a member of the Domain Users security group, but higher privileges may also be required, if your AD environment has any permission restrictions on accounts or OUs. Delegating permissions in AD for your privileged account may be required if experience sync issues.
- The Used for Authentication option is for authentication screens in Passwordstate. If you do not want users from a specific domain to be able to log into Passwordstate, then deselect this option on any domain of your choice
- If using LDAPS (LDAP over SSL) for connectivity to your domain, and are wanting to communicate to non-trusted domains, please see the section below titled LDAPS and Non-Trusted Domains.
- All authentication options require UDP Port 389 to be open in order to find the nearest domain controller. For full open port requirements for AD communications, see the Passwordstate Open Port Requirements guide.
Discover Active Directory Domain Information
In this section you larn how to find the Netbios, Fully Qualified Domain Name (FQDN) and LDAP Query String for your domain.
Option #1 - Using Active Directory User and Computers (ADUC) tools
- Open Active Directory User and Computers (ADUC), click View and enable Advanced Features
- In the Console Tree (Left Pane) you will see your domain listed. This is the FQDN value of your domain
- Right click your domain, and select Properties
- Go to Attribute Editor (tab) and look for Name, Distinguished Name attributes. These values equate to your Netbios and LDAP Query String values
Option #2: Using Powershell
On a computer which is joined to your domain, open Powershell ISE and paste in the following code to return the appropriate values:
powershell
cls
$root = [ADSI]"LDAP://RootDSE"
$domainDN = $root.defaultNamingContext

Write-Output "Netbios: $env:userdomain"
Write-Output "FQDN: $env:userdnsdomain"
Write-Output "LDAP Query String: $domainDN"
Example Output:
Netbios: CLICKDEMO
FQDN: CLICKDEMO.COM
LDAP Query String: DC=clickdemo,DC=com
Adding a new Active Directory Domain
Stage 1: Adding a Privileged Account
In this section you should have an Active Directory account already prepared, which has Read only permissions to your domain.
- In Passwordstate, go to Administration -> Privileged Account Credentials and click the Add button
- Give your account a brief description, and set the username and password in the format of domain\username or username@FQDN
- Select the Account Type as Active Directory and click Save
Example below: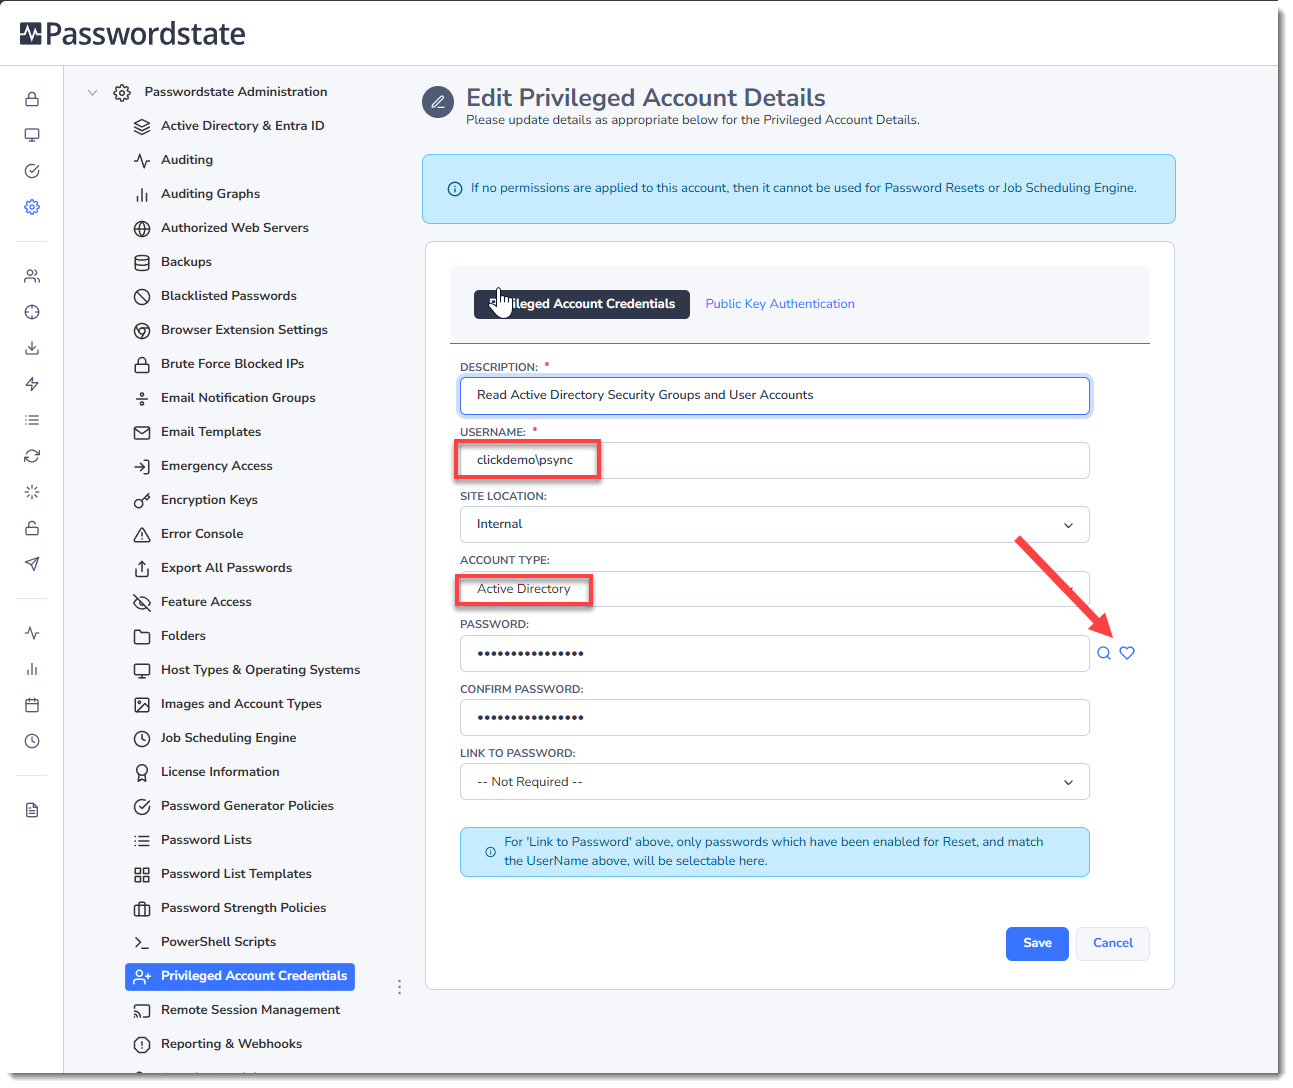
Stage 2: Adding the Domain
- Go to Administration -> Active Directory & Entra ID and under On Premise, click the Add button.
- Ensure you set the AD Domain Netbios Name, FQDN and AD Domain LDAP Query String that you discovered in the Discover Domain Information section above.
- By default, Passwordstate will do a broadcast to your domain to find the nearest domain controller to connect to, but if needed you can hardcode a known working domain controller in the Domain Controller FQDN field to force all connections to be made to that server.
- Set the privileged account you created in Stage 1 above under the Account With Read Access drop down menu
- Choose the appropriate protocol such as Kerberos and click Save to finish adding your domain
Example below: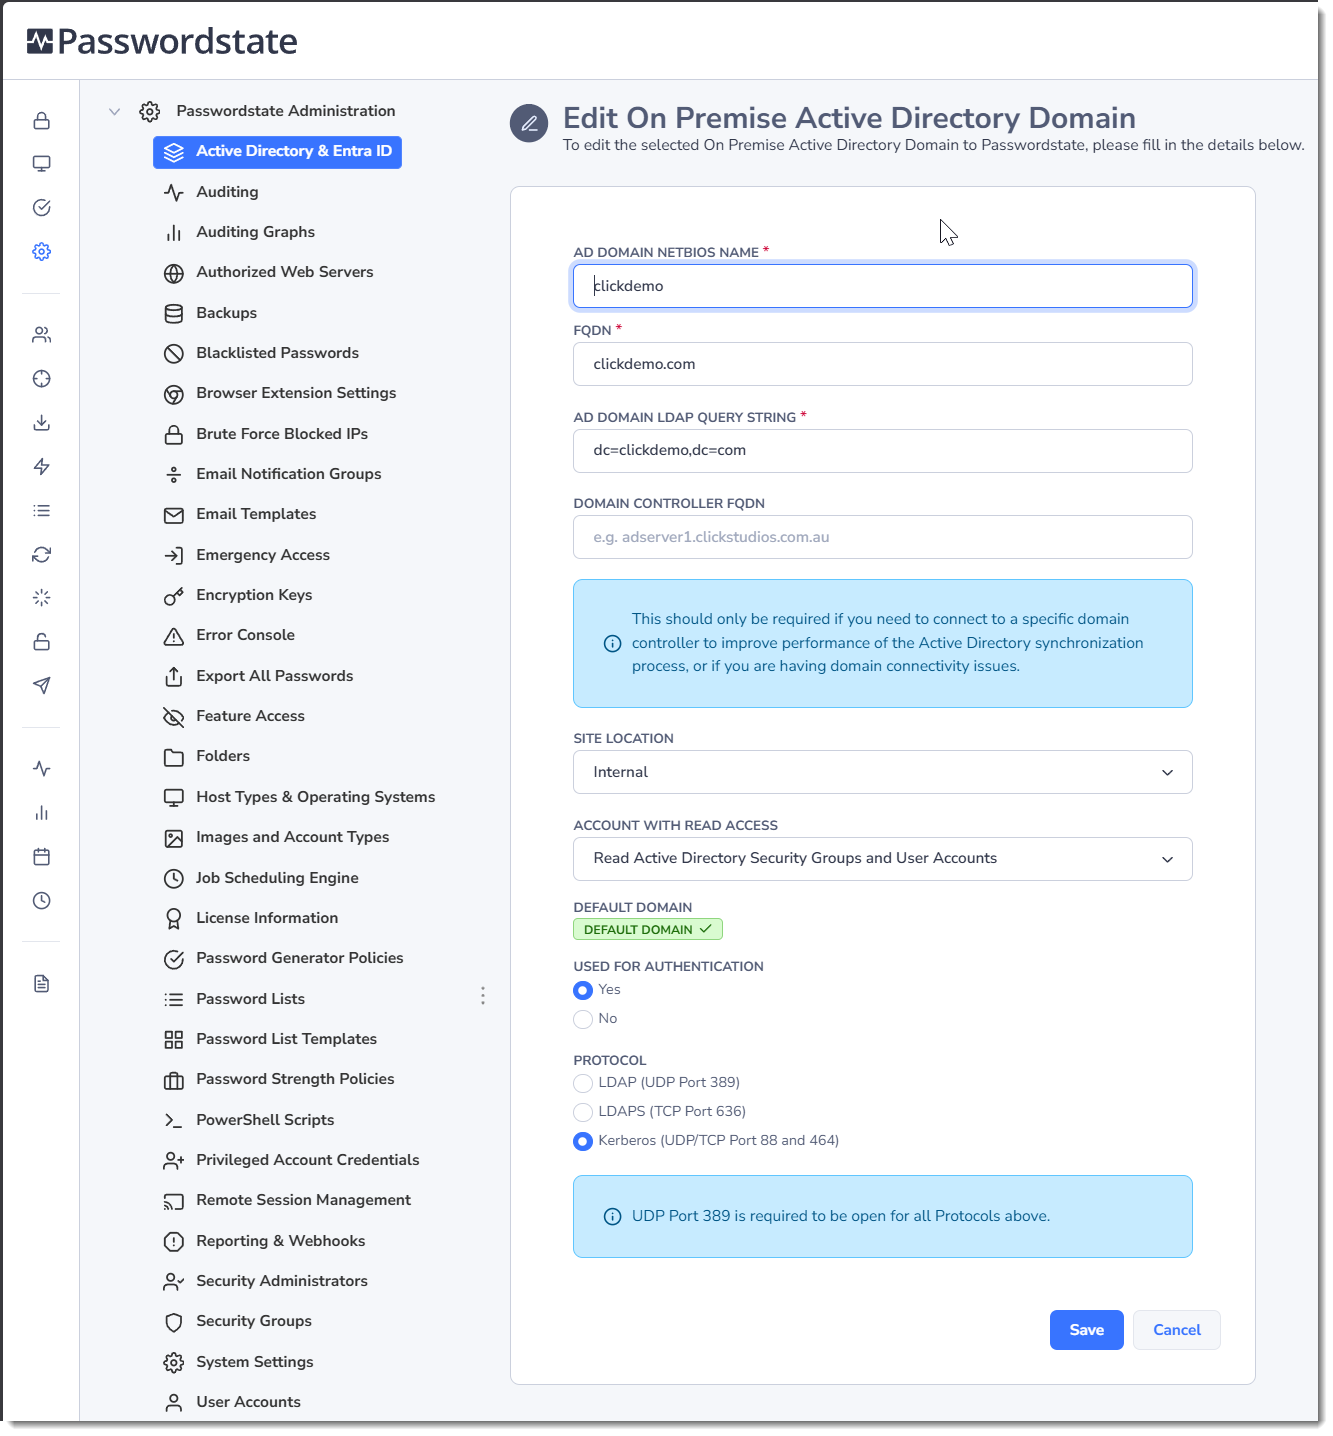
Now you can begin adding in new User Accounts or Security Groups from your domain.
LDAPS and Non-Trusted Domains
If you also want Passwordstate to communicate to non-trusted domains with LDAPS, i.e. other domains your web server is not a member of, then you will need to export the CA certificate from these domains, and import them onto your Passwordstate web server. If you have Passwordstate installed on a server in a Workgroup environment, then this is also needed for all domains you wish to communicate with. Below are some instructions for how this can be done.
Export the Domain CA Certificate
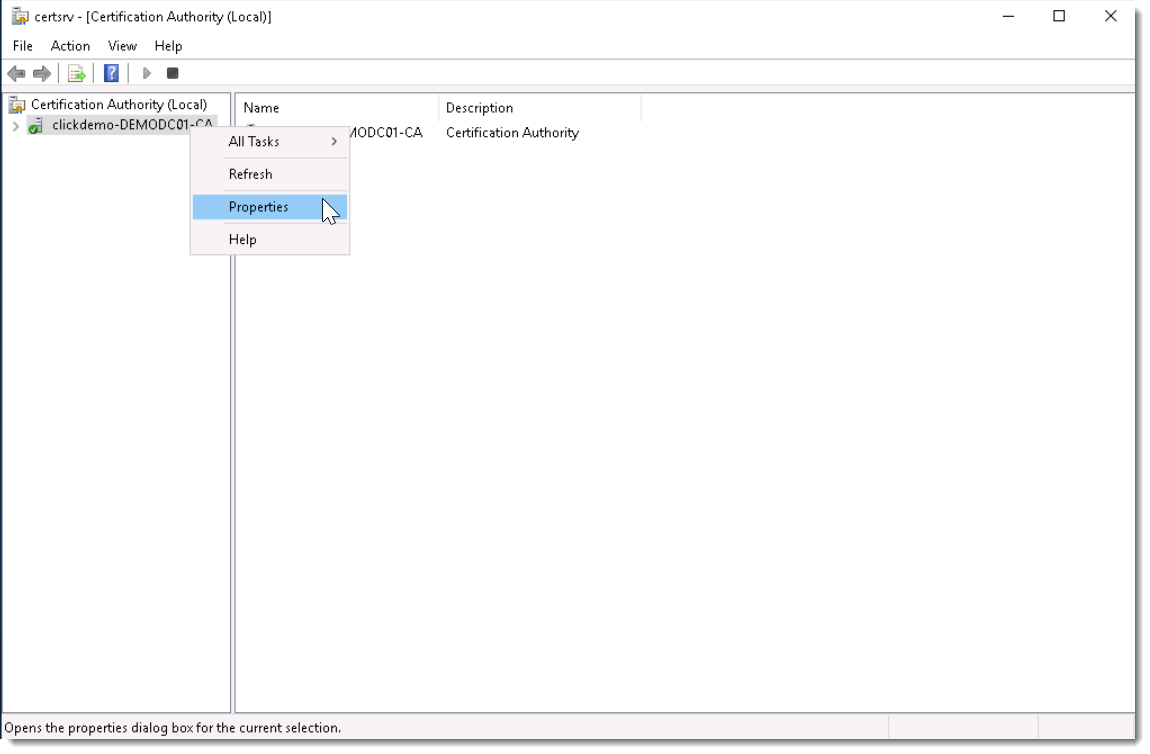
- On your Domain Controller that has the Certificate Authority installed, open Server Manager > Tools > Certificate Authority
- Right-click the CA server and select Properties
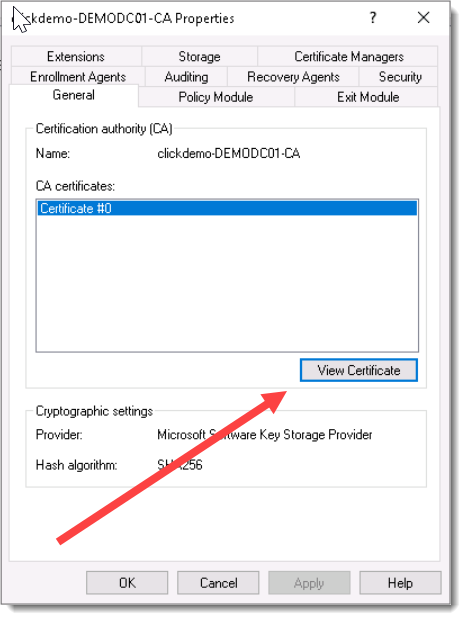
- From the General Menu, click View Certificate
- On the Details tab, click Copy to File
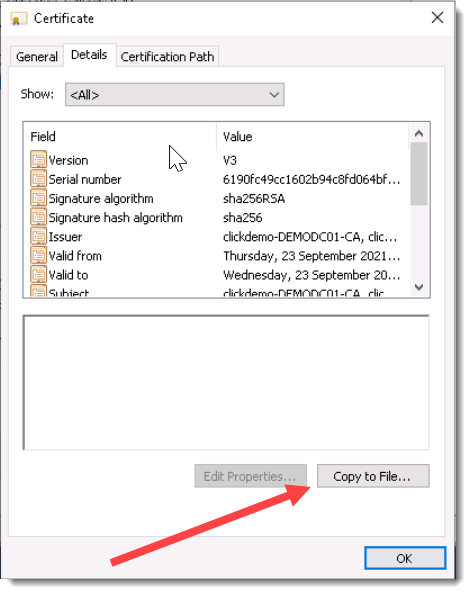
- Click Next
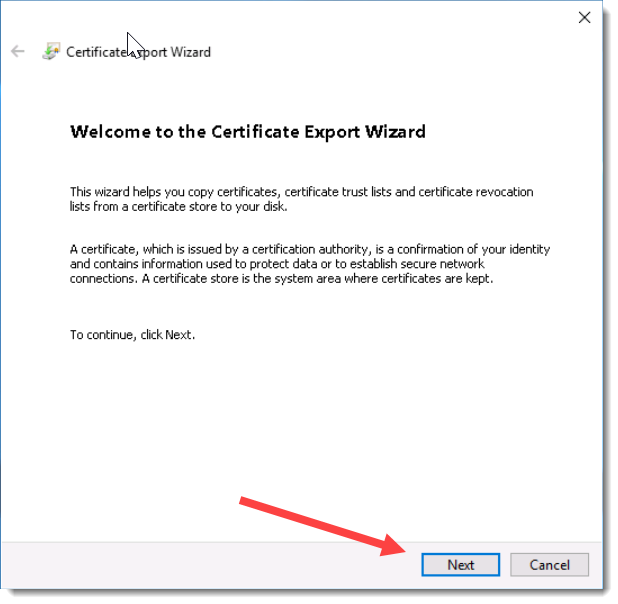
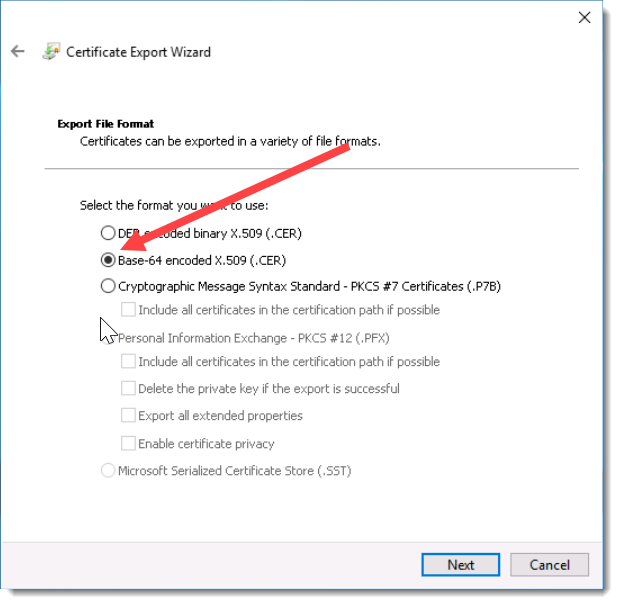
- Choose Base-64 encoded X.509(.CER) and click Next
- Save the certificate to your desktop, or somewhere local and click Next
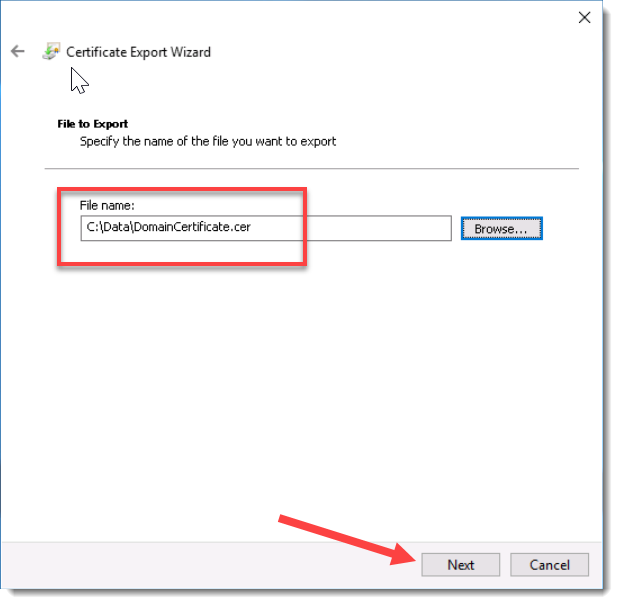
- Click Finish
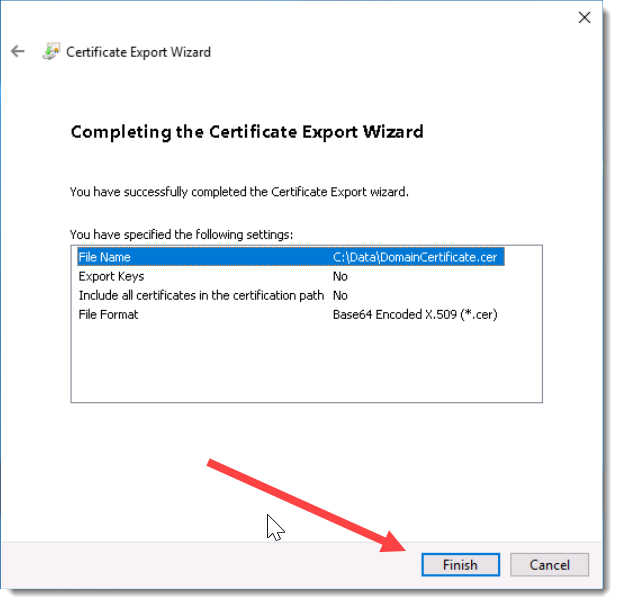
- Copy the certificate to your Passwordstate web server and close all windows.
Importing the Certificate into your Passwordstate web server
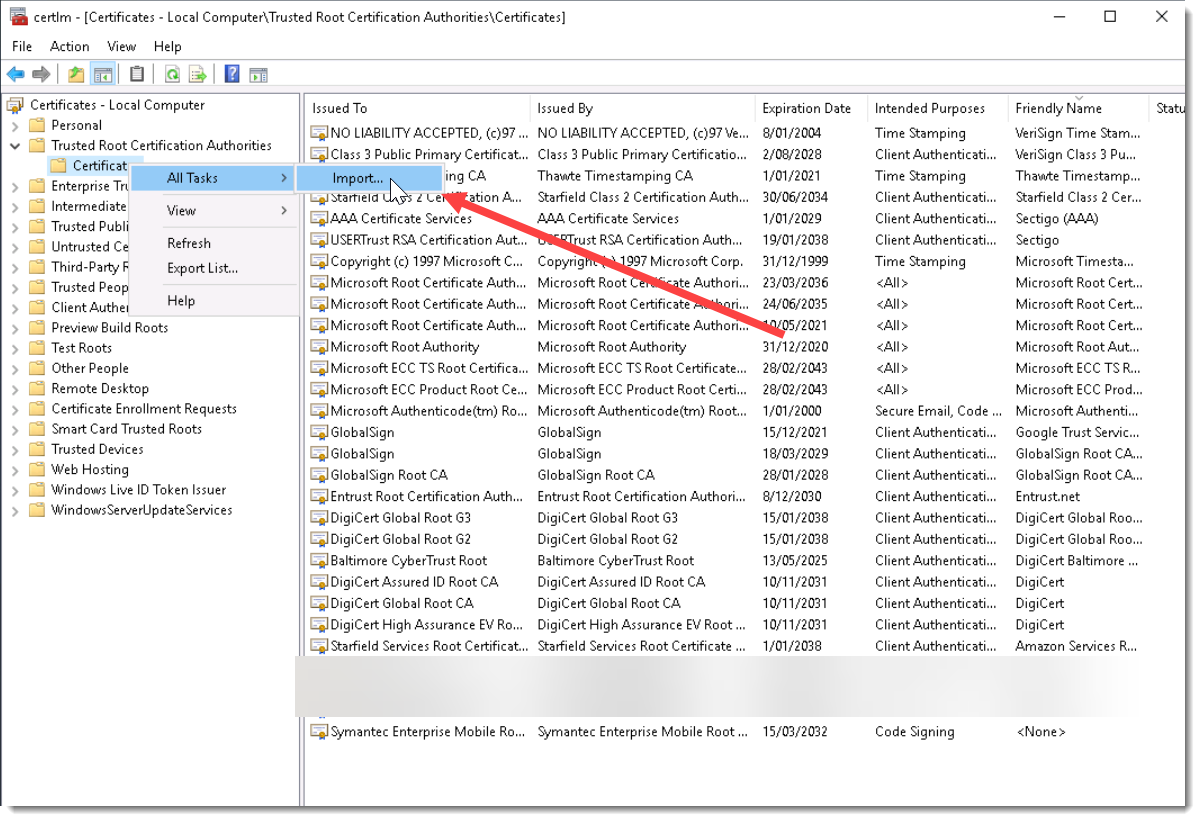
- On your Passwordstate web server, got to Start -> Run and type in certlm.msc to open Certificate Manager for Local computer
- Expand Trusted Root Certificate Authorities -> Certificates
- Right click Certificates and select All Tasks -> Import
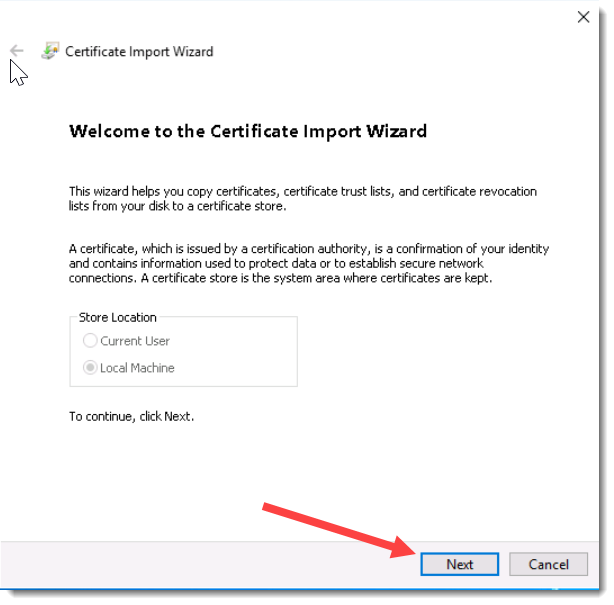
- Click Next
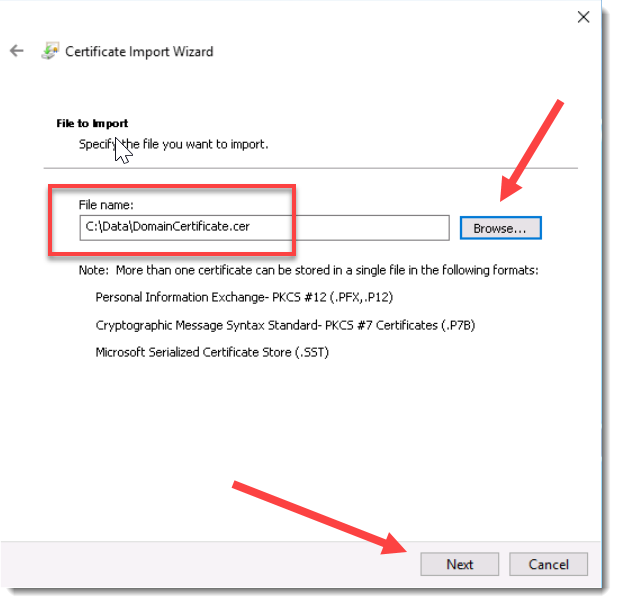
- Browse to the certificate and click Next
- Click Next to place the certificate in the Trusted Root Certificate Authorities store
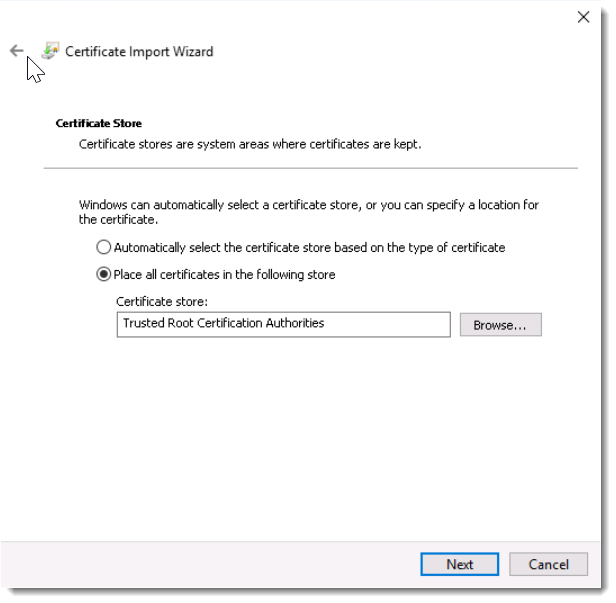
- Click Finish and then OK
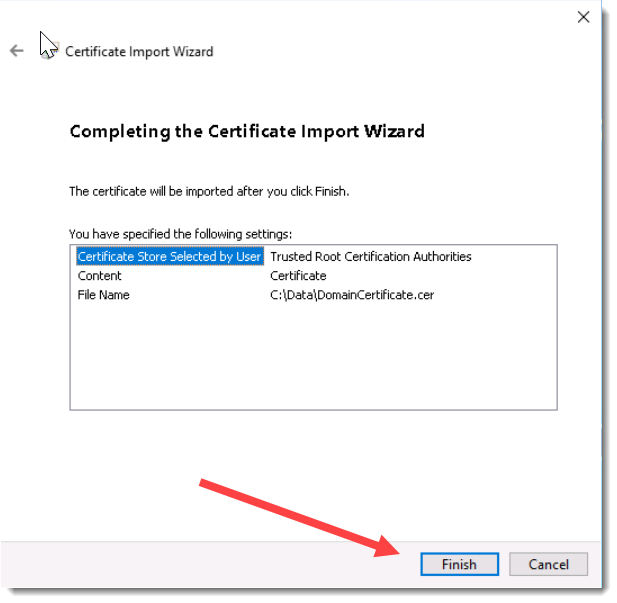
This ends the import process, and your domains should now be able to securely communicate using LDAP over SSL
Entra ID Providers (idP)
Adding in a Microsoft Entra ID tenant will allow users to log into Passwordstate using those credentials. In your Azure Tenant you will need to create a Graph API App, which will give Passwordstate enough permissions to securely add and synchronize Users and Groups from Entra ID into Passwordstate. You will then need to create a SAML application, which will allow your users to securely authenticate into Passwordstate, using their Entra ID credentials.
Below is the full process to process add in an Entra ID domain.
Once you have finished this process below, in order for your users to authenticate to Entra, you must go to the screen Administration -> System Settings -> Authentication Options tab, and enable SAML Authentication here.
Creating the Microsoft Graph API app
- Log into portal.azure.com with an Admin account of your choice
- Click Microsoft Entra ID
- In left hand pane, click App Registrations
- Click New Registration
- Give your App an appropriate name, ie “Passwordstate Entra ID API Application” and click Register
- Take note of the Application (client) ID and the Directory (tenant) ID. (these values will be used later in Passwordstate)
- Click on the Add a certificate or secret link on the same page
- Click New Client Secret and enter a description and expiry date of your choice, and click Add
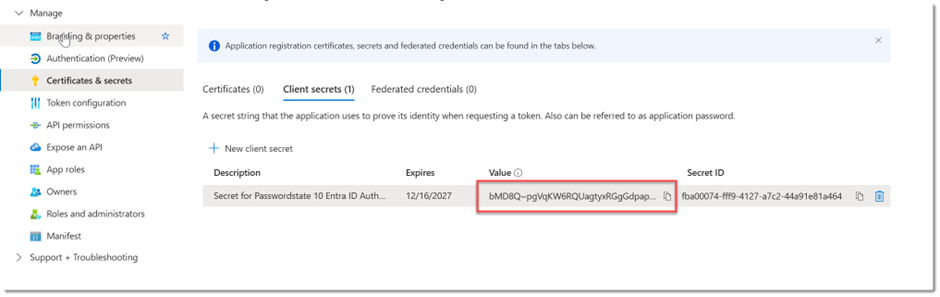
- On this screen take a note of the client secret value, as per the screenshot below. Once you browse away from this page, you’ll never be able to view this again, so it’s important to take a copy of it, and store it in a safe place
- In the left hand pane, click API permissions, click Add a Permission and then click the Microsoft Graph button
- Click the Applications Permissions button
- Search for and add the permission called User.Read.All
- Repeat the steps above to and add in the permission called GroupMember.Read.All
- Back on the API Permissions page, click the Grant admin consent for Default Directory button
Creating a SAML application
- Log into portal.azure.com with an Admin account of your choice
- Click Enterprise Applications
- Click New Application button
- Click the Create your own Application button
- Give your application a meaningful name, such as “Passwordstate SAML Authentication”
- Select the option called Integrate any other application you don't find in the gallery (Nongallery) and click the Create button
- Your new application is created. From the Overview page, click the Single sign-on button
- Select the SAML button
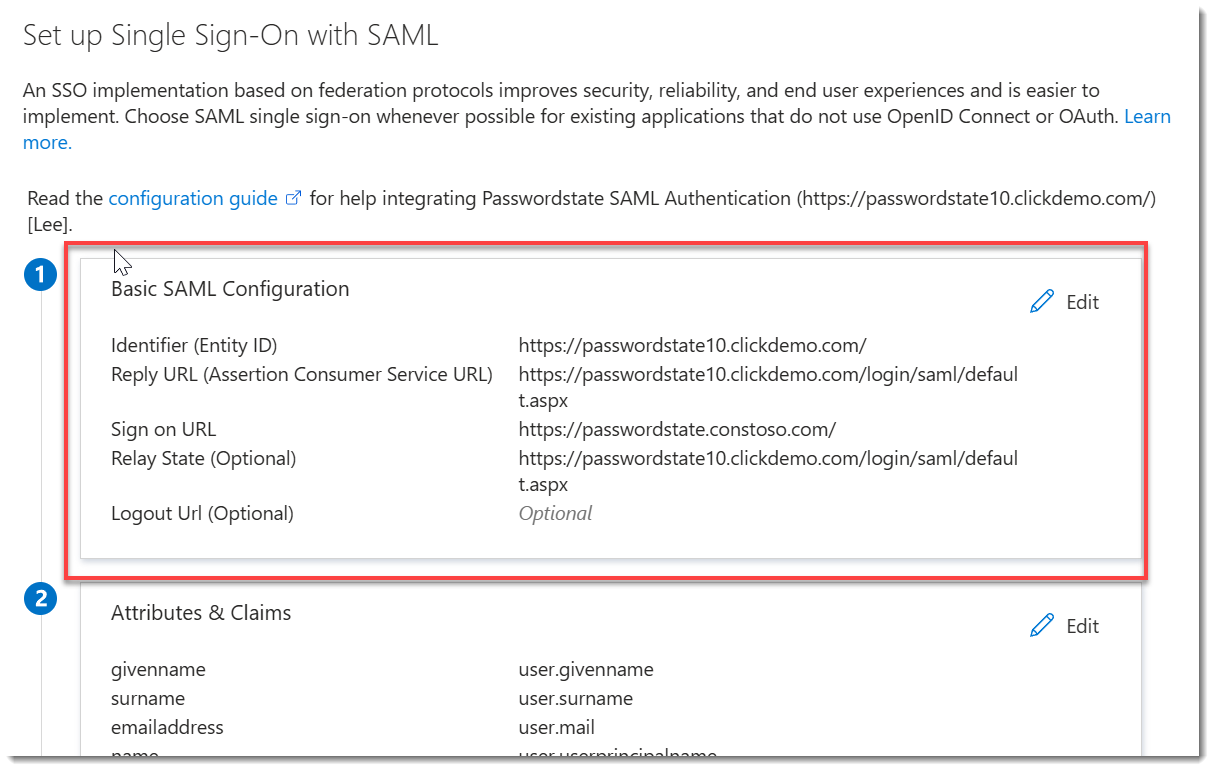
- Under the Basic SAML Configuration section, click the Edit button and configure the following five options below. This example uses
https://passwordstate10.clickdemo.comwhich is the Passwordstate URL used for this documentation. You will need to use your own Passwordstate URL when setting this up:
Identifier (Entity ID): https://passwordstate10.clickdemo.com
Reply URL: https://passwordstate10.clickdemo.com/logins/saml/default.aspx
Sign on URL: https://passwordstate10.clickdemo.com
Relay State: https://passwordstate10.clickdemo.com/logins/saml/default.aspx
Logout URL: (This is an optional setting, and you will be redirected to this URL when you log out of Passwordstate and a Single Logout Request will be sent to the Identity Provider)
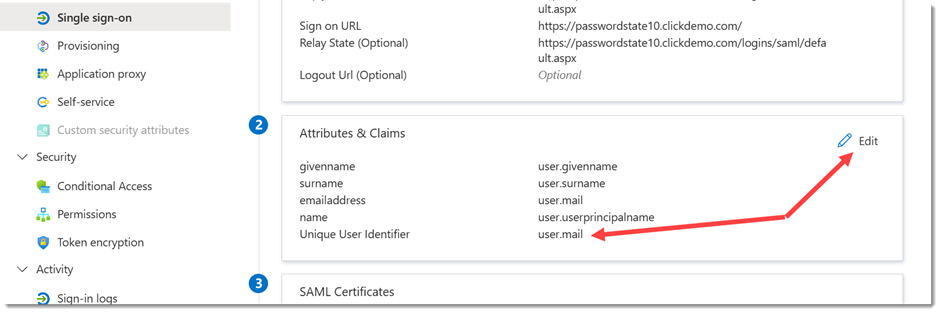
- Next, you need to choose which Unique User Identifier you will use. The value of this attribute in Entra ID must match the same value for the user account in Passwordstate, in order for a successful login. Typically, the email address attribute (user.mail) is the most commonly used identifier. Whilst still on the Single sign-on page, click the Edit button and select the Identifier of your choice:
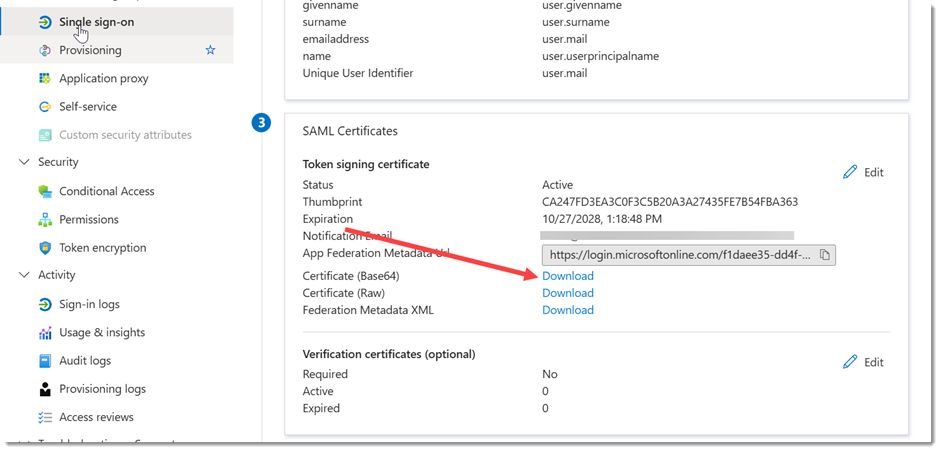
- Next, download the Certificate (Base 64) and save this to disk. Open this saved file with notepad and take a copy of the contents of the file which you will use later in Passwordstate:
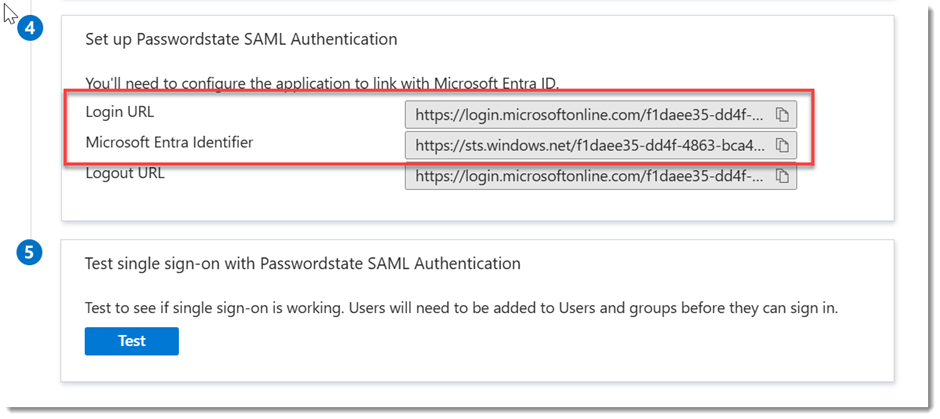
- Finally, take note of the Login URL and the Microsoft Entra Identifier, which will be used in Passwordstate in the next section of this guide:
Configure Passwordstate with your Entra ID information
- Log into Passwordstate and Browser to Administration -> Active Directory & Entra ID
- Under the Entra ID grid, click the Add button
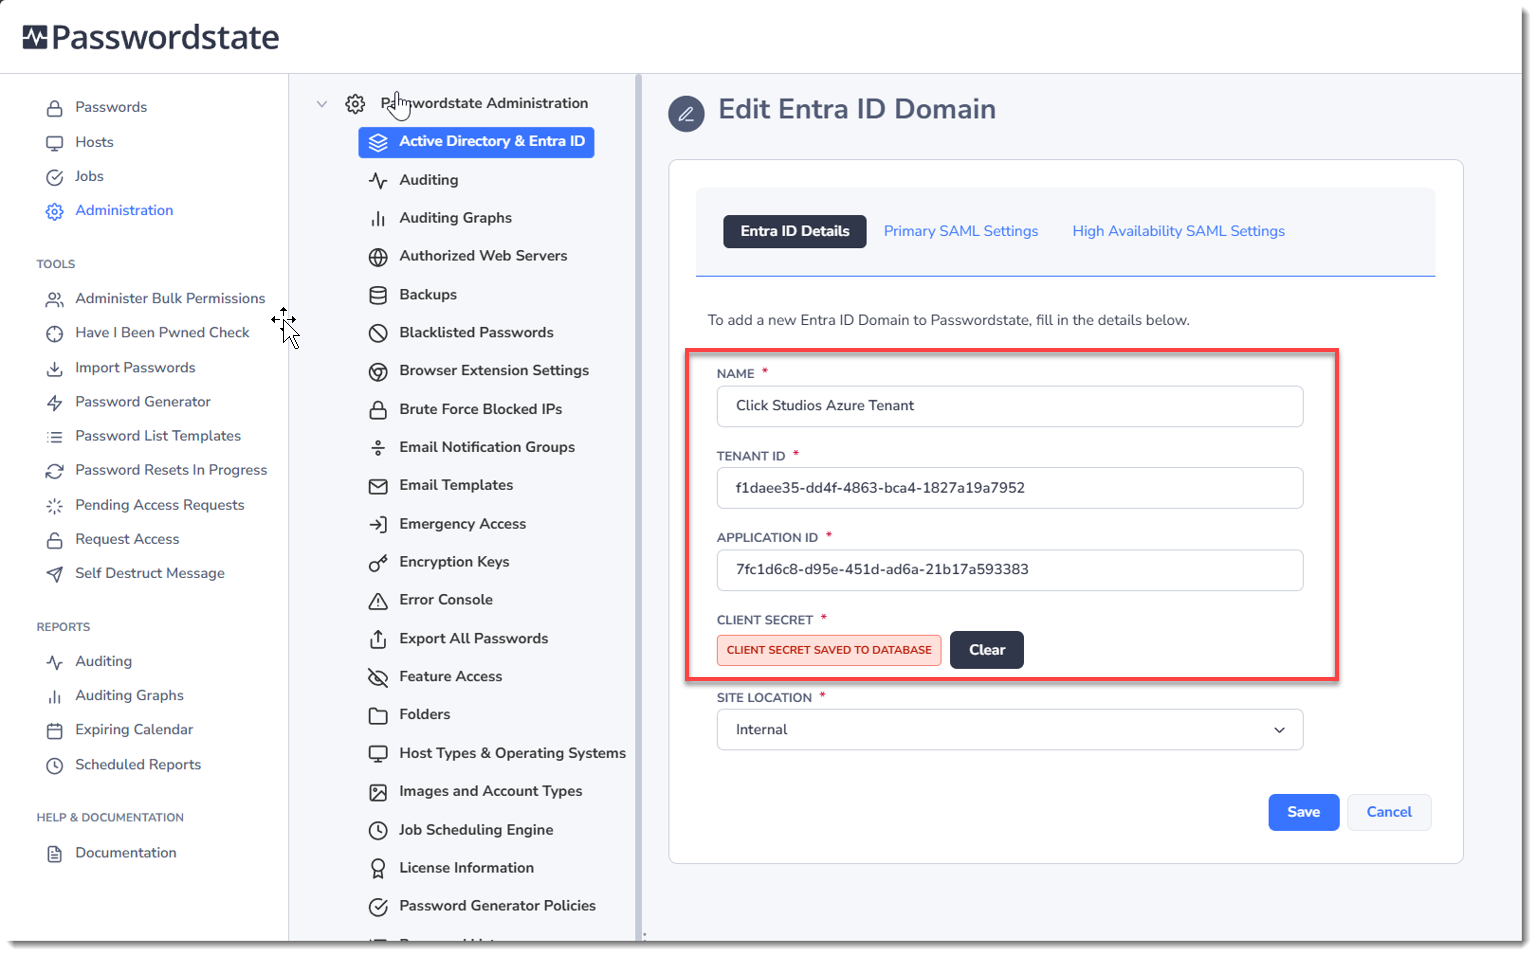
- Under the Entra ID Details tab, enter a descriptive name of your tenant, and paste in the Tenant ID, Application ID and Client Secret you created in Creating the Microsoft Graph API app section above:
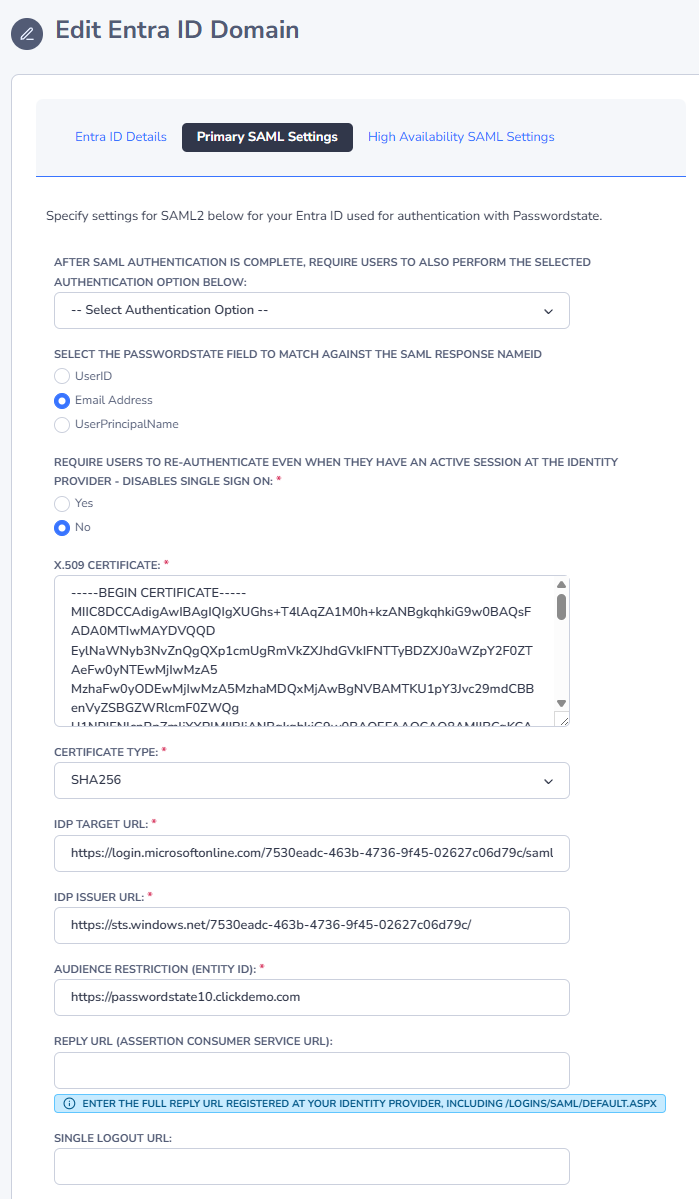
- Click on the Primary SAML Settings tab and configure settings using the information you gathered in all the steps above, and click Save. The Audience Restriction value is your Passwordstate URL:
This completes the setup process. Now you can begin adding in new User Accounts or Security Groups from your Entra ID provider.