
Move Passwordstate To New Web And Database Server
Instructions for moving both your installation of Passwordstate, and the Passwordstate database, to a new server.
Overview
Please use the following instructions as a guide for moving an existing Passwordstate Website and Database to a new server.
This guide assumes you are currently running Passwordstate with major build of 9 or above.
When this process is finished, you will be running the latest version of Passwordstate, so an upgrade of your database will occur unless you are already running the latest version.
This guide assumes you are intending on using a self-hosted Microsoft SQL install, as opposed to Managed Cloud Database Services such as Azure SQL Databases or Amazon RDS.
It is possible to use a cloud based virtual machine running Windows Server for this process, and this will require you to install Microsoft SQL on this virtual machine.
Note: You can leave your current production instance of Passwordstate running until you can confirm that the migration has worked. Once you can confirm the new website works, then you should decommission the old server.
Note: Please be aware of the instructions below where it instructs you to download the correct build number of Passwordstate. Versioning is important, depending on what build your current server is running.
Note: If you have encrypted your database Connection string, or AppSettings section of the web.config file, you will need to decrypt these prior to moving this file. Information about what an encrypted web.config file looks like, and how to decrypt it can be found in this KB Article. Decrypt/Encrypt Web.config
Preparation Required
Ensure your new server is built with an operating system that meets the Passwordstate system requirements: https://www.clickstudios.com.au/passwordstate-system-requirements.aspx
On this server, install SQL Server in Mixed Mode Authentication. Links to SQL Server install guides can be found on Click Studios’ documentation page: https://www.clickstudios.com.au/docs/
If you are intending on using the same URL on the new server, take note of any DNS record you have for your current URL. Also check your HTTPS bindings on your current webserver in IIS (Internet Information Services) as you will be re-creating these bindings on the new server. ( IIS Bindings Tutorial can be found here: How To Find My IIS Binding And SSL Certificate
Whilst still in IIS, take note of the Certificate you are using on your HTTPS binding, and install it on your new server ready to assign to the new website once installed.
Log in to your current Passwordstate instance and add the new web server Netbios name to the list of authorized web servers within Passwordstate. The Server Role you specify for this when adding it in should be “Primary Server”. You can do this from the screen Administration -> Authorized Web Servers.
Take note of your Emergency password, just in case you need to use this later in this migration process. This password can be found under Administration -> Emergency Access
Take a backup of your existing Passwordstate instance, which includes the web installation files, and the database. Passwordstate has its own backup feature you may have already configured you can use under Administration -> Backups, or you can use your own 3 rd party backup solution if you have one. Another option is to back up the data manually using this guide: Manual Backup Using SQL Management Studio Tool
Install Passwordstate on the New Webserver
On your new server, you will now need to download the latest Passwordstate installation files from Click Studios check sums page: https://www.clickstudios.com.au/passwordstate-checksums.aspx
Now you can follow the General Installation Instructions to install Passwordstate, stopping when you complete section Installing Passwordstate. You should not proceed to Configuring Passwordstate for First Time Use'.
Next, configure your HTTPS IIS Binding to match your existing web server if you intend on keeping the same URL. Otherwise, set your HTTPS binding to any new value you like.
Assign your SSL Certificate to your HTTPS binding that you previously prepared on your new server. If you intend on using a new certificate, more information about SSL Certificates can be found here: Passwordstate Certificates Explained
You will most likely be using an existing CNAME DNS entry to resolve the URL to your old web server. You will now need to edit the DNS entry and update the host name of your new web server, or you can create a new CNAME entry pointing to the new server.
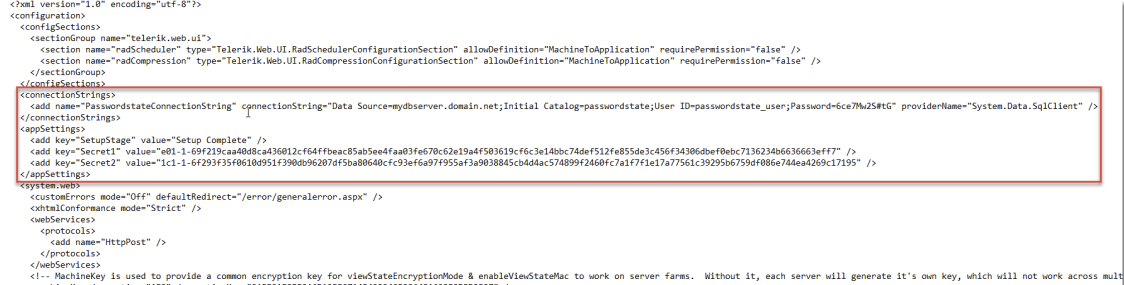
Next you need to copy the entire ConnectionStrings and AppSettings sections from your existing installation’s web.config file into the new website. (The default location for the web.config file is C:\inetpub\Passwordstate\web.config)
Example of these lines that need copying can be seen in the screenshot below:
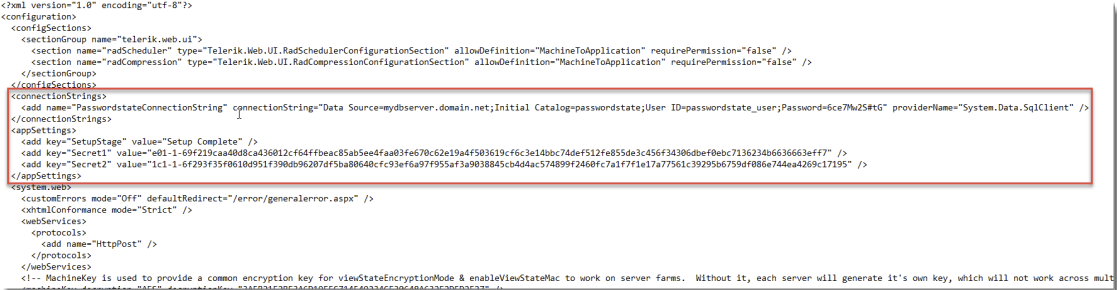
- At this point, do not log into this new website, instead follow the next section of this guide which will advise how to migrate your database.
Migrating the Database
- Open SSMS (SQL Server Management Studio) and connect to your existing database server, using an account that has permissions to perform backups.
- Expand out the Databases and then right click “Passwordstate”. Select Tasks -> Back Up…
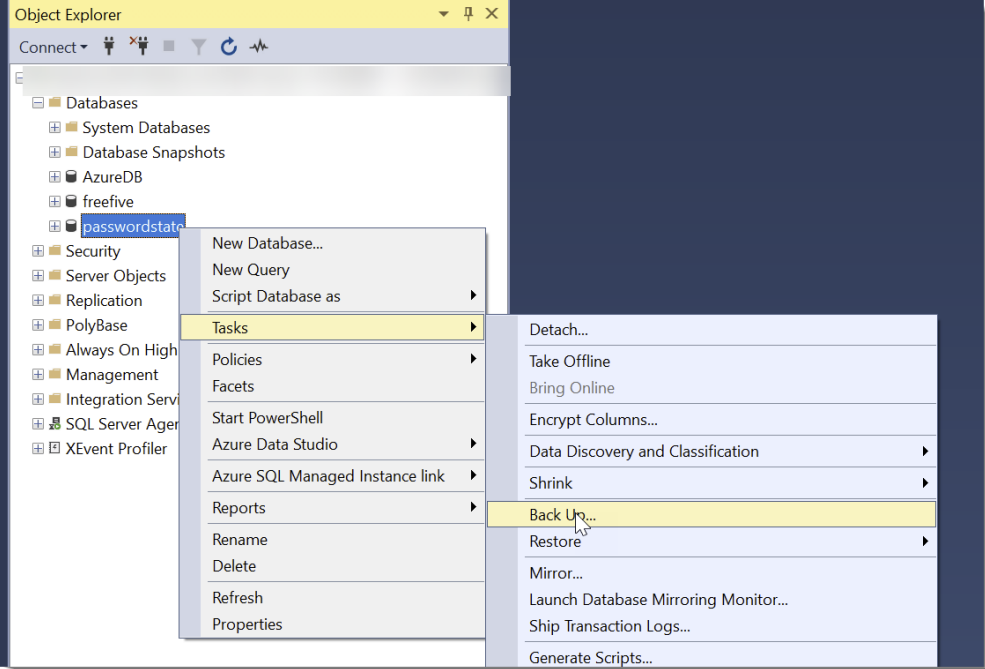
- You can either leave the default path to back the database up to, or choose a custom folder of your choice. Ensure you append the File name with .bak
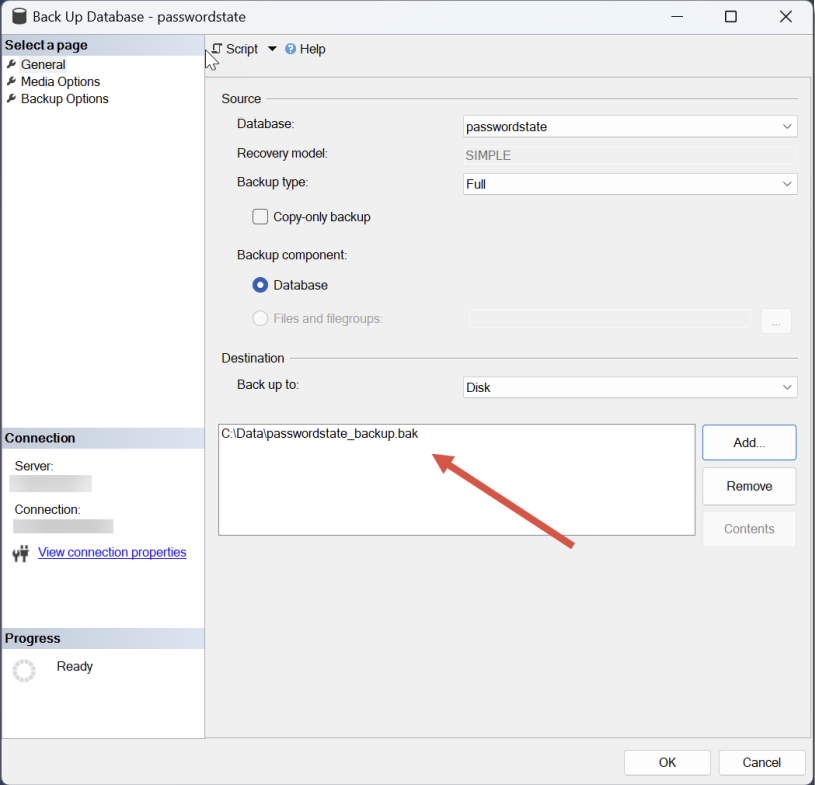
- Transfer this .bak file to your new server into a folder of your choice such as C:\Data
- Using SSMS, connect to the new server using an account that has permissions to restore databases.
- Right click Databases, and click Restore Database…
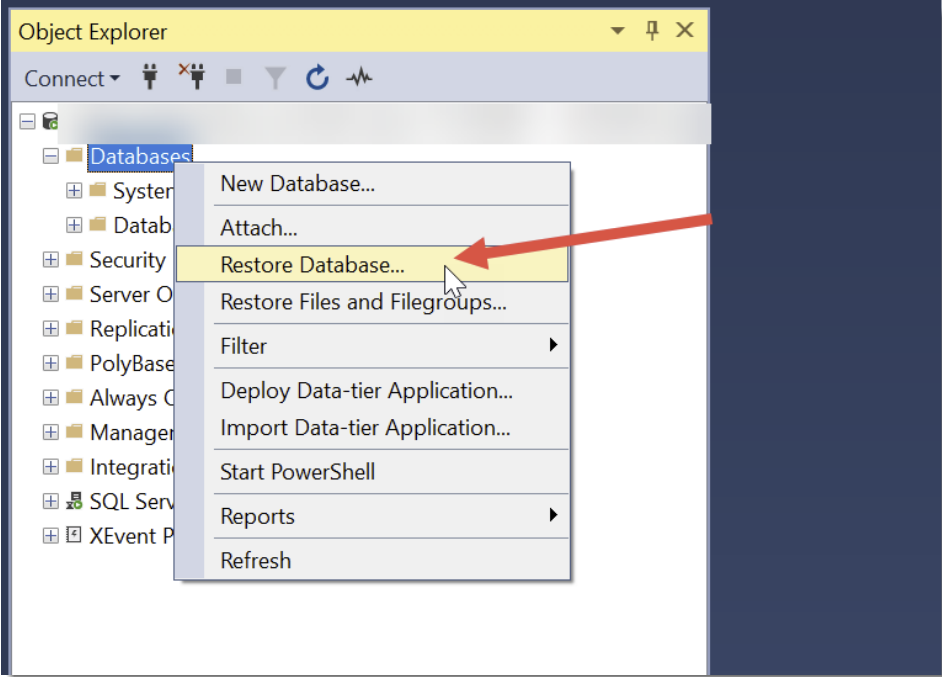
- Select Device, click the three dots and then browse to the .bak file you wish to restore:
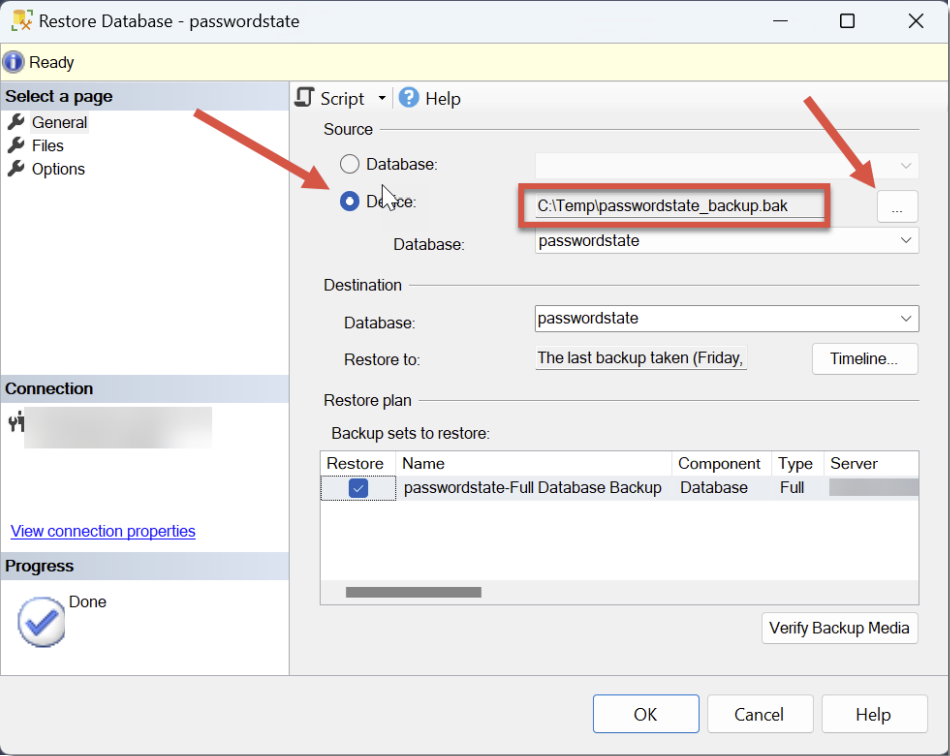
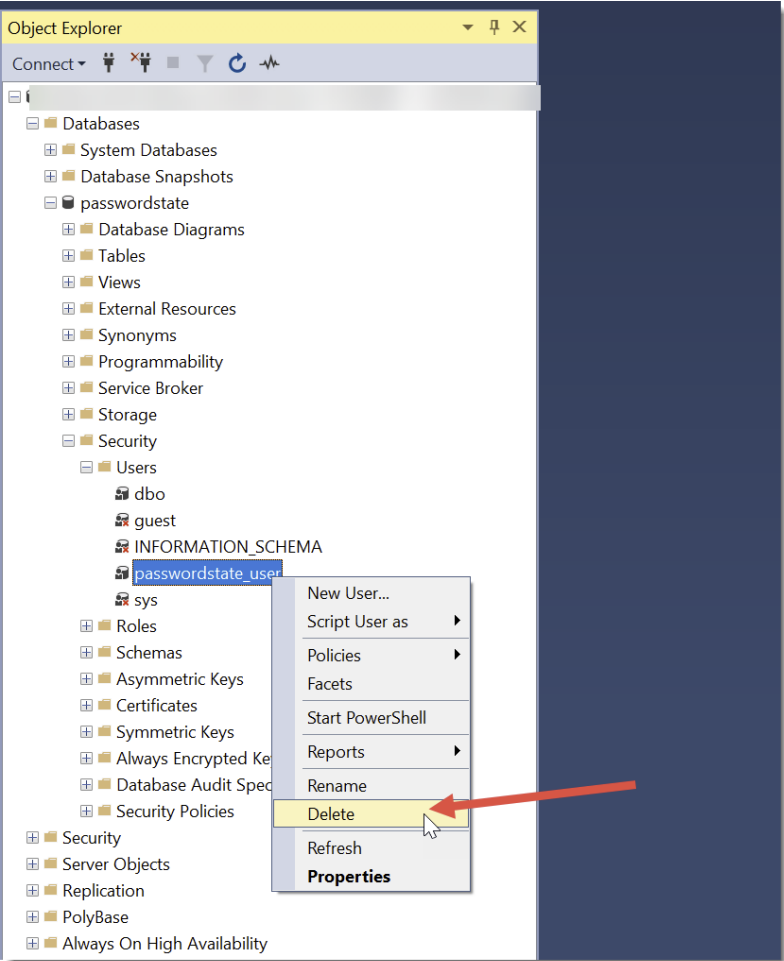
- You should now see your Passwordstate database under the Databases folder. Expand out your Passwordstate database, and then expand out your Security → Users folder. Right Click and Delete* the passwordstate_user:
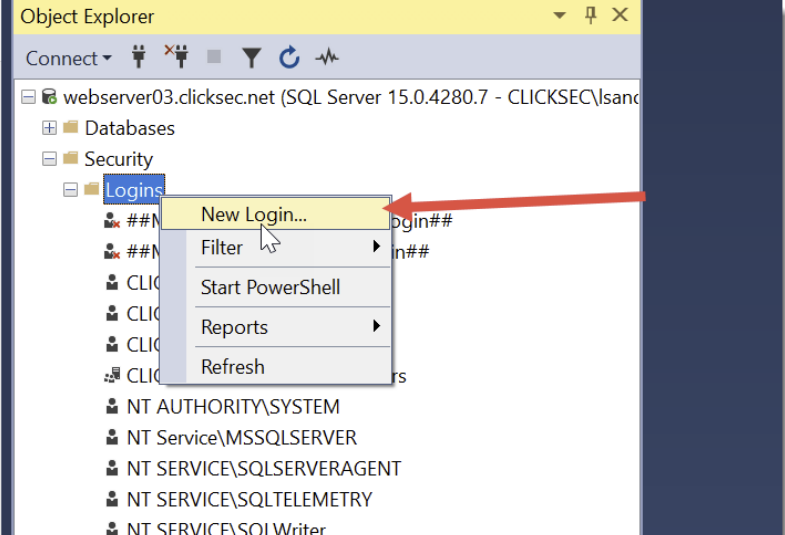
- Now right click Security → Logins and choose New Login…
- Set the username as passwordstate_user, tick the SQL Server Authentication option, set a password of your choice and then uncheck the option so the user does not need to change their password upon next login:
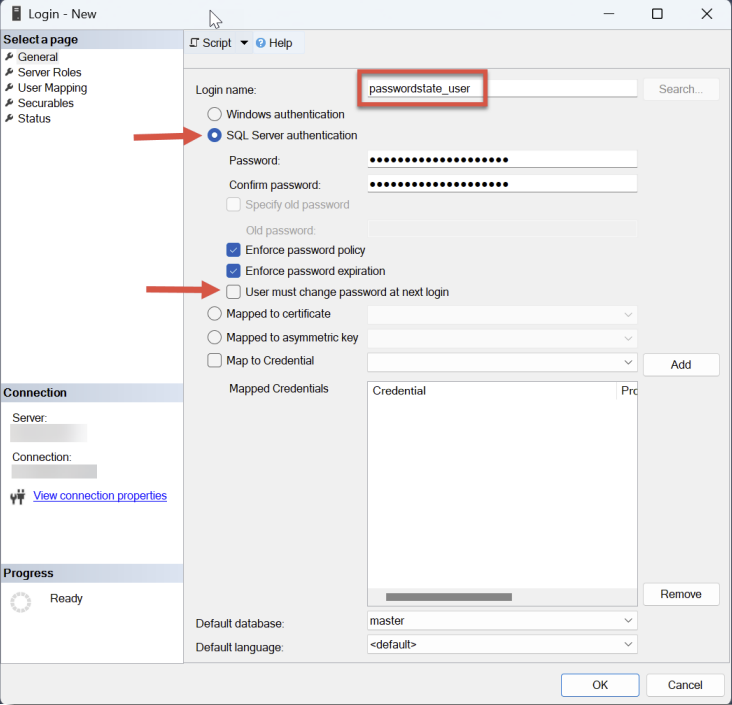
- Under the User Mapping menu, tick the Passwordstate database, and check the db_owner option. Click OK.
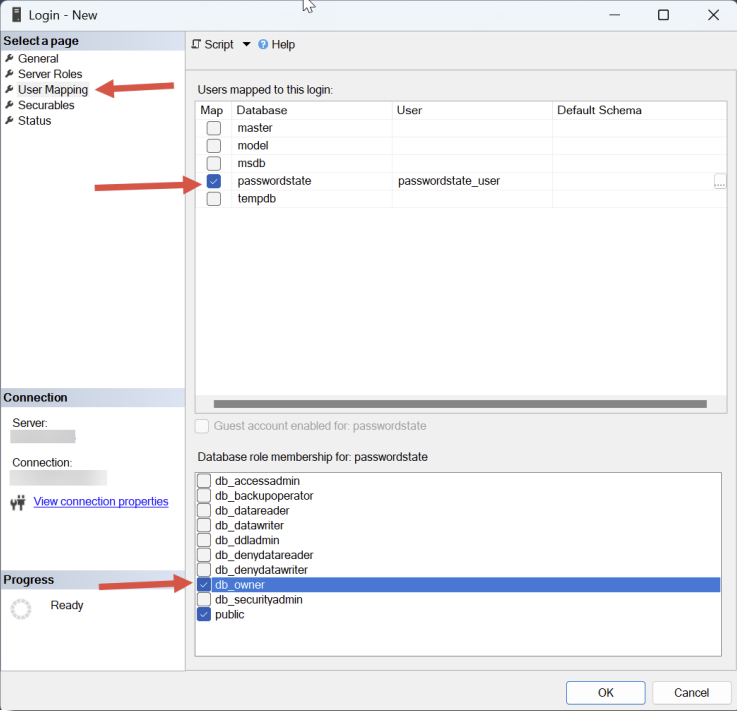
- Now you need to make some final changes to your web.config file on your new server. Open the file and change the Data Source and Password in the connection string to be relevant to your new server. The password is what you set in Item #10 above
Restart the Passwordstate Windows Service on your new web server (after the Service has been restarted, it will recreate any custom Logos or images you have uploaded into Passwordstate - you may need to give it a minute or two to do this)
Now you can attempt to log into Passwordstate for the first time after this migration, and you will most likely be prompted to upgrade the database. This is normal, and you can continue at this point until the upgrade process finishes.
If you now log in you should see all your data as it was when on premises. Everything including passwords, users, settings and license keys.
At this point, your Passwordstate instance has now been moved to your new server and your migration is complete. We encourage you to do some user acceptance testing and when complete, you can safely decommission the old server.
This concludes the migration process, and if you have any queries about this, you are more than welcome to log a support call with Click Studio via our support page: https://www.clickstudios.com.au/support.aspx