Install Browser Based Remote Session Launcher on Remote Site
Passwordstate comes with a Browser Based Gateway feature, which allows you to perform RDP and SSH connections using credentials out of the Passwordstate vault to connect to the remote devices. By configuring this Browser based Remote Session Launcher Gateway with the Remote Site Locations agent, you can get secure RDP and SSH sessions to hosts at the remote network.
You do not need functioning DNS for each of the Host records from your internal Passwordstate environment, the Gateway will perform DNS lookups on the network it is installed in.
In order for this feature to work on your remote site you must have:
- It is highly recommended to use a wildcard certificate. An example of this is *.clickstudios.com.au. If you do not supply your own certificate, a Self Signed one will be created for you automatically, however these can be difficult to work with as browsers do not trust them by default.
- At the remote site, the externally facing firewall must allow incoming traffic on the Port you specify the Gateway to listen on. Port 7273 is the default port. To ensure a secure connection between your company firewall, and the one at the remote end, you can restrict this open port by IP Addresses on each of your firewalls
- You must have a functioning external DNS record which can redirect traffic to the Gateway i.e. for a URL of
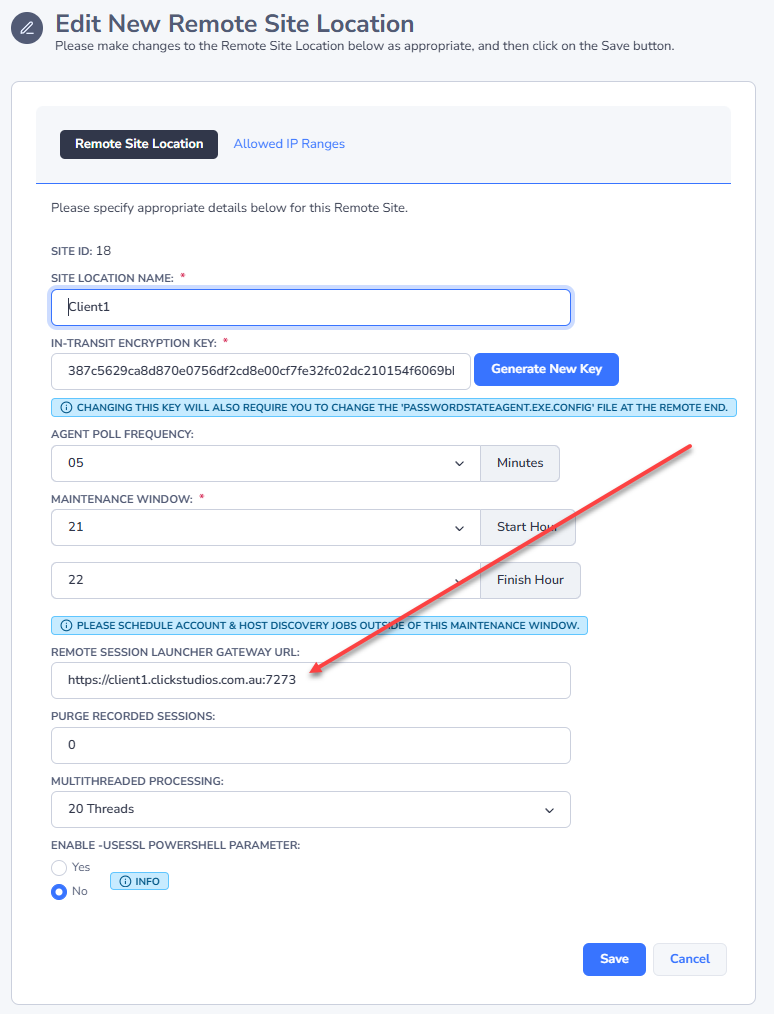
https://client1.clickstudios.com.au:7273, you would need a DNS entry for client1.clickstudios.com.au to point to the remote site's firewall. - The firewall would then need to forward traffic on Port 7273 to the host where you have installed the Remote Site Location Agent
- You must be using a trusted SSL certificate for the Remote Session Launcher Gateway. If you are using a purchased wildcard certificate, your browser will automatically trust this which makes for the most user-friendly experience.
Changes Made to your Server During this Automated Install
When installing the Remote Site Locations Agent at your remote site, it also preloads some of the files required for the Remote Session Launcher. As a once off process you'll then need to run a Powershell script on the same server where you have the Remote Site Agent installed, which will finish setting up the Browser Based Launcher. This Powershell script will perform the following changes to this server:
- Create a log file in the same directory where you execute the Powershell script from
- Download the latest version of OpenJDK from https://cdn.azul.com/zulu/bin/ and extracts this file to C:\Program Files (x86)\OpenJDK. This download is approximately 200mb in size
- Adds a file path to the “PATH” System Environment Variable. Also adds in a new Environment Variable called JAVA_HOME. If these already exist, they will be removed before adding them back in
- Installs a Windows Service called Passwordstate-Gateway
- Removes all temporary source files that were created during this process
- Will create a Self Signed certificate with the name of your server, if you do not supply your own certificate
Installing the Browser Based Gateway on your Remote Site
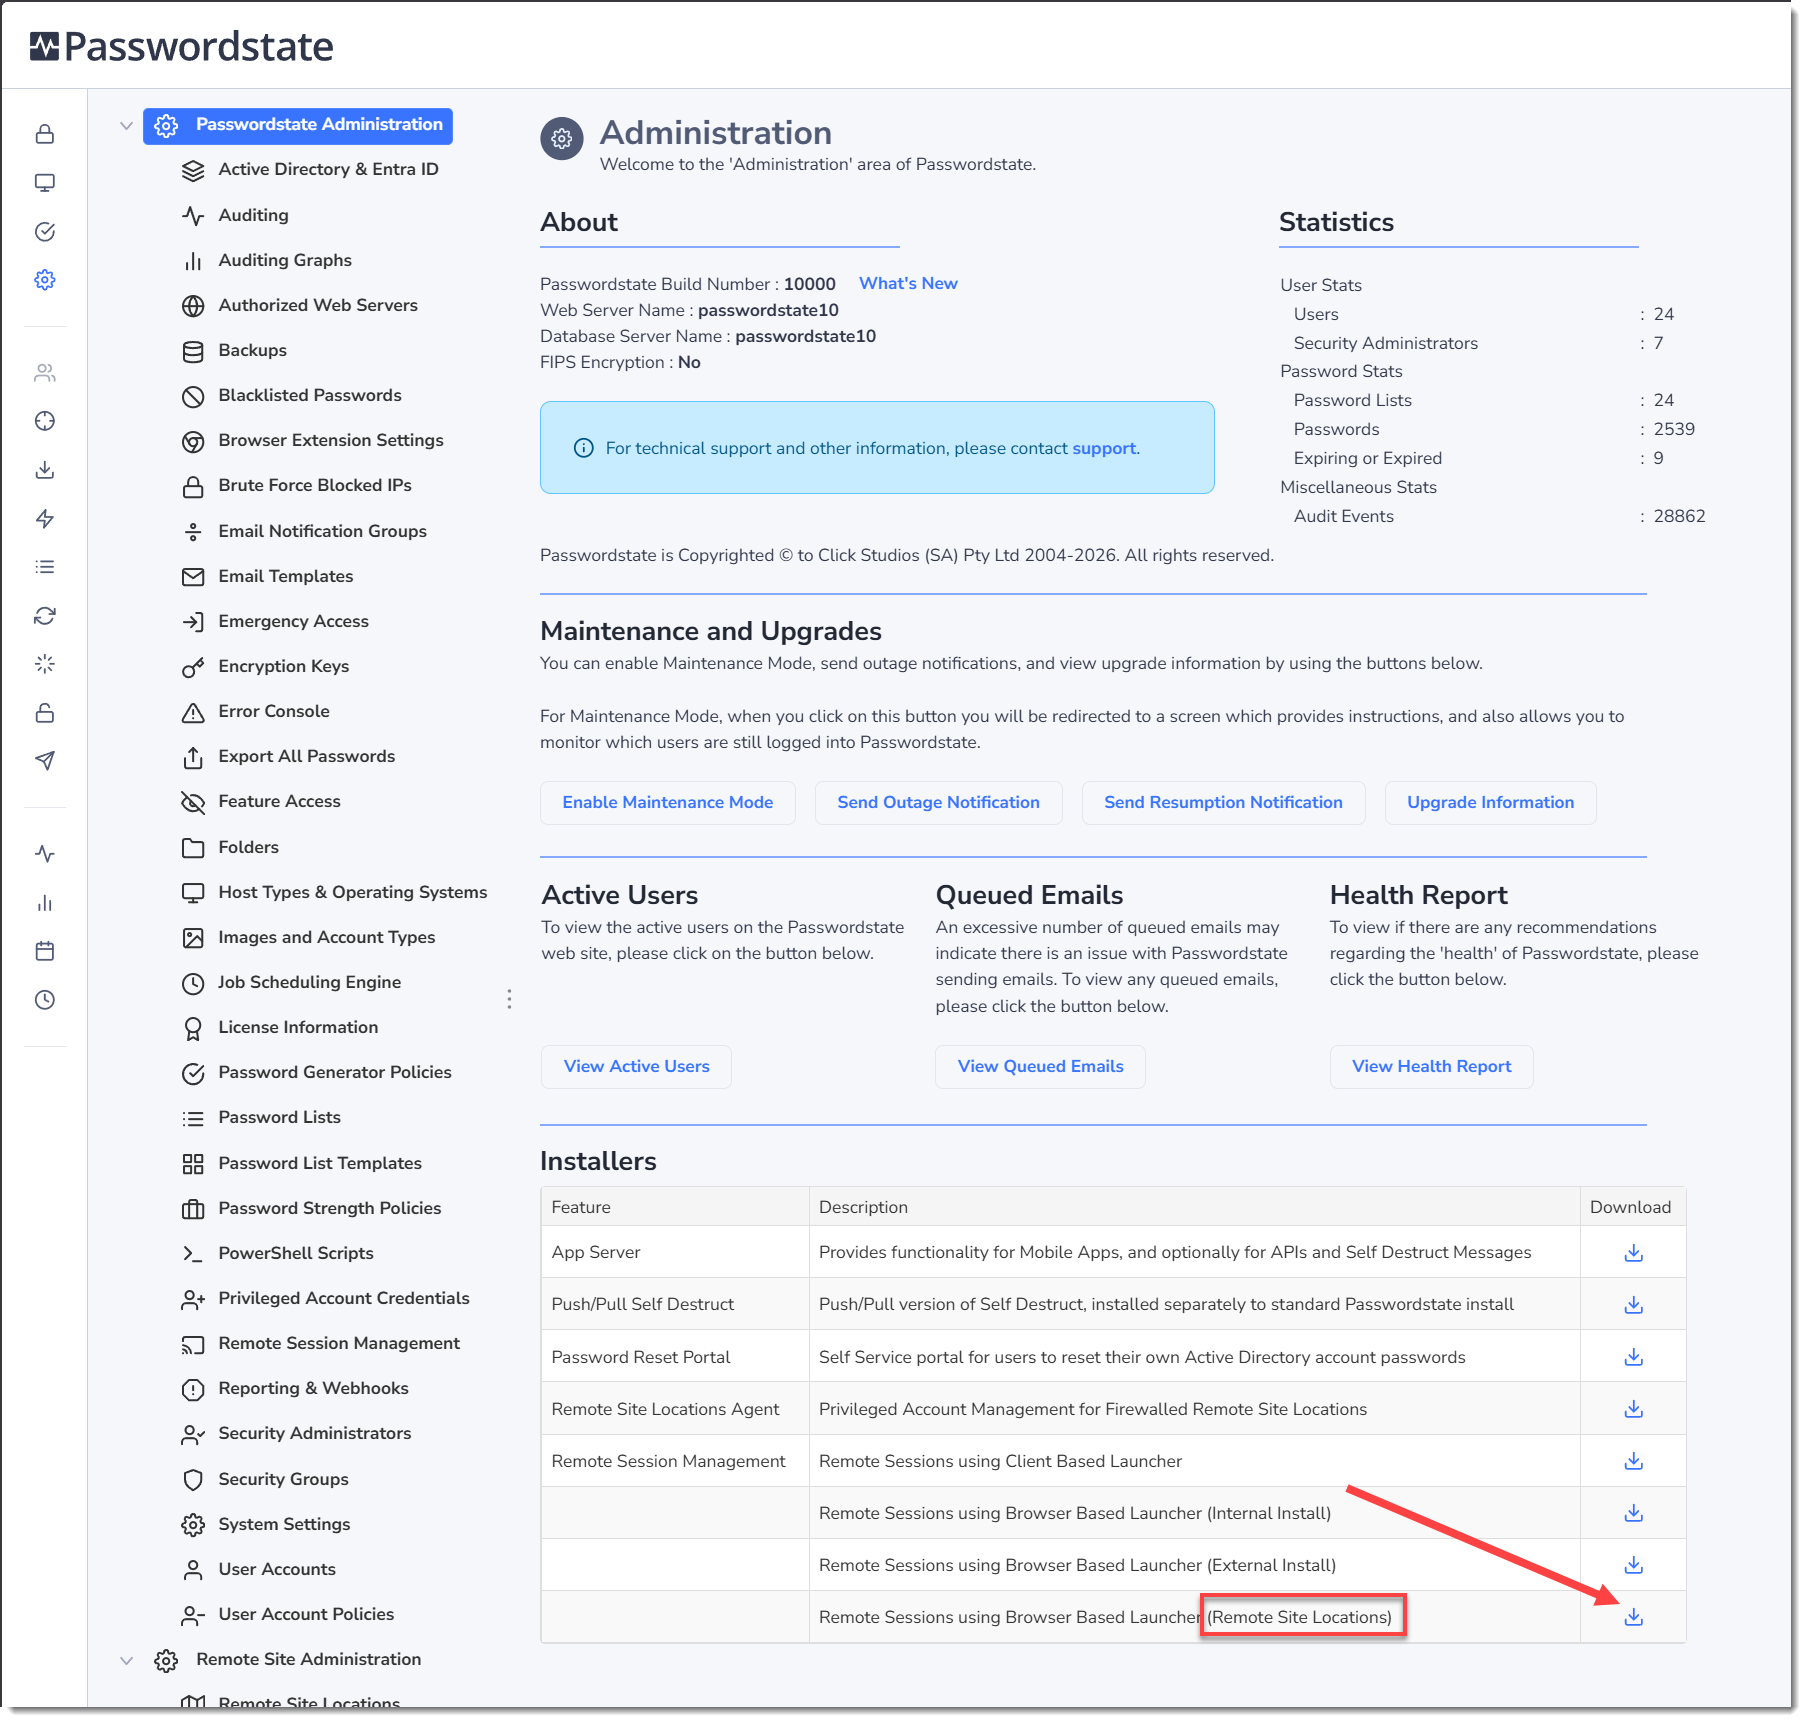
- In Passwordstate, go to Passwordstate Administration home page and click the download button for the Remote Site Locations Browser based Launcher, and transfer it to your to the computer where you have the Remote Site Locations agent installed:
- Extract the zip file into a temporary location, such as C:\Temp
- Open Powershell ISE "As Administrator" and open the C:\Temp*Install-GatewayRemoteSite.ps1*
- When supplying your own certificate, you will need to supply it in the format of a password protected .pfx file. The exact name of this must be Passwordstate.pfx. Place this Passwordstate.pfx file into the same directory where you are running the Powershell script from. More information about supplying your own certificate can be found in the next section, SSL Certificate Considerations
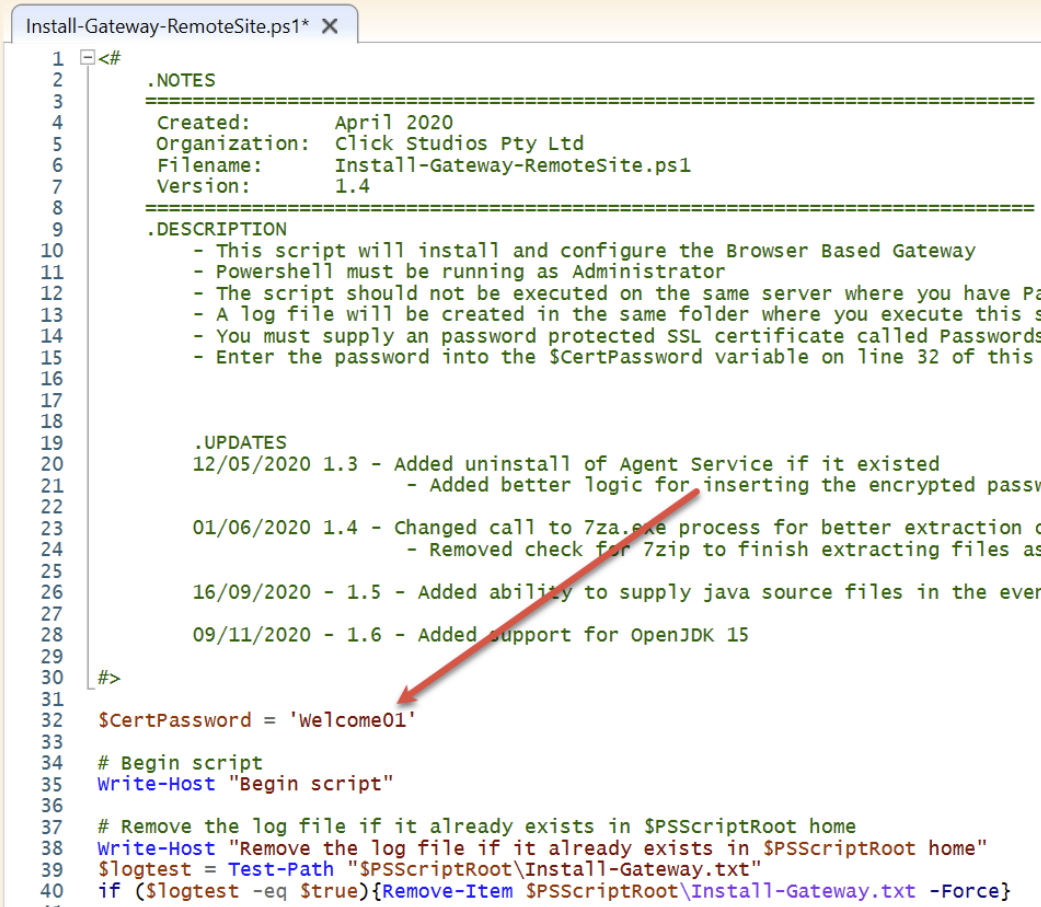
- When you obtain your own certificate and saving it as a .pfx file, you will be assigning it a custom password. This password can be anything you like and you must also insert this password into the PowerShell script, as per screenshot below
- Run the script, and it should take about 1minute to complete
If there are any issues running the script, you should see some information in the Powershell output console, and there will be a log file created in the folder where you ran the Powershell script from. If you are unable to determine the cause of the failed install, please create a Support Ticket on the following page https://www.clickstudios.com.au/support.aspx requesting assistance in diagnosing the issue.
If the installation was successful, you should see a Windows Service called Passwordstate-Gateway and it should be running.
SSL Certificate Considerations
Click Studios recommends using a wildcard certificate for all your clients, as this means you can use the same certificate file, and gateway.conf configuration file across all sites. An example would be to purchase a wildcard certificate like *.clickstudios.com.au, and then you could use URLs like https://client1.clickstudios.com.au:7273 and https://client2.clickstudios.com.au:7273, etc, etc.
Note 1: You don't have to use a wildcard certificate, but it might work out more cost effective, and easier to manage, if you are deploying multiple agents.
Note 2: If you instead wish to use the Self Signed Certificate that comes with the installer automatically, then you will need to trust this certificate in the browser where you're trying to establish RDP and SSH session from. Please see SSL Certificate Considerations of this install guide for details on how to trust certificates in your browser - Passwordstate Installation Instructions
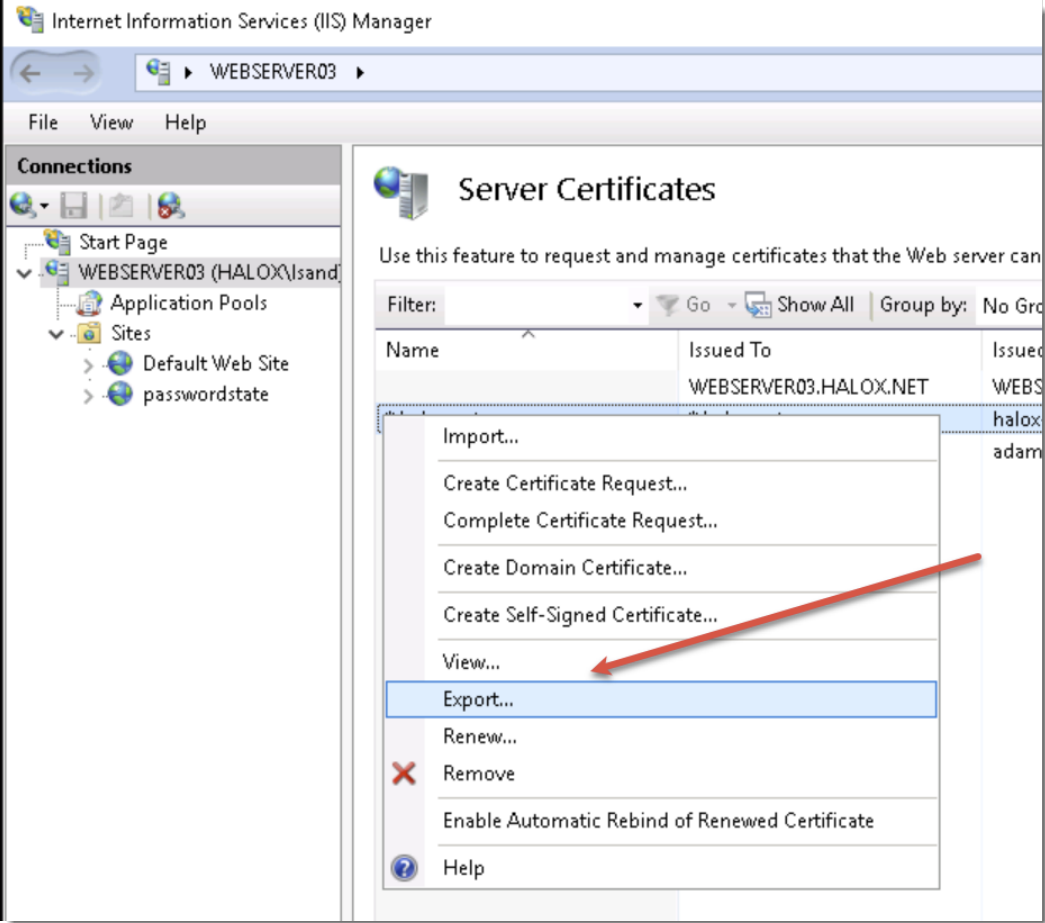
If you already have a wildcard certificate you can use in IIS, you can use the instructions below to export it for use.
- In IIS, navigate to ‘Server Certificates’
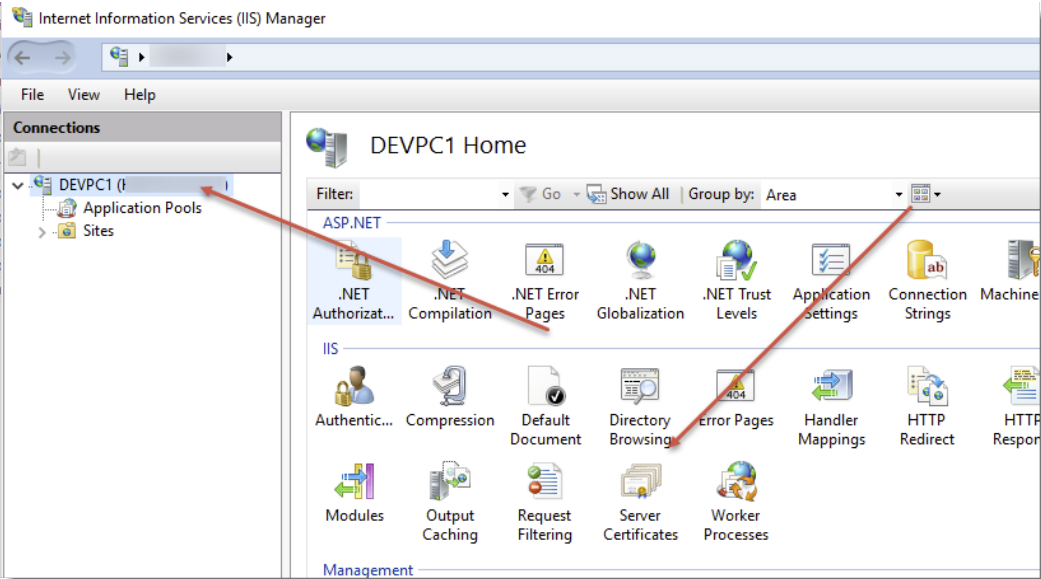
- Right-click on your certificate and select ‘Export’
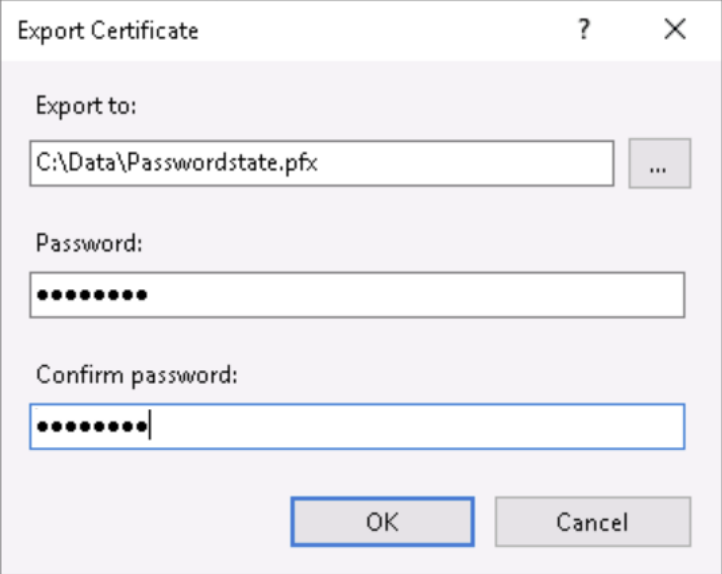
- Export the certificate to a temporary folder, and name it Passwordstate.pfx – make sure you specify a password for the exported certificate as well, and keep this password in mind as you'll need it when you install the Gateway
DNS and Port Considerations
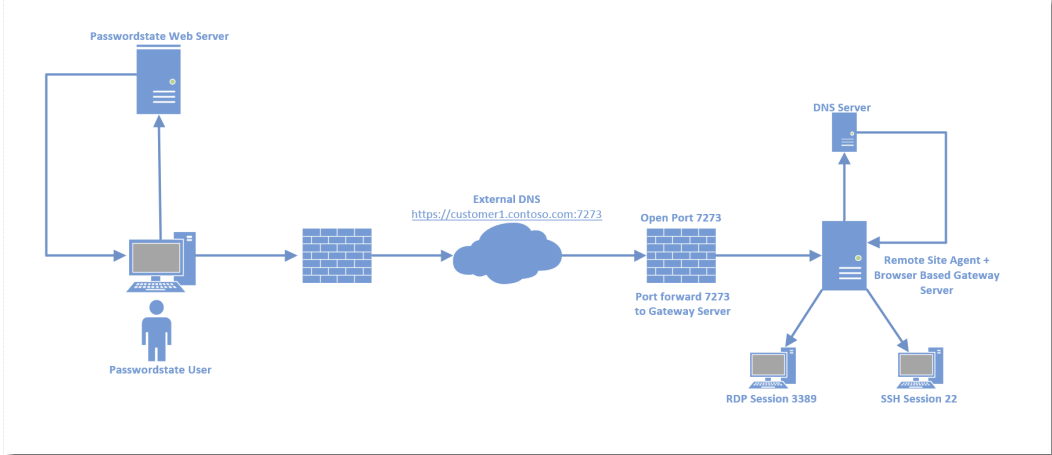
In order for your RDP and SSH sessions to communicate to the remote site correctly, you will need to ensure you have a functioning DNS entry , forwarding on traffic to the Remote Site firewall. This firewall will also need a port open which forwards HTTPS traffic onto the server where you have the Remote Site Agent and the Browser Base Gateway installed.
Below is a diagram to give you a visual reference as to how a RDP or SSH Session can be established over the internet, using the Browser Based Launcher and the Remote Site Locations module. You will need to create your own external DNS entry, and this must be set on your Remote Site Location in Passwordstate Administration area. More information about where to set this can be found in the "Specify Gateway URL in Passwordstate" below.
Ideally if you had a wildcard certificate of *.contoso.com for example, this one certificate could be used on multiple sites. You could create your DNS entries as customer1.contoso.com, customer2.contoso.com etc.
Session Recording Folder in the Gateway.conf File
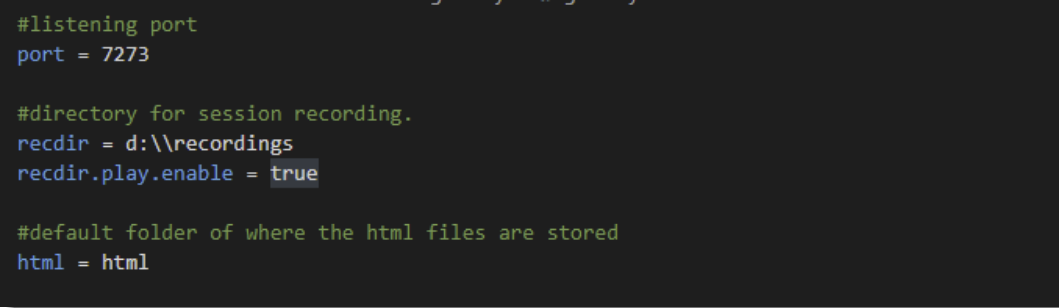
By default, any session recordings will be stored in the folder "C:\Program Files (x86) \Passwordstate Agent\gateway\rec".
Depending on how many session recordings you do, and their duration, then this may cause issues with disk space on the C drive, so it is recommended you move this to a different disk with more space. To do this, do the following:
- Change the 'recdir'setting in the Gateway.conf file, like in the screenshot below
Specify Gateway URL in Passwordstate
In order for traffic to route to the correct remote site Gateway, you need to edit the Remote Site Locations record and specify the URL, as per the screenshot below.
Remember: You need a functioning DNS record in order to route traffic to the example below of client1.clickstudios.com.au.
Passwordstate URL used by the Gateway
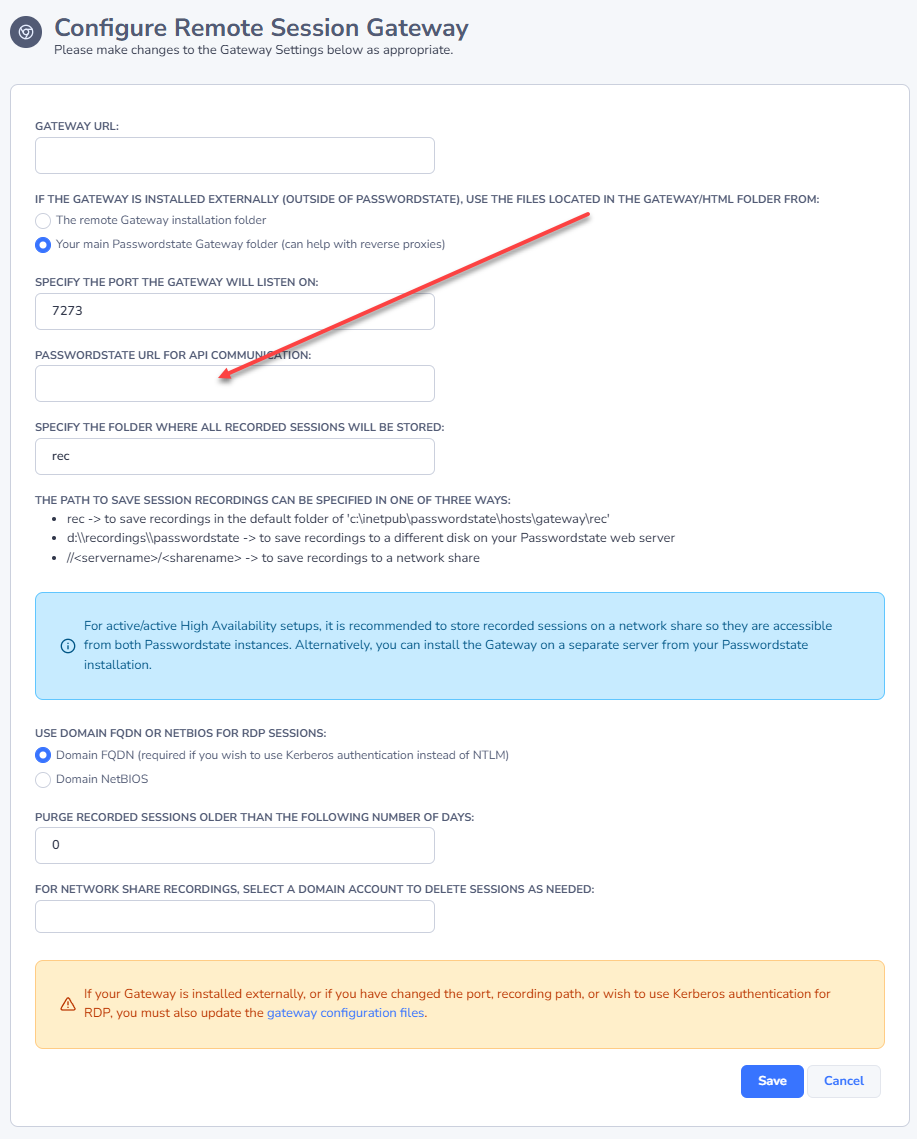
When connecting to the Gateway that is installed with the Remote Site Locations agent, the gateway must make several calls back to the Passwordstate API - for functional, and security reasons.
By default, it will communicate on the Base URL setting you have set on the screen Administration -> System Settings -> Miscellaneous tab.
If, for whatever reason, you need the Gateway to communicate back to the Passwordstate API using a different URL, you can specify this on the screen Administration -> Remote Session Management -> Browser Based Gateway Settings, as per the screenshot below.
Remote Sessions to Host
Now from within Passwordstate, performing remote sessions to Hosts is as simple as making connections to your own internal hosts. What's required is:
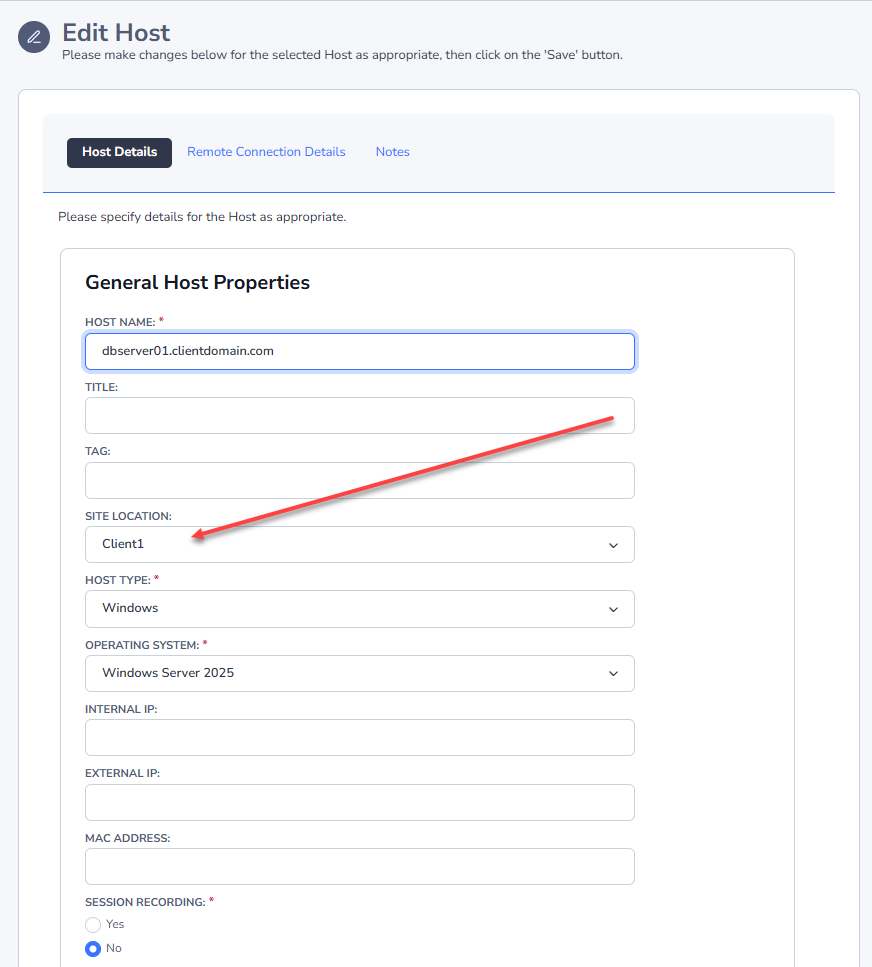
- Your Host records must be "tagged" to the correct Remote Site Location - screenshot below
- You must have access to the Web Based Remote Session Launcher in Passwordstate - please refer to the Passwordstate Security Administrator's Manual if you do not have access to this. Access can be granted on the page Administration -> Feature Access -> Remote Sessions tab
- Then you can authenticate with any of the supported methods to the Host. For more information on authenticating, please refer to the Passwordstate User Manual in the Help Menu, under the section Hosts -> Hosts Navigation Tree -> Remote Session to a Host